Ordering Instant Server in Invapi
In this article
Attention
If automatic payment from your account balance is enabled, all payments for instant servers will be automatically charged to the billing credit balance. Ensure there are sufficient funds on your account to place the order.
Order Server Menu in Invapi
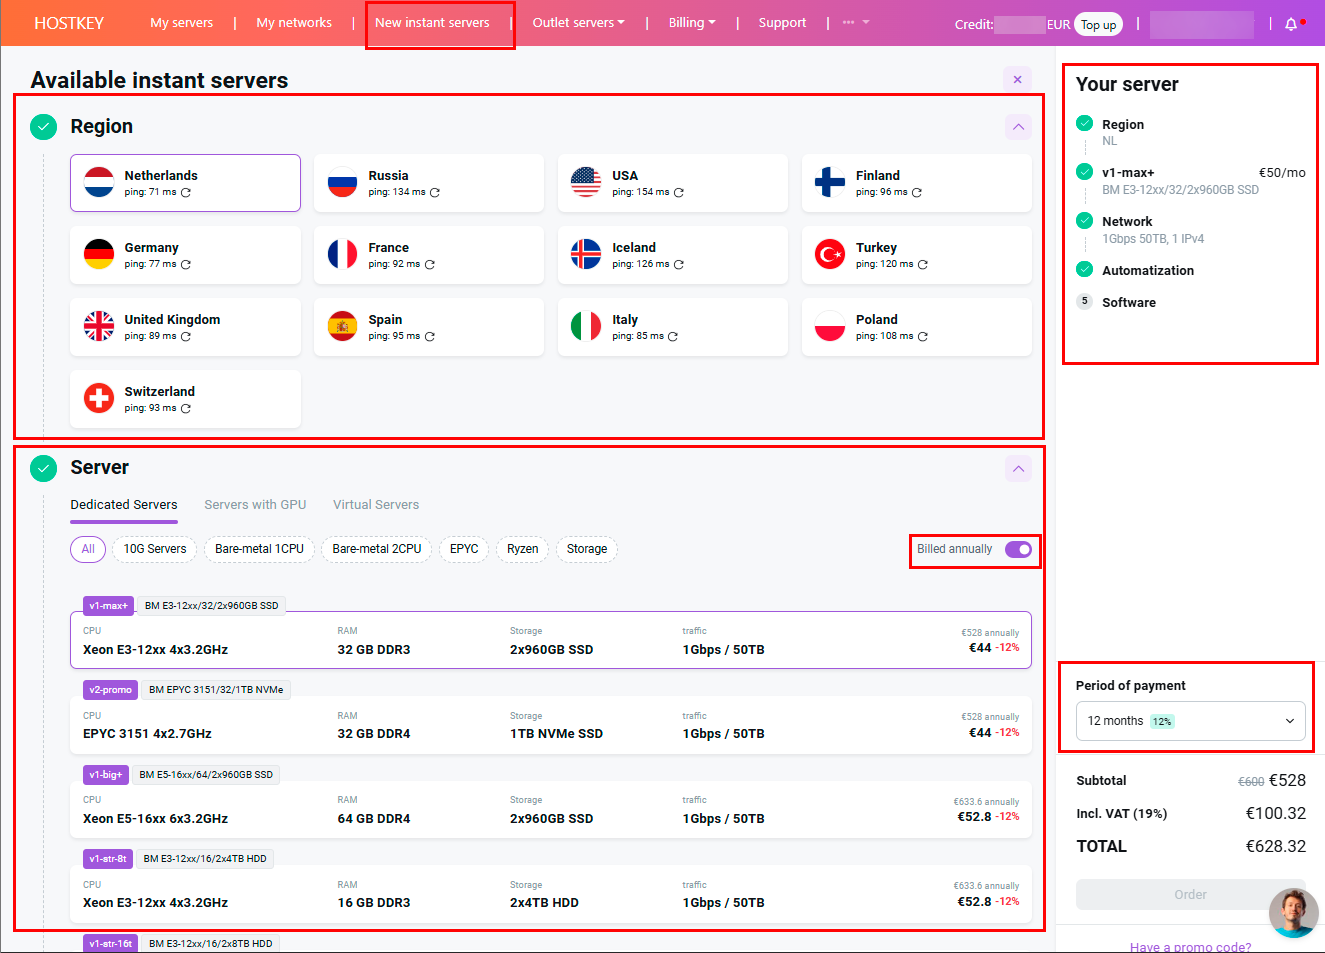
To order a VPS/VDS/Dedicated server, log in to the Invapi control panel. In the left navigation bar, click on Order server. This section is designed for online ordering of physical (dedicated) and virtual (VPS/VDS/vGPU) servers with standard configurations. These servers are already rack-mounted and ready to deploy. Installation takes 5 to 60 minutes after ordering, depending on the OS. The entire process is fully automated.
After navigating to this section, a general list of available configurations for order is displayed, including price and quantity available.

Ordering Virtual Servers (VPS/VDS)
Selecting Region and VPS Configuration
-
Choose Your Region
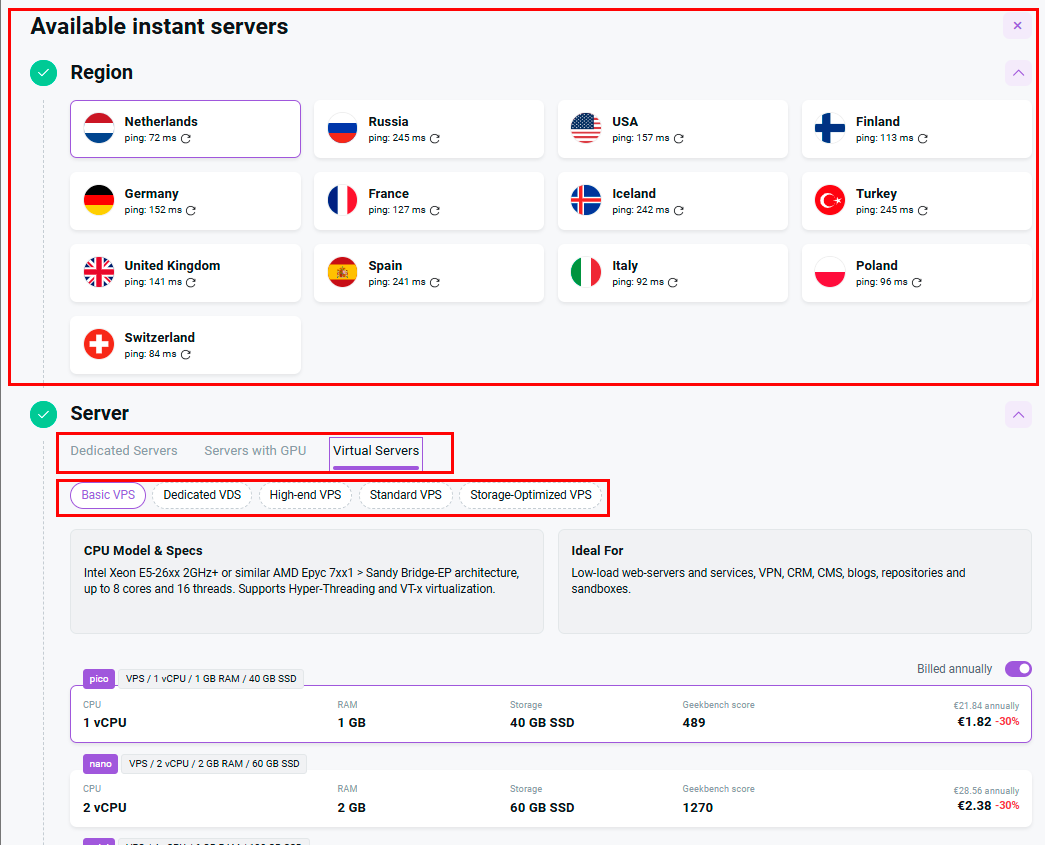
At the top of the page, you'll find the Region section with available locations. For each region, the following is displayed:
- Country name with flag;
- Ping to the region in milliseconds;
- Ping refresh icon:
-
Select Virtual Servers Category
Click on the Virtual Servers tab to view VPS/VDS options. The following categories are available:
- Basic VPS - basic virtual private servers;
- Dedicated VDS - VDS with dedicated resources;
- High-end VPS - high-performance VPS;
- Standard VPS - standard VPS configurations;
- Storage-Optimized VPS - VPS optimized for data storage.
For each category, you'll see:
- CPU Model & Specs - processor information (e.g., Intel Xeon E5-26xx 2GHz+ or similar AMD Epyc 7xx1 > Sandy Bridge-EP architecture)
- Ideal For - recommended use cases (e.g., "Low-load web-servers and services, VPN, CRM, CMS, blogs, repositories and sandboxes")
-
Choose Your VPS Configuration
For each VPS configuration, the following information is displayed:
- Plan name (pico, nano, micro, etc.);
- CPU - number of vCPUs;
- RAM - memory amount;
- Storage - disk type and capacity;
- Geekbench score - performance benchmark;
- Price with discount indication (e.g., €3.4/mo -30%).
In the top right corner, toggle Billed annually to view prices with annual billing discounts.
Note
If you need a configuration currently unavailable for order, it can be requested manually by sending an email in any format to [email protected].
-
Select Payment Period
When ordering a server, pay attention to selecting the payment period from the Period of payment dropdown menu on the right panel. This choice is critical for further server management.
Attention
- Long-term tariffs (quarterly, semiannual, annual) imply discounts and upfront payment for the entire period.
- Refunds on long-term tariffs are possible only after the rental period ends.
Information
Hostkey customers have access to the hourly billing server rental service.
Software Configuration
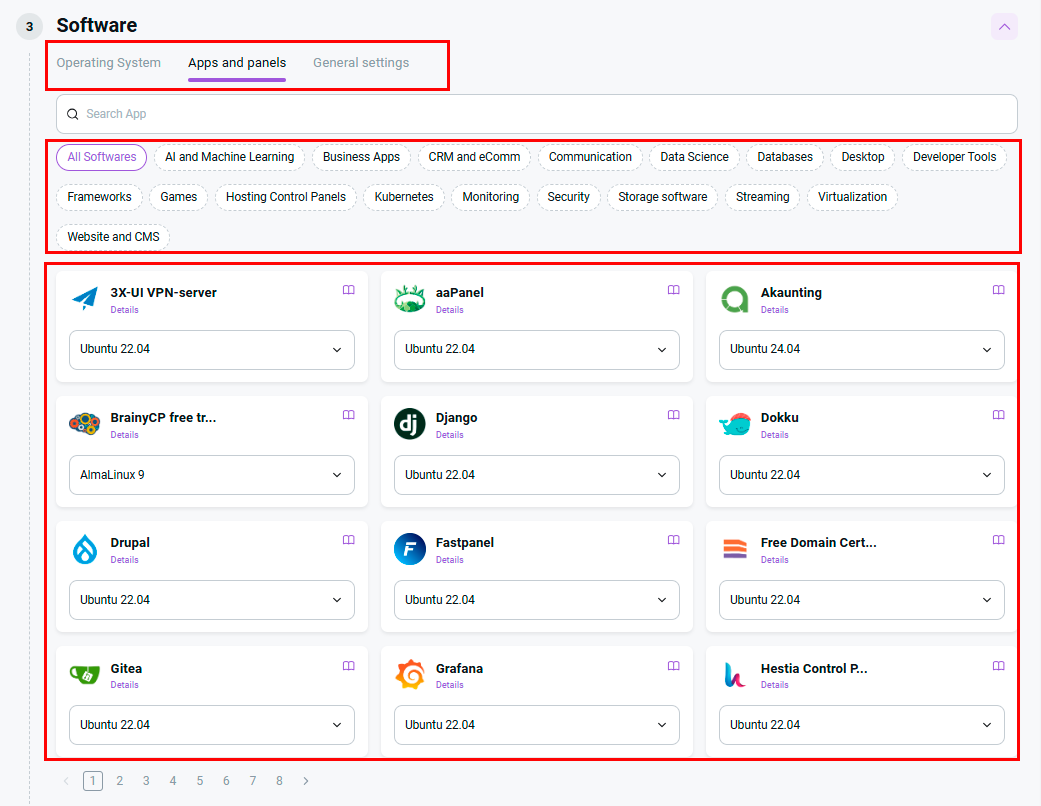
The Software section is divided into two tabs:
-
Panels and Applications
In this tab, you can select additional software and control panels. A compatible operating system (e.g., Ubuntu 22.04, AlmaLinux 9) is specified for each application.
Automatic OS Selection
If you select a control panel, the operating system will be added automatically.
Software Compatibility
Software that is not compatible with the selected configuration is grayed out and unavailable for selection.
-
Operating System
Select the required operating system from the available options. Available systems may include various Linux distributions (Ubuntu, CentOS, Debian, AlmaLinux, etc.) and Windows Server.
Disk Configuration
For VPS, the OS Partition Size can be configured. Default: 100%

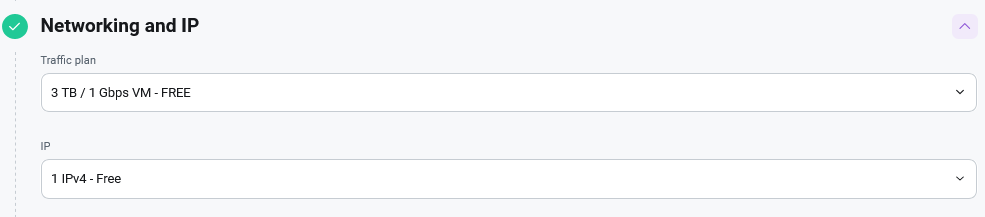
Network Settings for VPS
Network settings for VPS are typically pre-configured. The standard configuration includes:
- Traffic Plan - usually 3TB @ 1Gbps or similar;
- 1 IPv4 - one IPv4 address (included).
VPS Network Information
All VPS instances are deployed with a 1Gbps port. Inbound traffic is free (fair use policy). Outbound traffic limits and rates depend on the selected plan. The use of unlicensed MS Windows is prohibited. By default, ports 25/tcp, 587/tcp, 465/tcp, and 5060/udp are closed for outbound traffic on all VPS. Please contact support if you wish to open them.
Automation
This tab is used to configure basic server parameters:
Required fields:
- Hostname - any unique name (defaults like nl-vmpico, nl-nano are suggested);
- Password - create a strong password for server access.
Optional settings:
- SSH key - the root user's public SSH key, which will be written to the OS;
- Post-install script - commands that will be executed upon the first server boot;
- Post-install callback URL - a URL that will be called via curl during the first server boot;
-
Cloud-init script - a YAML configuration for automatic server setup after the OS installation:
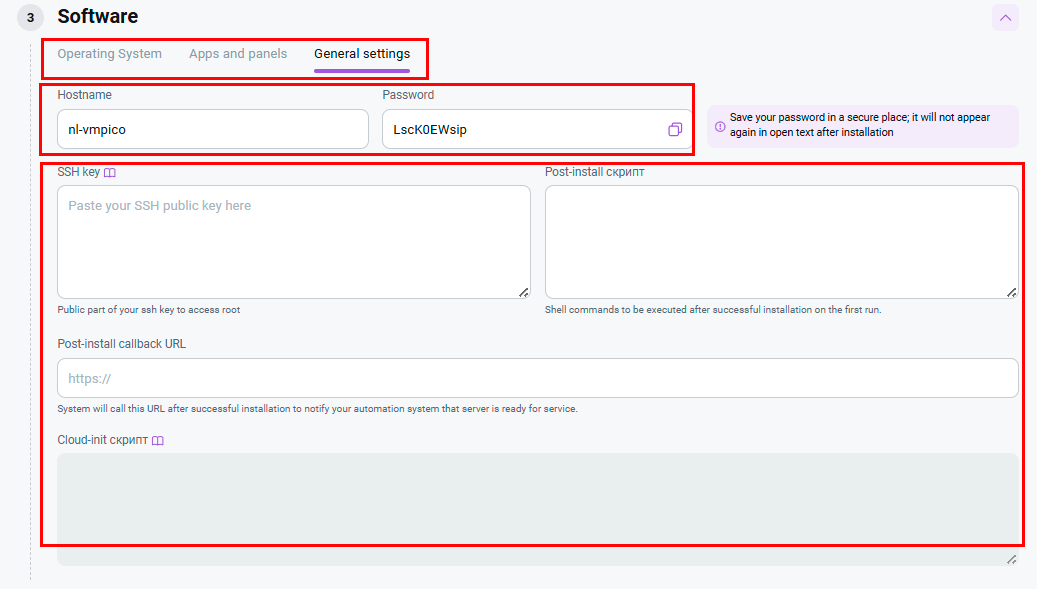
Field Visibility
Cloud-init script fields appear only after an operating system has been selected.
Cloud-init Scripts
You can use Cloud-init scripts to automatically configure the server immediately after the OS installation. This allows you to create users, configure SSH keys, install packages, and perform other configuration tasks without manual intervention.
For a detailed guide on creating and using Cloud-init scripts, see the article: Using Cloud-init scripts.
Custom Domain for the Control Panel
Custom Domain for the Control Panel
If you have selected a control panel (e.g. n8n, Nextcloud, etc.), you can specify your own domain - the panel will be accessible at your address instead of the default one. Learn more about custom domain setup
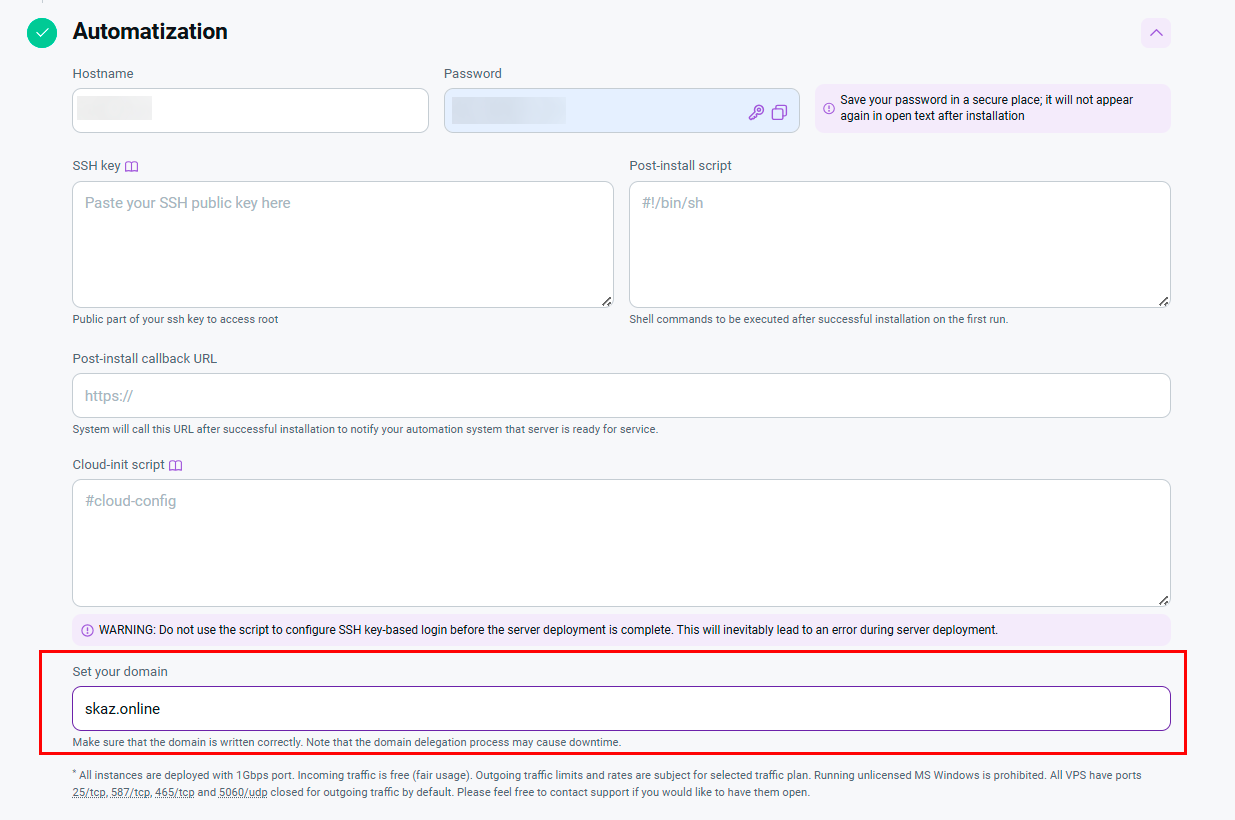
Information
The custom domain field is displayed only if adding a domain is supported for the selected control panel or server type.
Complete Your VPS Order
After configuring all parameters:
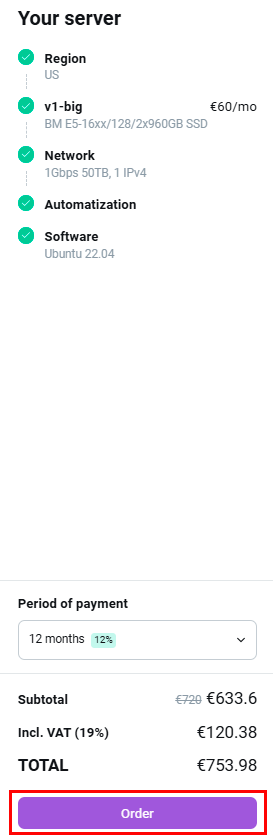
- Review the order summary in the right panel Your server;
- Ensure the correct Period of payment is selected;
- Check the final price in the TOTAL field;
- Click the
Orderbutton to complete the order:
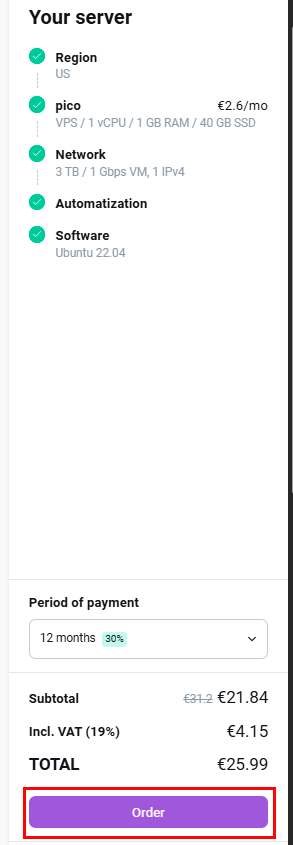
If you have a promo code, use the Have a promo code? link at the bottom of the order form.
Ordering Dedicated Servers
Selecting Region and Dedicated Server Configuration
-
Choose Your Region
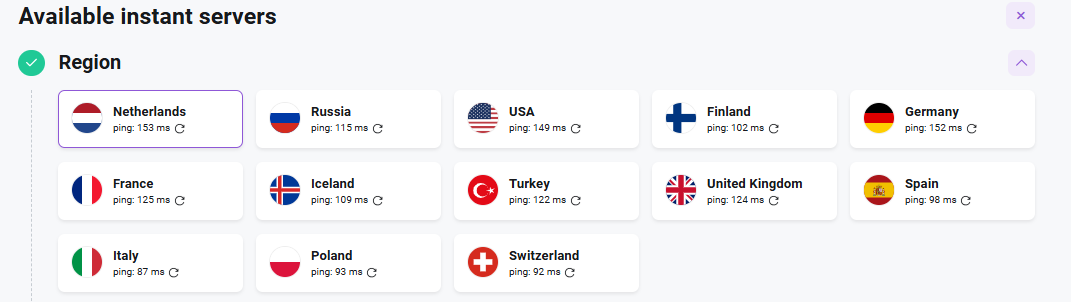
At the top of the page, you'll find the Region section with available locations. For each region, the following is displayed:
- Country name with flag;
- Ping to the region in milliseconds;
- Ping refresh icon:
-
Select Dedicated Servers Category
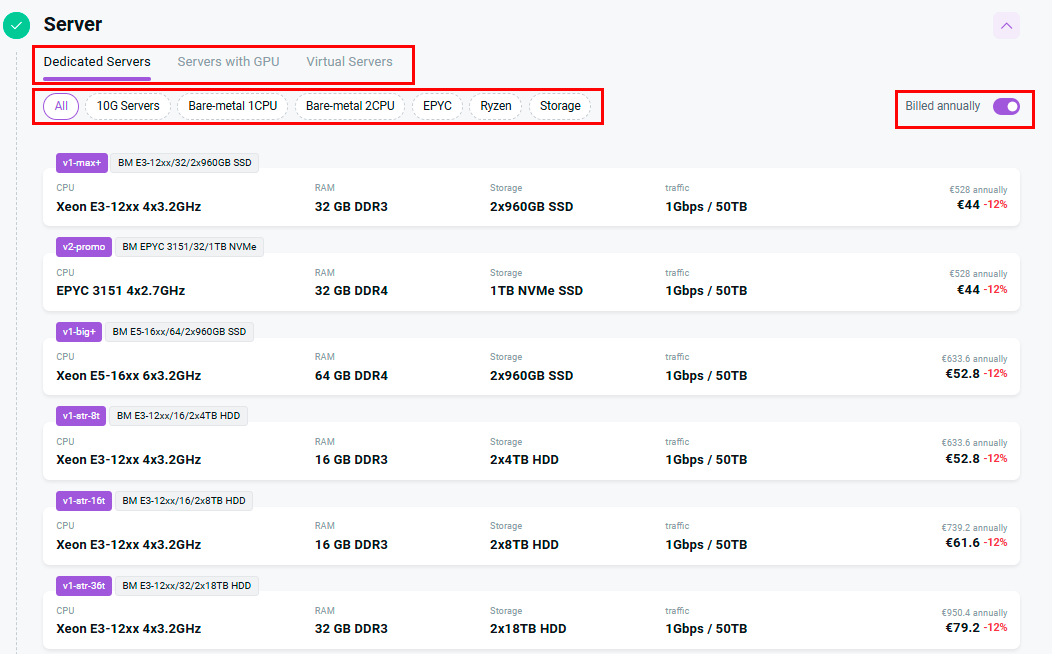
Click on the Dedicated Servers tab to view bare-metal server options. The following filters are available to refine your search:
- All - all configurations;
- 10G Servers - servers with 10 Gbps connectivity;
- Bare-metal 1CPU - single-processor bare-metal servers;
- Bare-metal 2CPU - dual-processor bare-metal servers;
- EPYC - AMD EPYC processor servers;
- Ryzen - AMD Ryzen processor servers;
- Storage - storage-optimized servers.
In the top right corner, toggle Billed annually to view prices with annual billing discounts.
-
Choose Your Dedicated Server Configuration
For each dedicated server configuration, the following information is displayed:
- Configuration name (e.g., v1-max+, v2-promo, v1-big+);
- Brief description (e.g., BM E3-12xx/32/2x960GB SSD);
- CPU - processor model and specifications;
- RAM - memory type and capacity;
- Storage - disk type and capacity;
- Traffic - bandwidth and data transfer;
- Price with billing period and discount (e.g., €528 annually, €44 -12%).
Note
If you need a configuration currently unavailable for order, it can be requested manually by sending an email in any format to [email protected].
-
Select Payment Period
When ordering a dedicated server, pay attention to selecting the payment period from the Period of payment dropdown menu. This choice is critical for further server management.
Attention
- Long-term tariffs (quarterly, semiannual, annual) imply discounts and upfront payment for the entire period.
- Refunds on long-term tariffs are possible only after the rental period ends.
Information
Hostkey customers have access to the hourly billing server rental service.
Software Configuration
The Software section is divided into two tabs:
-
Panels and Applications
In this tab, you can select additional software and control panels. A compatible operating system (e.g., Ubuntu 22.04, AlmaLinux 9) is specified for each application.
Automatic OS Selection
If you select a control panel, the operating system will be added automatically.
Software Compatibility
Software that is not compatible with the selected configuration is grayed out and unavailable for selection.
-
Operating System
Select the required operating system from the available options. Available systems may include various Linux distributions (Ubuntu, CentOS, Debian, AlmaLinux, etc.) and Windows Server.
Disk Configuration
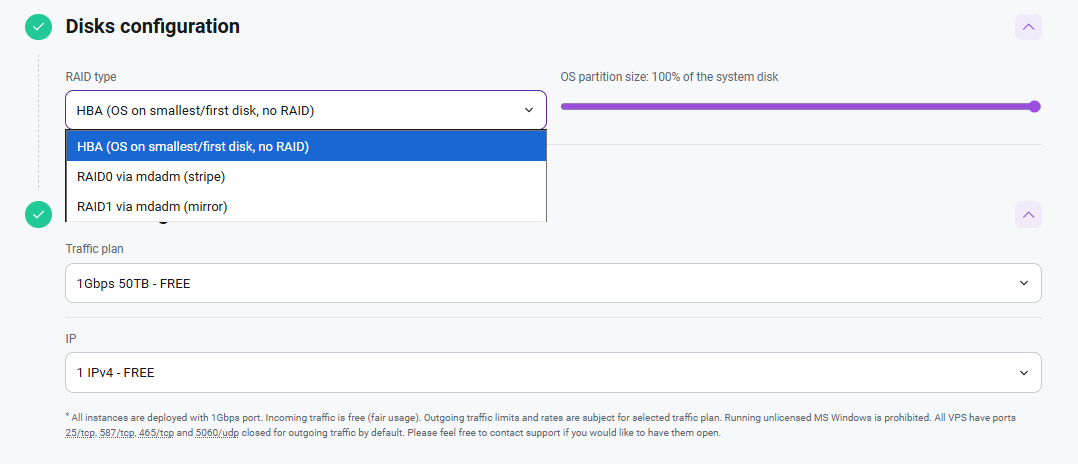
In this section, you can configure the disk parameters for your dedicated server:
RAID Type:
- HBA (OS on smallest/first disk, no RAID) - The OS is installed on the smallest/first disk without RAID configuration;
- RAID0 via mdadm (stripe) - RAID0 via mdadm (striping for performance);
- RAID1 via mdadm (mirror) - RAID1 via mdadm (mirroring for redundancy).
OS Partition Size: Use the slider to set the percentage of the system disk allocated to the OS partition (from 0% to 100%).
Network and IP
This section is used to configure the network parameters for your dedicated server:
Traffic Plan:
Select the required traffic plan:
- Free options (e.g.,
1Gbps 50TB - FREE); - Paid plans with increased traffic volume or additional features:
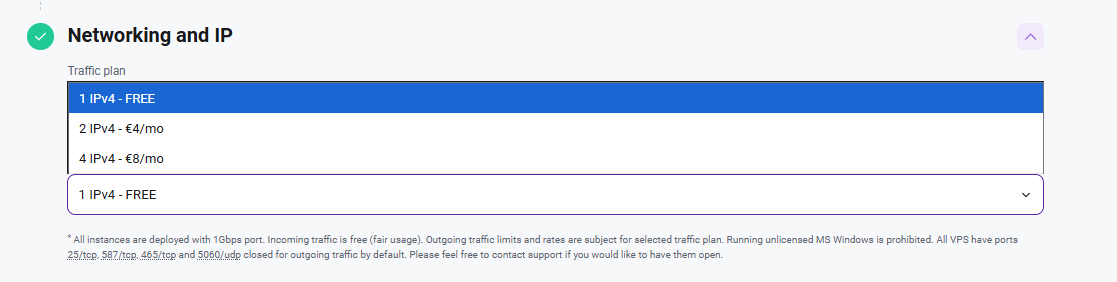
IP Addresses:
Select the number of IPv4 addresses:
- 1 IPv4 - FREE - one IPv4 address is included;
- 2 IPv4 - €4/month - two IPv4 addresses;
- 4 IPv4 - €8/month - four IPv4 addresses.
Dedicated Server Network Information
All servers are deployed with a 10Gbps port. Inbound traffic is free (fair use policy). Outbound traffic limits and rates depend on the selected plan. The use of unlicensed MS Windows is prohibited. By default, ports 25/tcp, 587/tcp, 465/tcp, and 5060/udp are closed for outbound traffic on all servers. Please contact support if you wish to open them.
Automation
This tab is used to configure basic server parameters:
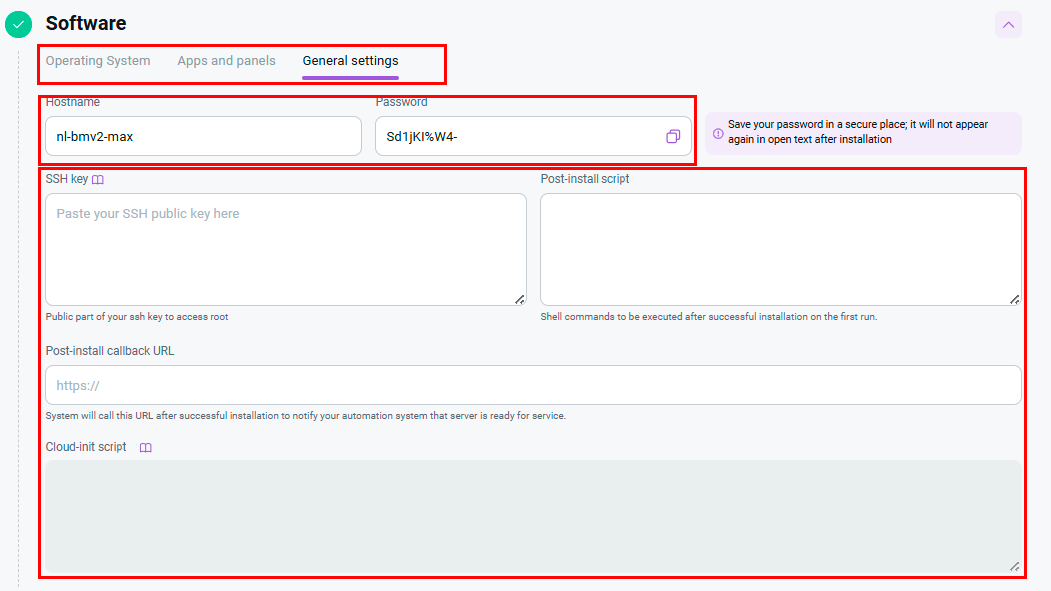
Required fields:
- Hostname - any unique name (defaults like nl-bmv2-max are suggested);
- Password - create a strong password for server access.
Optional settings:
- SSH key - the root user's public SSH key, which will be written to the OS;
- Post-install script - commands that will be executed upon the first server boot;
- Post-install callback URL - a URL that will be called via curl during the first server boot;
- Cloud-init script - a YAML configuration for automatic server setup after the OS installation.
Field Visibility
Cloud-init script fields appear only after an operating system has been selected.
Cloud-init Scripts
You can use Cloud-init scripts to automatically configure the server immediately after the OS installation. This allows you to create users, configure SSH keys, install packages, and perform other configuration tasks without manual intervention.
For a detailed guide on creating and using Cloud-init scripts, see the article: Using Cloud-init scripts.
Custom Domain for the Control Panel
Custom Domain for the Control Panel
If you have selected a control panel (e.g. n8n, Nextcloud, etc.), you can specify your own domain - the panel will be accessible at your address instead of the default one. Learn more about custom domain setup
Information
The custom domain field is displayed only if adding a domain is supported for the selected control panel or server type.
Complete Your Dedicated Server Order
After configuring all parameters:
- Review the order summary in the right panel Your server;
- Ensure the correct Period of payment is selected;
- Check the final price in the TOTAL field;
- Click the
Orderbutton to complete the order.
If you have a promo code, use the Have a promo code? link at the bottom of the order form.
Order Confirmation
Note
To install your own OS or an OS with a non-standard disk partitioning, you need to select the No OS option: in this case, the server disks will only be cleaned and all the necessary settings for the Internet access port will be made.
The server will be cleaned up and appear in the Invapi control panel ready for you to set up. You will be notified of this via e-mail.
Following the server deployment, you need to visit the server's control interface and install the OS yourself - either via the Reinstall menu, or manually over IPMI (ISO can be uploaded from your local computer), or utilizing the Native Console and our library of popular ISO images.
If you can't find the ISO image you want in our library of images, you can request the technical support to add it to the library.
After clicking the Order button, the system will check for server availability and account funds before sending the order for execution, informing of the assigned machine number. During order fulfillment, messages about installation stages will be sent, indicating when everything is ready - a dialog about server readiness will open. After placing an order, the system shows an information window with order details and cancellation options:
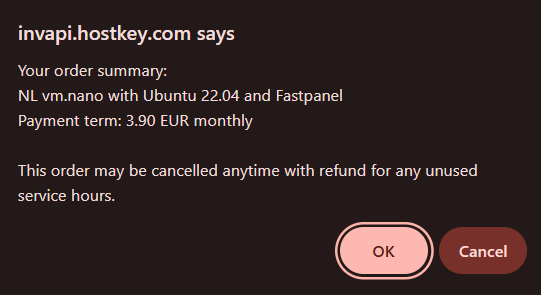
Final order confirmation and fund deduction from the account occur only after successful server delivery.
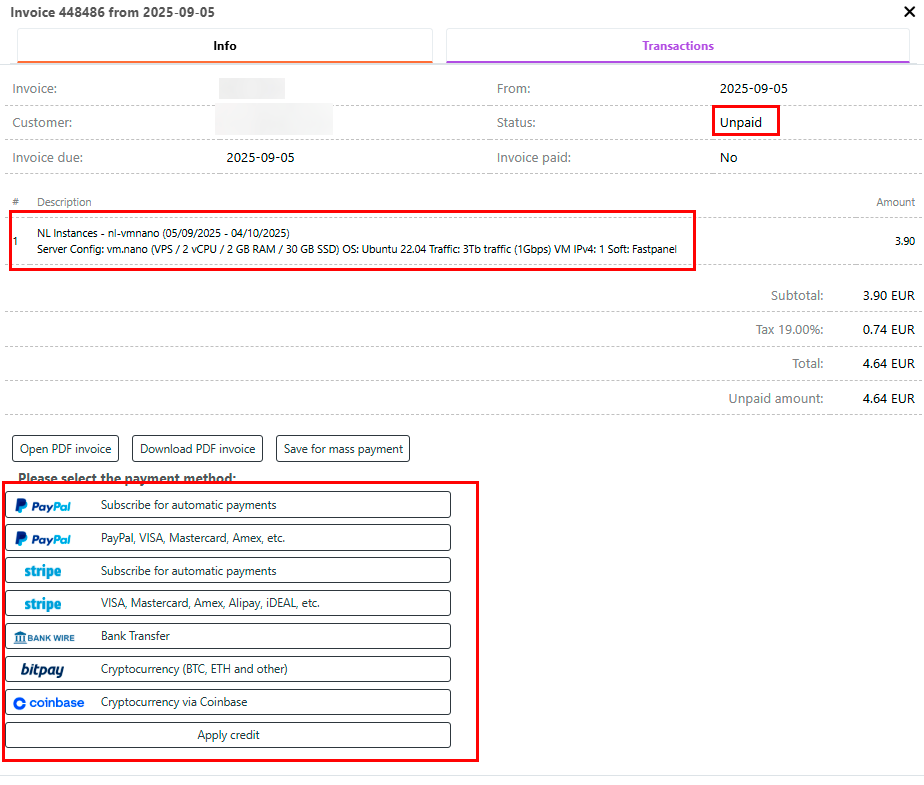
If automatic payment from the balance is not enabled, you must pay by one of the following methods:
- PayPal - Subscribe for automatic payments;
- PayPal - One-time payments (VISA, Mastercard, Amex, etc.);
- Stripe - Subscribe for automatic payments;
- Stripe - VISA, Mastercard, Amex, Alipay, iDEAL, etc.;
- Bank Transfer - Wire transfer;
- BitPay - Cryptocurrency (BTC, ETH and other);
If for some reason the server is not delivered within 10-15 minutes, check the order status with an online chat operator - they can quickly see what is happening with the machine.
Note
If a machine is not delivered for any reason, it may be possible to order another in the same configuration.
Information