3X-UI Graphics Panel
In this article
Information
3X-UI is a graphical panel for the X-Ray server. It supports Shadowsocks-2022, VLESS with XTLS, and other features. It is an enhanced fork of the original X-UI, which can be easily installed in Docker and has an interface in English with the option. 3X-UI has all the necessary features and, unlike other similar panels, it has higher stability and reliability. The key difference between 3X-UI and other VPN services is advanced settings and increased data security. We recommend using 3X-UI to users with experience in working with unblockable website protocols.
Getting started after deploying 3X-UI
After payment of the order, a notification of the server's readiness for operation will be sent to the e-mail address specified during registration. It will contain the IP address of the VPS, as well as the login and password for connection. Clients of our company manage the equipment in the server control panel and API - Invapi.
Here you can also find the credentials, which can be found either in the Info >> Tags tab of the server control panel or in the email sent to you:
- Link to access the 3X-UI webpanel: in the webpanel tag. The exact link of the form
https://{Server_ID_from_Invapi}.hostkey.in:XXXXXcomes in the email sent when the server is handed over; - Login:
root; - Password: Sent to your email address after the server is ready for use following software deployment.
Note
Visiting https://{serverID}.hostkey.in will take you to a page that appears to be 3X-UI, another service.
Set up a New Connection
Note
In our example, we will set up a new connection via the VLESS protocol.
Information
VLESS is a new protocol that does not include encryption mechanism and allows only "own/foreign" checking and data padding. Several vulnerabilities of the old VMess protocol have been fixed in VLESS, and this protocol is actively developing. For example, support for compression with the Zstd algorithm is planned to be added. While establishing a connection, the client and server exchange the protocol version and the list of supported features. It ensures backward compatibility during further development. Overall, VLESS is the freshest and most progressive protocol at the moment.
-
After logging into the 3X-UI panel, go to the Inbounds tab and click on the
Add Inboundbutton: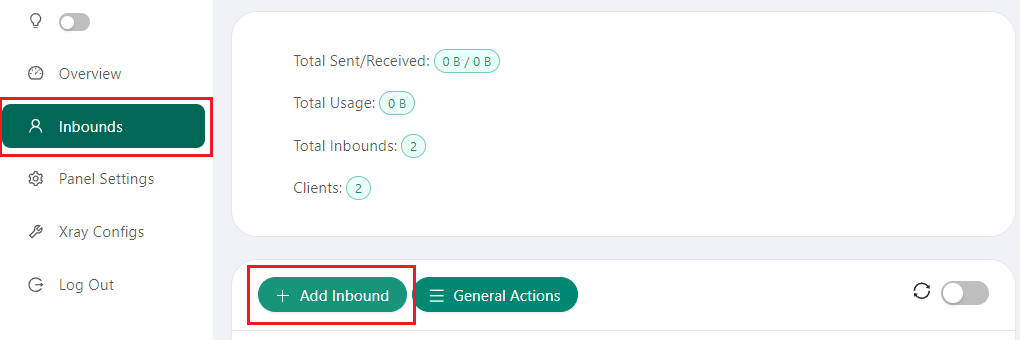
-
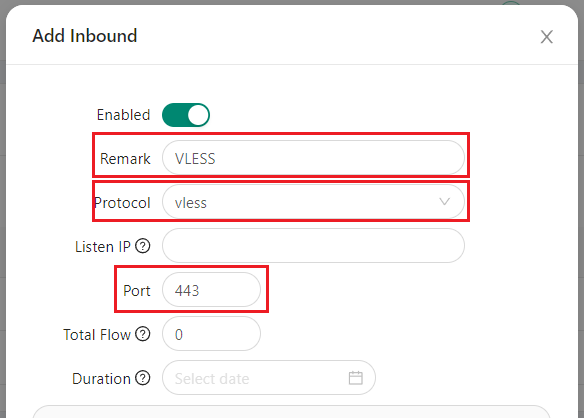
Fill in the following fields in the opened menu:
- Remark - name the connection using the protocol type (e.g. VLESS) or client group type.This name will be displayed in the list of incoming connections;
- Protocol - protocol selection is set to
vlessby default, but it can bechanged and configured manually if desired; - Listen IP - if you leave this field empty, the server will listen on all IP addresses;
- Port - specify port 443.
Note
The fields Total Flow (GB) and Expire Date are optional.
-
Select the REALITY tab located under Security at the bottom of the window.

-
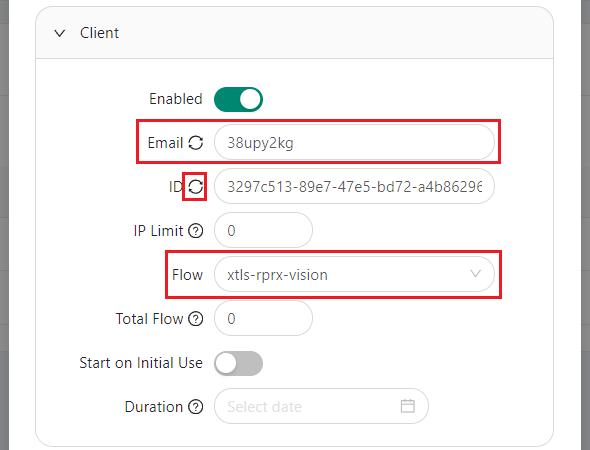
Navigate to the client settings and complete the necessary fields in the Client section.
- Email - client ID, must be unique. If entering an email, it must also be unique for each protocol. If you have a user, keep the existing one or create a new user by clicking the
icon next to the email field. If there are multiple users, set a readable identifier such as[email protected]. - ID - unique identifier for the incoming connection. The ID must be 32 characters long and can only contain numbers and lowercase letters of the Latin alphabet. It can be generated automatically by clicking the
icon in front of the key input field. - Flow - the value is set to
xtls-rprx-vision.
- Email - client ID, must be unique. If entering an email, it must also be unique for each protocol. If you have a user, keep the existing one or create a new user by clicking the
-
Navigate to the REALITY setting and select
chromein the uTLS field, or choose another option from the list. -
Enter the domain to mask in the Dest and SNI fields. The default option is
yahoo.com.Attention
Consider selecting a different domain from the proposed options and replacing the default one in the corresponding fields:
- Dest: www.microsoft.com:443 and SNI: www.microsoft.com
- Dest: dl.google.com:443 and SNI: dl.google.com
-
In ShortIds click on the icon
. This action will generate a random ID. -
Click the
Get New Certbutton to generate new keys for Private Key and Public Key.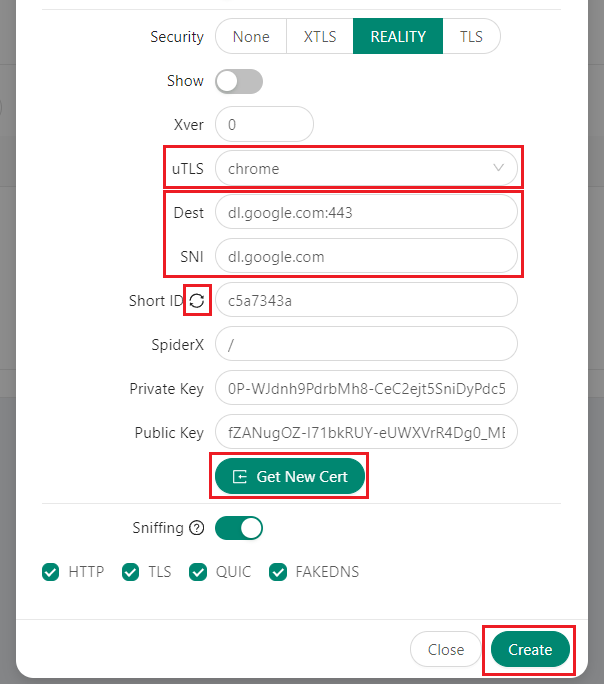
-
After entering the data, click the
Createbutton.
If configured correctly, you will have an entry with the protocol.

Connections for other protocols can be configured in the same manner.
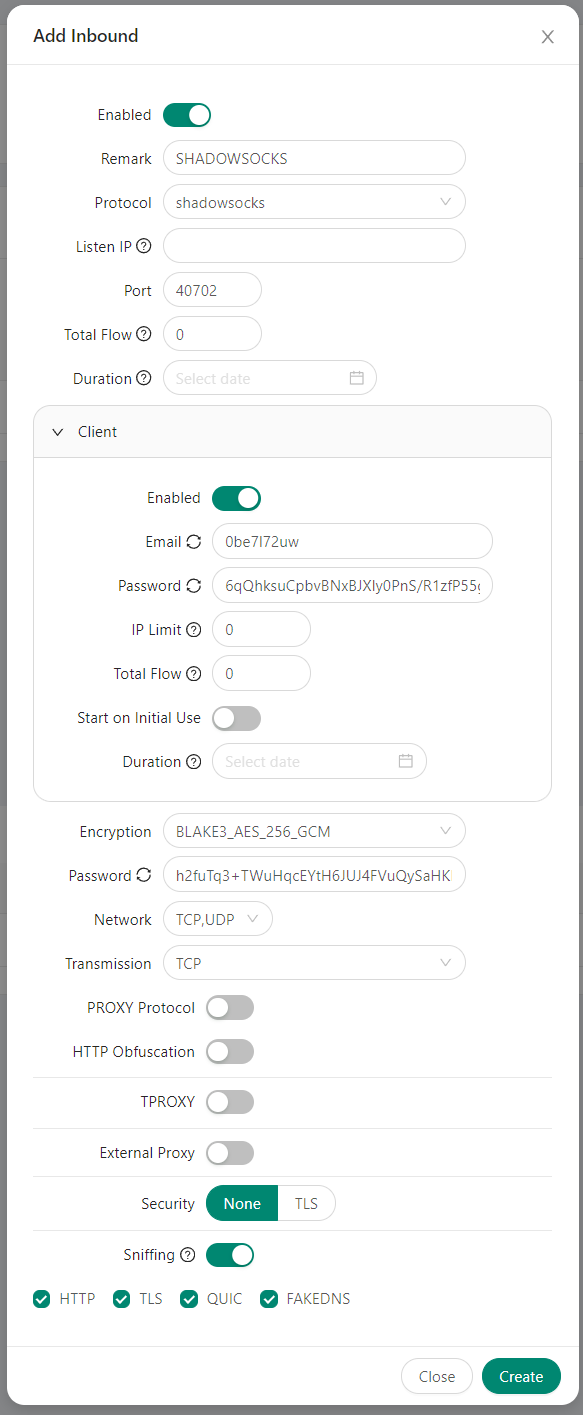
Shadowsocks Protocol settings example
The connection to 3X-UI from PC
Various clients can be used to connect to 3X-UI: [v2rayN](https://github.com/2dust/v2rayN), [Invisible Man XRay](https://github.com/InvisibleManVPN/InvisibleMan-XRayClient), [v2rayU](https://github.com/yanue/V2rayU/tree/master), [Nekoray](https://github.com/MatsuriDayo/nekoray) and others. For macOS devices, it is recommended to use the FoXray client or Hiddify Next.
Note
For our example, we will use the Hiddify Next client for beginners and the Nekoray client for advanced users.
Using the Hiddify Next client on Windows, Linux or macOS
Attention
Before setting up the connection on the local device, you need to configure a new connection in the 3X-UI graphical panel. In this example, we are examining a Windows client.
To connect to 3X-UI using the Hiddify Next client, follow these steps:
-
[Download] the Hiddify Next release with the
Latesttag and install the package or file for your operating system. -
In Explorer, navigate to the installation path (usually
C:\Program Files\hiddify), select Properties from the right-click menu of theHiddifyNext.exefile, and click the Compatibility tab in the window that opens.Click on
Change settings for all users, check the box Run this program as administrator, and clickOK.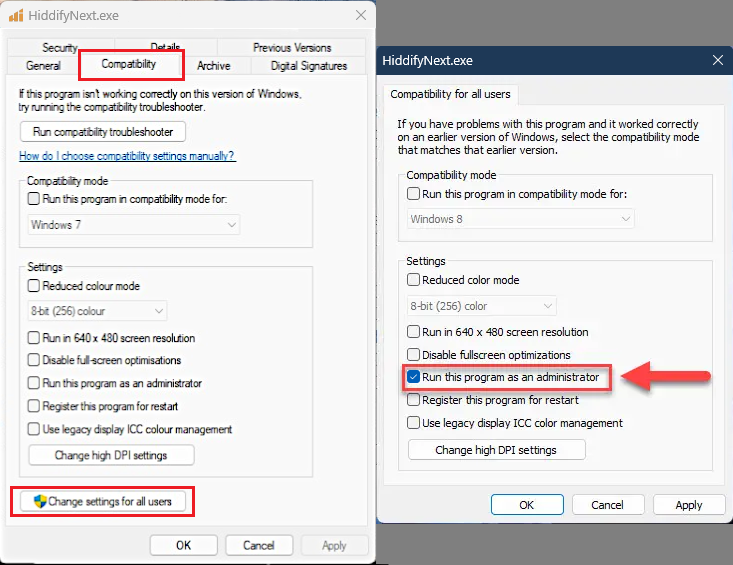
-
Open the Hiddify Next client and configure the following settings:
- Go to Settings and choose Region - Other.

- Go to Settings >> Config Options and set Service Mode - VPN (Experimental).

-
Add server data by following these steps:
-
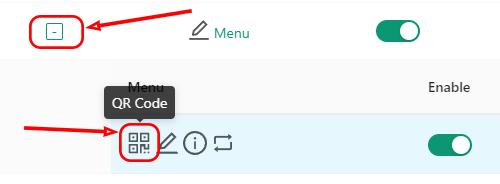
Open the QR code with the connection settings in the 3X-UI graphical panel:
-
Copy the QR code in the 3X-UI graphic panel to the clipboard (just click on it);
-
Navigate to the Home page and establish a connection to the server by selecting either
+ New Profileor the+icon located in the upper right corner. -
Click on the panel labeled Add From Clipboard:
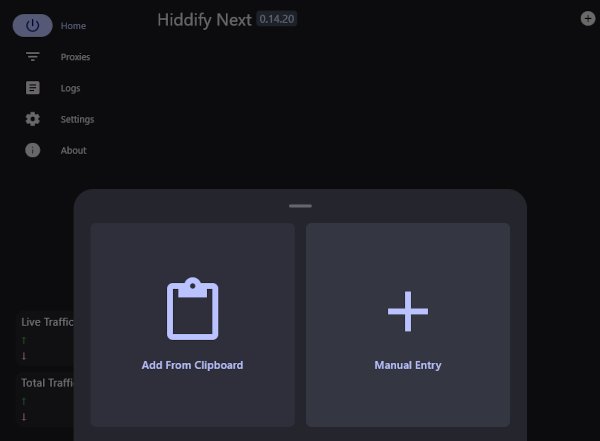
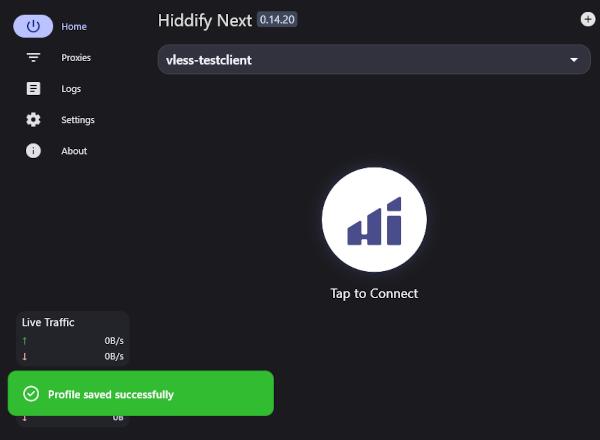
Upon successful addition of the data, a pop-up message will appear and the server profile will be added to the list:
-
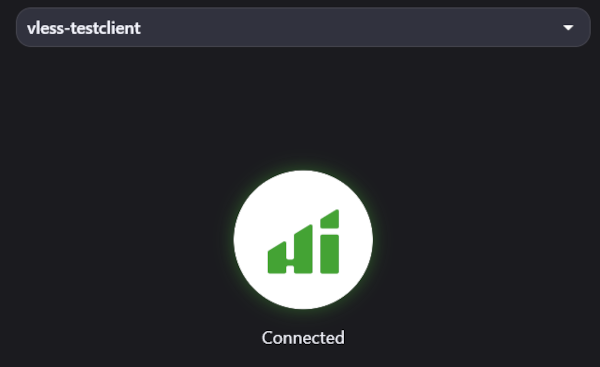
To connect to the 3X-UI, press the large round button. If the connection is successful, the icon will turn green and display Connected. Disconnecting is done in the same way by clicking the button.
Using the Nekoray client on Windows or Linux
Attention
Before setting up the connection on the local device, you need to configure a new connection in the 3X-UI graphical panel. In this example, we are examining a Windows client.
To connect to 3X-UI using the Nekoray client, follow these steps:
-
Download the archive containing the Windows program or download and install the package on Linux.
To use Nekoray on Windows, extract the
nekorayfolder from the archive onto your disk and runnekoray.exefrom within the folder. -
The first time you start the client, specify the kernel -
sing-box. You can change the kernel in the already installed client by going to Preference >> Basic settings >> Core. -
Add server data. To do this:
-
Open the QR code with the connection settings in the 3X-UI graphical panel:

-
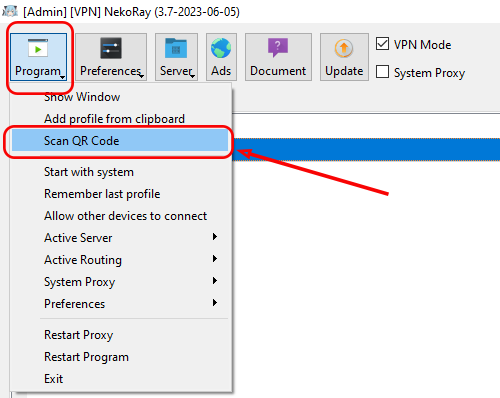
Without minimising the browser window with the QR code, go to the Program menu in Nekoray and select Scan QR Code:
or
-
Copy the QR code in the 3X-UI graphic panel to the clipboard (just click on it);
-
In the Nekoray client, select Program >> Add profile from clipboard.
-
-
Check the box next to Tun mode;
-
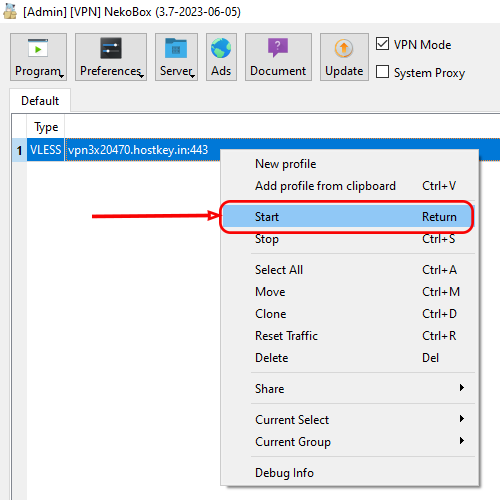
Start the connection by right-clicking on its name and selecting Start:
Android Mobile Devices
Connecting using Hiddify Next
Attention
To set up a connection on the local device, first configure a new connection in the 3X-UI GUI panel.
To connect to the 3X-UI using Hiddify Next, follow these steps:
-
Download and install FoXray Hiddify Next from Google Play or download the appropriate APK for your architecture from the developer's website.
-
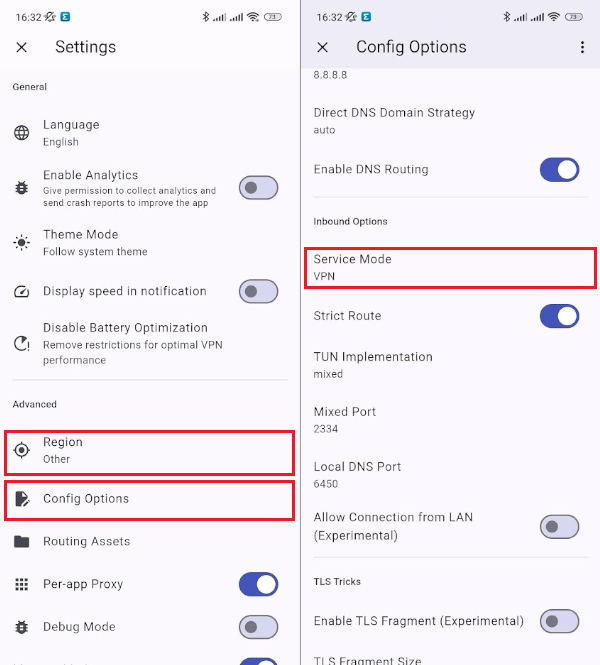
To complete the presets, open the Hiddify Next app:
- Go to the menu item Settings under the
icon and select Region - Other; - In the menu
, go to Settings >> Config Options. From there, set the Service Mode - VPN.
- Go to the menu item Settings under the
-
Include server data by following these steps:
-
Open the QR code with the connection settings in the 3X-UI graphical panel on the server:

-
To add a server connection in the Hiddify Next app, navigate to the main screen and click on either the
+ New Profilebutton or the+icon located in the top right corner. Next, select Scan QR Code and scan the code: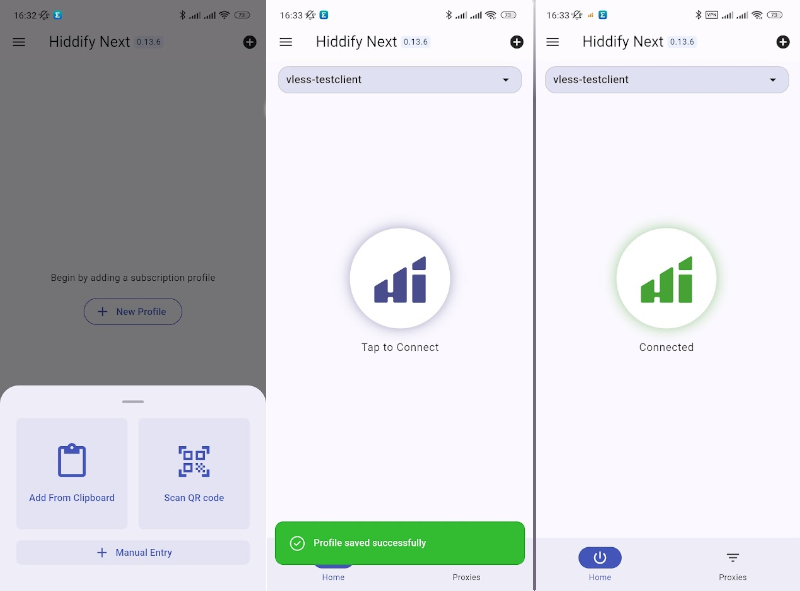
-
-
Upon successful completion of the scan, a message will display and the server profile will be added to the list. To connect to the 3X-UI, click the large round button. Once the connection is established, the icon will turn green and display Connected. To disconnect, simply click the button again.
-
To enable proxy mode for specific applications, go to
>> Settings and turn ON the Per-app Proxy switch. Then, select the applications you want by checking the proxy mode checkbox next to them.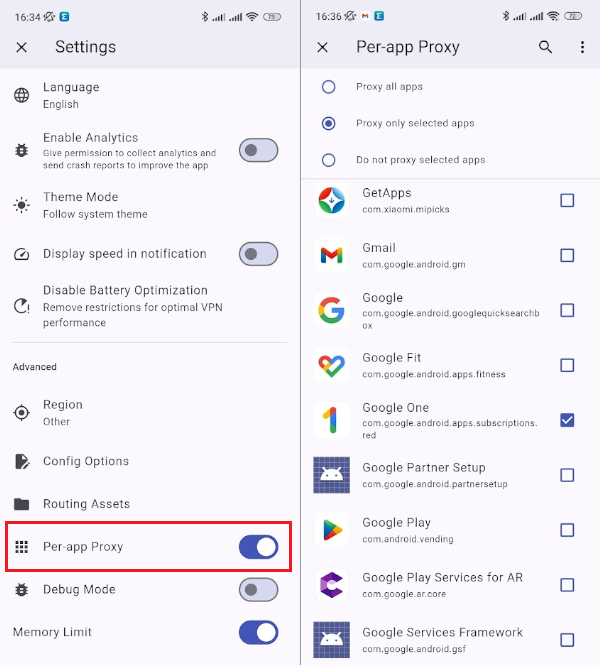
Connect using v2rayNG
Attention
To set up a connection on the local device, first configure a new connection in the 3X-UI GUI panel.
To connect to the 3X-UI using v2rayNG, follow these steps:
-
Download and install v2rayNG from the Google Play.
-
Open the v2rayNG app and click the
button:
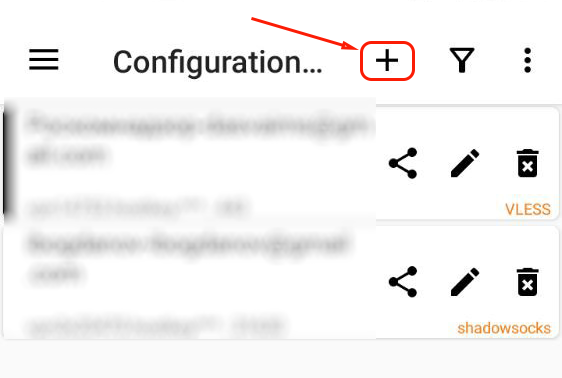
- In the menu, choose the Import profile from QR code option and scan the QR code in the 3X-UI graphical panel:
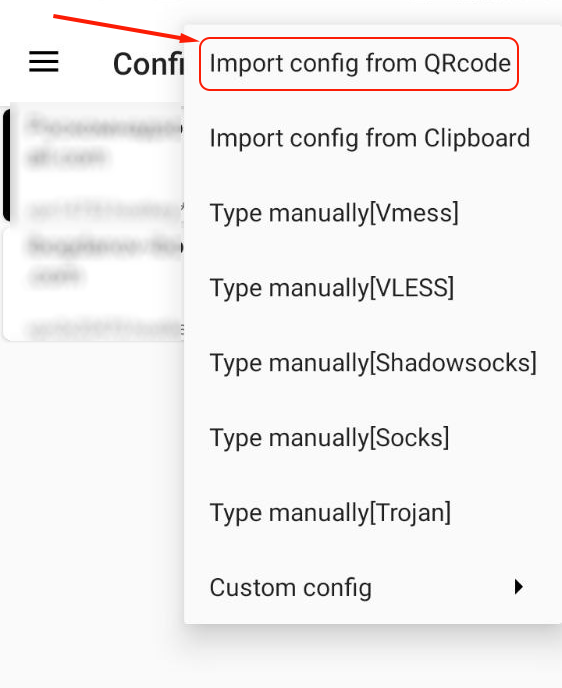
You need to scan the QR code with the connection settings in the 3X-UI graphic panel:

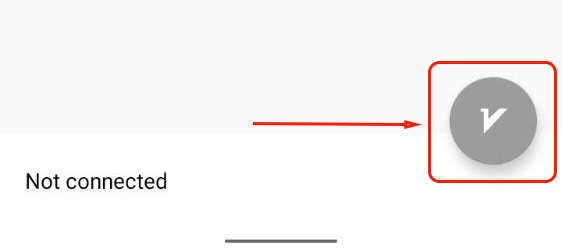
- Activate the connection.
iOS Mobile Devices
Attention
To set up a connection on the local device, first configure a new connection in the 3X-UI GUI panel.
In our example, we will use the FoXray client. Alternatively, you can use the v2box or Shadowrocket client. To connect to 3X-UI using FoXray, follow these steps:
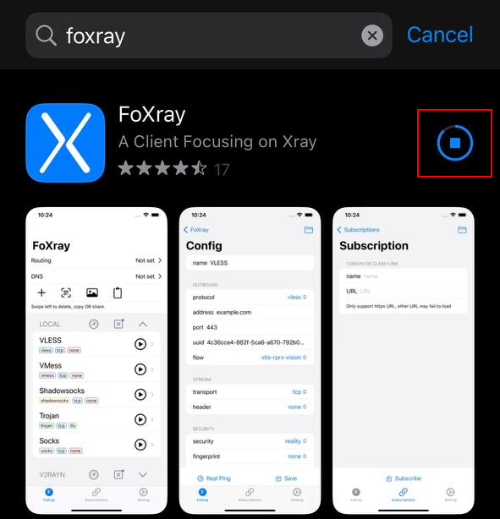
- Download and install FoXray from the App Store.
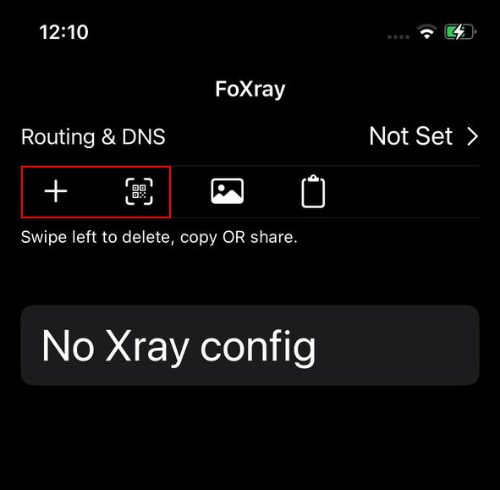
- Open the FoXray app and click the
button (it will allow you to add the configuration manually) or scan the QR code in the 3X-UI graphical panel:
- Click the
Playbutton and allow the app to add the VPN configuration to the device:
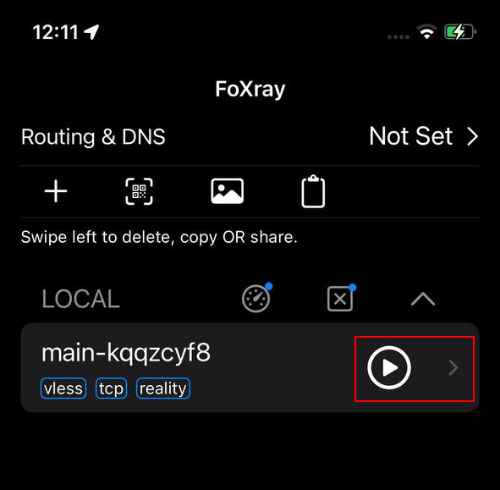
Update 3X-UI
To update the panel to the latest version, connect to your server via SSH or HTML5 console from the command line.
Please enter the root password and execute the following commands:
Key Features 3X-UI
- Traffic Encryption: VLESS, Shadowsocks-2022, and XRay (XTLS) allow encrypting user’s traffic, making it impossible to read or monitor by the Internet service provider or other third parties.
- Multi-factor Authentication: Support for multi-factor authentication enhances security and protects users’ data from unauthorized access.
- Flexible Settings: The ability to configure connection’s parameters such as encryption type, ports, and protocols. It provides flexibility in connection setup and ease of use.
- Speed Optimization: Optimization for fast network connection. They can use various technologies such as TCP Fast Open and Congestion Control, which accelerate data transmission and improve connection quality.
- Support for Various Operating Systems: Windows, MacOS, Linux, Android, and iOS. This ensures the universality and accessibility of the product for users on any platform.
- Open Source: It provides developers with the opportunity to study the code and make their own changes, which can help improve the product and its functionality.
- Reliability and Stability: VLESS, Shadowsocks-2022, and XRay (XTLS) are reliable and stable protocols. They provide high connection speed and stability, as well as protection of user data.
Deployment Features
| ID | Compatible OS | VM | BM | VGPU | GPU | Min CPU (Cores) | Min RAM (Gb) | Min HDD/SDD (Gb) | Active |
|---|---|---|---|---|---|---|---|---|---|
| 26 | Ubuntu 22.04 | + | + | + | + | 1 | 1 | - | Yes |
- In RHEL-like operating systems, VLESS and Shadowsocks-2022 protocols are open only on port 443 by default.
- Installation time is 15-20 minutes, including OS.
- Containerized installation of 3X-UI + SSL in the hostkey.in zone.
- Installed software:
- Docker CE
- Docker Compose.
- Xray Panel - the channel of the developer's panel on Telegram.
- The build MHSanaei/3x-ui.
- Used containers:
ghcr.io/mhsanaei/3x-uijonasal/nginx-certbot:latest
- Route to
compose:/root/3x-ui. - Route to mounted directories:
/data. -
To customize the installation, you need to make changes in
/root/3x-ui/compose.ymlThen restart compose via commands:-
To stop containers, run the command:
-
To enable containers, you need to run the command :
-
Note
Unless otherwise specified, by default we install the latest release version of software from the developer's website or operating system repositories.
Ordering a server with 3X-UI using the API
To install this software using the API, follow these instructions