
In our previous article, we explored the inner workings of object storage like buckets, objects, keys andreplication. Now it's time to connect to it manually and start working. This part is all practice. No theory, just commands and settings.
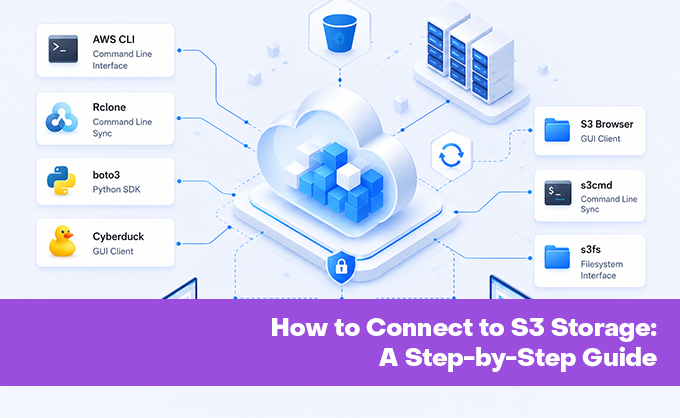
This article will be useful for developers, system administrators and anyone who needs to migrate backups, media files, or logs to S3-compatible object storage. We'll cover six connection methods, ranging from command-line utilities to graphical clients and Python libraries. All examples are given for HOSTKEY storage, but they're universal and work with any S3-compatible service. You just need to substitute your endpoint and keys.
What you need to connect to S3
The minimum set required to connect to any S3-compatible object storage consists of three things. The requirements are universal; only where you obtain them differs.
Access Key and Secret Key – a pair of identifiers that serve as a login and password. Unlike standard authorization, these keys aren't transmitted in plain text with every request. They're used to cryptographically sign each request using the AWS Signature Version 4 scheme. From the signature, the server can tell that the request came from someone who possesses these keys and that the request itself wasn't altered in transit. Keys are obtained in your provider's control panel. At HOSTKEY, this is the S3 Storage section in Invapi, under the "Credentials" tab.
Endpoint – the URL where the S3 client finds your storage. For Amazon S3, it's hardcoded in libraries by default; for any other service, it must be specified explicitly. For HOSTKEY, this is https://s3-nl.hostkey.com. Without an explicit endpoint, clients will try to reach Amazon by default, which won't work.
Bucket name is required for most operations. A bucket is created once, after which objects can be created inside it. The bucket name must be globally unique, so HOSTKEY automatically prepends a prefix based on the user ID – this solves the problem of popular names like backups or media having long since been taken.
One last security note: all S3 services support HTTPS and there's no reasonable case for working over unencrypted HTTP today. All clients we'll cover use encryption by default, but verify this in the settings, especially when working with confidential data.
Obtaining credentials in HOSTKEY
Before connecting, you need to create storage and obtain keys. This takes a couple of minutes.
Log in to your Invapi control panel, go to the S3 Storage section and click the button to create a new storage.
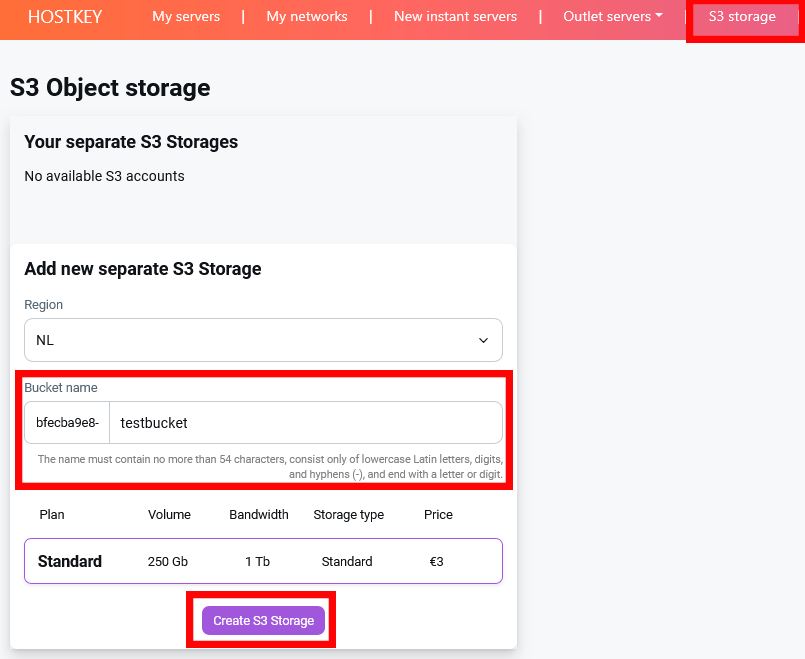
In the form, specify the region (NL – Netherlands by default), choose a bucket name (lowercase letters, numbers and hyphens only, maximum 63 characters, starting and ending with a letter or number), select the Standard Storage tariff and click "Order".
After creation, open the "Credentials" tab.
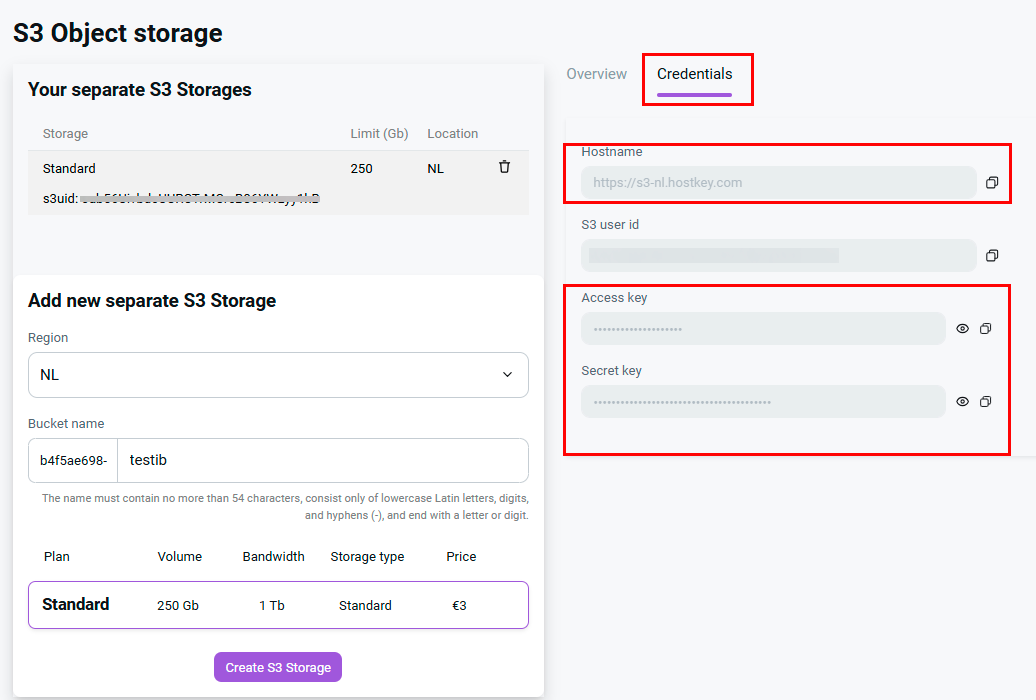
You'll see four values:
- Host name (Endpoint URL) – `https://s3-nl.hostkey.com`. The same for all clients in the NL location.
- S3 User ID – a service identifier. Most clients don't need it, but it can be useful in some cases.
- Access Key – the public part of the key pair.
- Secret Key – the private part. Never publish it in source code, push it to repositories, or send it via messengers under any circumstances.
Key values are revealed by clicking the eye icon to the right of the field. Only after revealing them can the keys be copied with the button next to the field – without revealing first, only asterisks will end up in the clipboard.
Save both keys to a secure place immediately. If you lose the secret key, you'll have to create a new one, because the storage doesn't remember the secret key and won't display it again. This isn't done out of malice but for security reasons. The key should exist only with the owner.
Connecting via AWS CLI
AWS CLI is the official command-line utility from Amazon. Despite the name, it works perfectly with any S3-compatible storage – you just need to specify a different endpoint. This is arguably the main tool for automation: anything that can be done manually through a graphical client can be done via a command and added to a script.
Installing AWS CLI
AWS CLI can be installed in two ways. Which one to choose depends on whether you have Python and how comfortable you are with pip.
Method 1: via pip. A universal option that works on Windows, Linux and macOS. Requires Python.
pip install awscli boto3Verify the installation:
aws --versionIt's updated the same way:
pip install--upgrade awscli boto3Method 2: MSI installer for Windows. If you don't need Python itself but only AWS CLI, go with the MSI. It installs more cleanly into the system, doesn't depend on Python and doesn't produce warnings in the terminal.
Download the installer from the console:
curl -o AWSCLIV2.msi https://awscli.amazonaws.com/AWSCLIV2.msiRun a silent installation:
msiexec /i AWSCLIV2.msi /quiet /norestartThen restart the terminal and verify:
aws --versionYou can also just download the installer from the Amazon website and run it with a double-click.
Don't install AWS CLI via both pip and MSI at the same time. If the pip version is already installed and you run the MSI on top of it, you'll end up with two different `aws.exe` files in different locations. Which one gets called depends on the order of paths in your `PATH` environment variable. You'll then spend hours figuring out why pip updates aren't taking effect. Check for duplication:
where awsIf it shows multiple paths, delete one of the versions.
Configuring a profile
AWS CLI supports profiles – named sets of credentials that are convenient when you have multiple accounts or multiple different storages. One profile for the main cloud, another for testing, a third for client backups.
Create a profile for HOSTKEY:
aws configure --profile hostkeyThe utility will ask for four values:
AWS Access Key ID [None]: your_access_key
AWS Secret Access Key [None]: your_secret_key
Default region name [None]: nl
Default output format [None]: json
The region for HOSTKEY is nl. The json output format is convenient for scripts; if you plan to read output by eye, set it to table.
Verify that everything was saved correctly:
aws configure list--profile hostkeyThe command will show which values are set. The keys themselves aren't displayed in full; only the last few characters are visible. This is by design – the full key is never shown anywhere for security reasons.
Basic operations
Every AWS CLI command for working with HOSTKEY must include two extra parameters: `--profile hostkey` (which profile to use) and `--endpoint-url https://s3-nl.hostkey.com` (which service to talk to). Without `--endpoint-url`, the client will go to Amazon.
To avoid repeating this every time, you can create a shell alias. For bash, in `~/.bashrc`:
alias hk='aws --profile hostkey --endpoint-url https://s3-nl.hostkey.com'After this, instead of a long command you just type `hk`. Below I'll show commands in their full form so it's clear what each part does; in real work you'll quickly set up an alias like this for yourself.
List buckets:
aws s3 ls --profile hostkey --endpoint-url https://s3-nl.hostkey.comThis will print the creation date and name of each of your buckets.
List bucket contents:
aws s3 ls s3://bucket-name/ --profile hostkey --endpoint-url https://s3-nl.hostkey.comThe trailing slash is important. Without it, the command behaves differently.
Upload a file:
awss3cp test.txt s3://bucket-name/ --profile hostkey --endpoint-url https://s3-nl.hostkey.com`cp` is the copy command, with the same syntax as the regular `cp`: source, then destination. You can change the file name during upload by specifying it in the destination: `s3://bucket-name/new-name.txt`.
Download a file:
aws s3 cp s3://bucket-name/test.txt./local.txt --profile hostkey --endpoint-url https://s3-nl.hostkey.comSame `cp` command, with source and destination swapped.
Delete a file:
aws s3 rm s3://bucket-name/test.txt --profile hostkey --endpoint-url https://s3-nl.hostkey.comCreate a bucket:
aws s3 mb s3://new-bucket --profile hostkey --endpoint-url https://s3-nl.hostkey.com`mb` stands for "make bucket". The name must be globally unique.
Delete an empty bucket:
aws s3 rb s3://bucket-name --profile hostkey --endpoint-url https://s3-nl.hostkey.comIf objects remain in the bucket, the deletion will fail. To delete it along with its contents, you need the `--force` flag. The command doesn't ask for confirmation and removes everything inside without warning, so be careful.
Folder synchronization – a very useful command for backups. It compares a local folder with a folder in the bucket and uploads only what's missing or has changed:
aws s3 sync ./local-folder s3://bucket-name/remote-folder/ --profile hostkey --endpoint-url https://s3-nl.hostkey.comThe arguments can be swapped to sync in the opposite direction – from the bucket to the local folder.
If there are spaces in any path, wrap it in quotes:
awss3 sync "C:\Users\Name\My Documents"s3://bucket-name/docs/ --profile hostkey --endpoint-url https://s3-nl.hostkey.comWhere settings are stored
After running `aws configure`, two files are created:
- On Linux and macOS: `~/.aws/credentials` and `~/.aws/config`.
- On Windows: `C:\Users\NAME\.aws\credentials` and `C:\Users\NAME\.aws\config`.
Keys are in `credentials`; the region and output format are in `config`. The files are plain text and can be edited manually. But keep in mind: the credentials file contains passwords. Don't push it to public repositories, don't transmit it over insecure channels and set restrictive permissions (`chmod 600 ~/.aws/credentials` on Linux).
A full configuration reset, if something goes wrong:
Linux/macOS:
rm -rf ~/.awsWindows:
rmdir /S/Q %USERPROFILE%\.awsAfter this, configure again with `aws configure --profile hostkey`.
Common errors
- `aws is not a command` – the terminal wasn't restarted after installation, or the path to the utility didn't make it into `PATH`. Restart the console; if that doesn't help, run `where aws` and verify that the path is actually in your system variables.
- `Invalid bucket name` – the bucket name doesn't comply with the rules. Lowercase letters, numbers and hyphens only; length 3–63 characters; no consecutive dots; no underscores.
- `AccessDenied` – wrong keys or insufficient permissions. Verify that the keys were copied in full (run `aws configure list --profile hostkey` to see which last characters the CLI sees and compare them with the HOSTKEY panel). If you're sure the keys are correct, try recreating the profile.
- `SSL: CERTIFICATE_VERIFY_FAILED` – a problem with the system certificate store, usually on older systems or behind a corporate proxy. Solved by updating system certificates or using the `--no-verify-ssl` flag (but this is a bad idea, since it disables HTTPS verification entirely).
Connecting via S3 Browser
S3 Browser is a graphical client for Windows. The free version lets you work with any S3-compatible storage with no limits on file size or number of connections. It's convenient when you need to quickly see what's in a bucket, drag files with a mouse, or configure access rights through a familiar interface.
Installation
Download the installer from s3browser.com and run it the usual way. It doesn't require administrator rights and leaves no traces in the registry beyond the application itself. After installation, launch the program.
Adding an account
On first launch, S3 Browser will prompt you to add an account immediately. If the window doesn't appear, open the menu Accounts >> Add New Account.
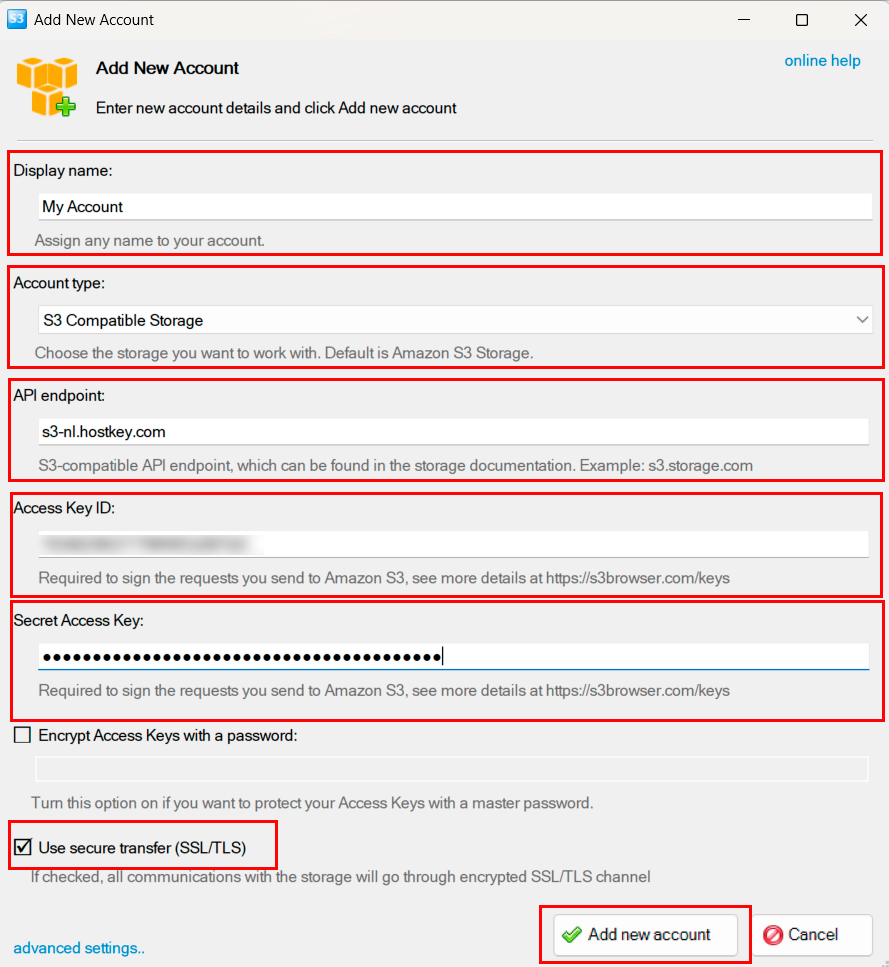
Fill in the form:
- Display name – any convenient name for the list, e.g. `HOSTKEY S3` or `Prod Backups`.
- Account type – be sure to select S3 Compatible Storage, not Amazon S3 Storage. This is the most common mistake: with Amazon S3 selected, the client ignores the endpoint field and tries to connect to Amazon.
- API endpoint – `s3-nl.hostkey.com`. No `https://` prefix and no trailing slash. Encryption is enabled via a separate checkbox below.
- Access Key ID – your access key from the Invapi control panel.
- Secret Access Key – your secret key.
- Use secure transfer (SSL/TLS) – leave it enabled. This is what turns on HTTPS.
- Encrypt Access Keys with a password – an optional setting. If enabled, S3 Browser will ask for a master password every time it launches and without it the keys in the local database will remain encrypted. I recommend enabling it, especially if more than one person uses the computer.
After clicking “Add new account,” the list of buckets should appear in the left panel. If it doesn't, double-check the keys and the storage type in the account settings.
Working with files
The rest is intuitive. The left panel holds the list of buckets; the right shows the contents of the selected one. Uploads happen via the Upload button or by dragging from File Explorer. To download, just select a file and click Download. Folders (more precisely, virtual folders – in S3 these are simply prefixes in object names) are created with New Folder.
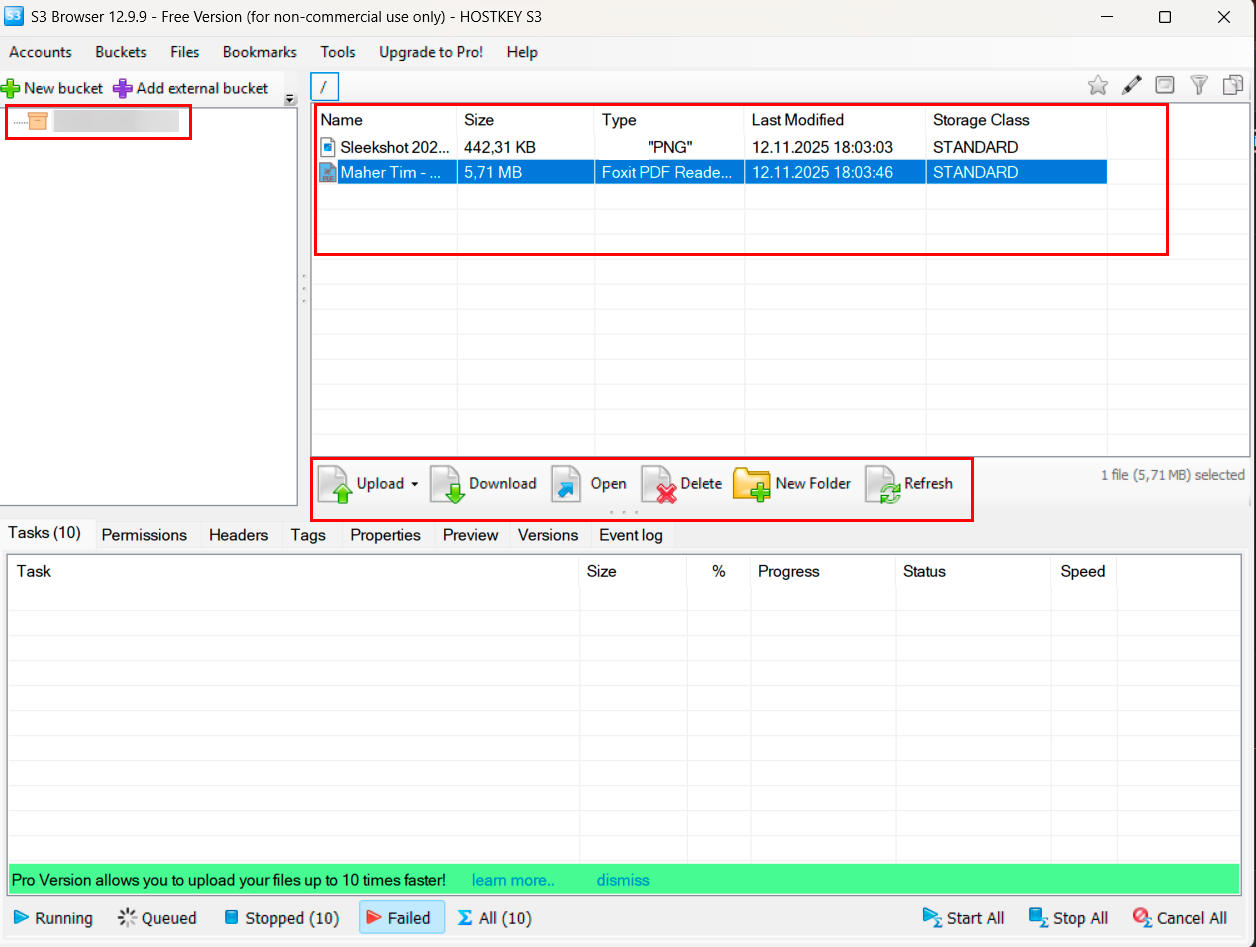
A few less obvious features. Right-clicking a file opens a context menu that includes Generate Web URL – this generates a direct public link to the file. Useful when you need to let someone download a specific object without opening the entire bucket. You can configure the link's expiration time and shorten it via Bitly or TinyURL right from the interface.
Access rights are configured via the Edit Permissions (ACL) item in the same context menu. A file can be opened to everyone for reading without authorization, kept private, or have rights distributed by user groups. For everyday tasks, two buttons are enough – Make public and Make private, which do the same thing in one click.
Be careful with public access at the bucket level. One click to "open for everyone to read" and a month later you won't remember what's inside – and along with website images there may be logs and internal documents. It's safer to keep the bucket private and expose only what really needs to be public.
Connecting via Cyberduck
Cyberduck is a graphical client for macOS and Windows. It is functionally similar to S3 Browser, but the interface is nicer, macOS support is native and it can work not only with S3 but also with FTP, SFTP, WebDAV, and other protocols. Free and open source.
Installation and connection
Download Cyberduck from cyberduck.io. There's an installer for Windows and a standard `.dmg` for macOS. Launch the program and click Open Connection in the top panel (or Cmd+N on macOS, Ctrl+N on Windows).
In the window that opens, at the very top, select the connection type Amazon S3. This is the correct choice even for S3-compatible storages – there's no special type for them; everything works over the same protocol.
Configuring the profile
Before the first connection, you need to enable a special compatibility profile. Open Edit >> Preferences >> Profiles, type `path` in the search bar and you'll find two profiles. Check the box next to S3 (Deprecated path style requests).
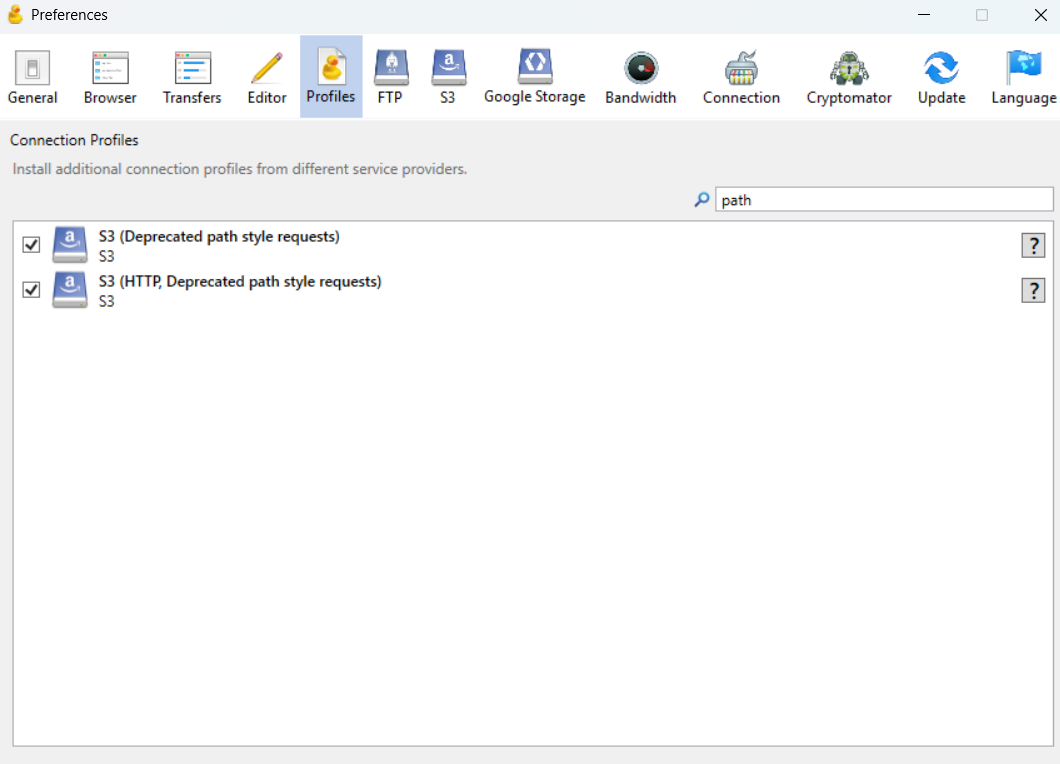
Without this step, Cyberduck will connect and show the list of buckets, but will fail with `Failed to parse XML document` when trying to open a bucket. This is a known compatibility bug with Ceph-based storages. The server responds correctly; the problem is on the client side – Cyberduck can't parse the response. The "Deprecated path style requests" profile works around this.
Connecting
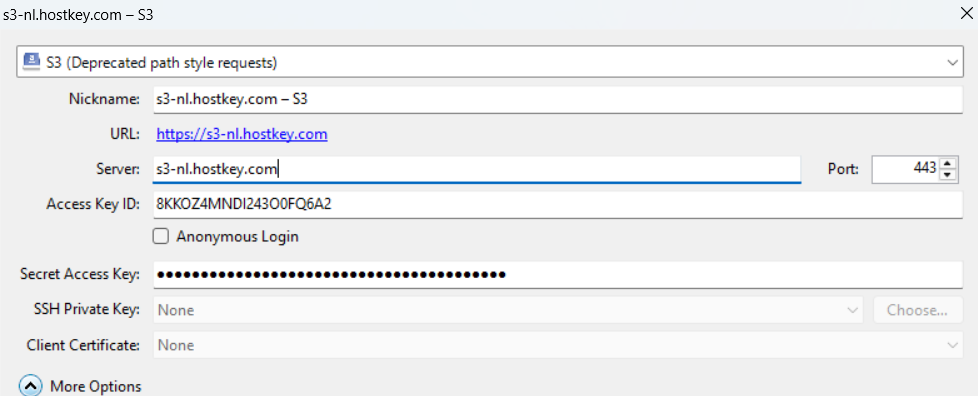
Click Open Connection (Ctrl+N). In the dropdown at the top, select S3 (Deprecated path style requests) – not the regular Amazon S3, but specifically this profile.
Fill in the fields:
- Server – `s3-nl.hostkey.com`. No `https://` and no slashes.
- Port – 443 (filled in automatically).
- Access Key ID – your access key.
- Secret Access Key – your secret key.
Click Connect. The list of buckets will open.
Working with files
Double-clicking a bucket opens its contents. Files are dragged with the mouse between Cyberduck and File Explorer. For folder synchronization, there's a File >> Synchronize command.
The connection can be saved as a bookmark via Bookmark >> New Bookmark – it will then appear in the list and open with a double-click.
Common errors
- "Connection failed: Operation timed out` – check the Server field; it should be `s3-nl.hostkey.com` with no prefixes or slashes.
- `Failed to parse XML document` – the S3 (Deprecated path style requests) profile isn't enabled, or you selected regular Amazon S3 at connection time instead of it. Go back to the profile setup section above.
Connecting via Rclone
Rclone is a cross-platform command-line utility designed for synchronizing data between different storages. Its capabilities go beyond `aws s3 sync`. It works with dozens of protocols simultaneously, including S3, Google Drive, Dropbox, OneDrive, FTP andSFTP – and that's far from a complete list. It supports on-the-fly encryption, name-based filters and deduplication.
If your main task is to move large volumes of data between different storages or make backups with compression and encryption, Rclone is a better fit than AWS CLI.
Installation
Linux:
Debian/Ubuntu
sudo apt install rcloneFedora
sudo dnf install rcloneArch
sudo pacman -S rclonemacOS, via Homebrew:
brew install rcloneWindows, via winget:
winget install Rclone.RcloneOr manually: download the zip archive from rclone.org, choose Windows AMD64, unpack it and place `rclone.exe` in any folder that's in `PATH`.
For Linux and macOS, there's a universal method via the official install script:
curl https://rclone.org/install.sh | sudo bashThis script doesn't work on Windows; the options there are winget or manual installation.
Verify the installation:
rclone versionConfiguring the connection
Rclone stores connections (it calls them "remotes") in a single configuration file and they can be configured interactively or by hand. The interactive way is easier:
rclone configA wizard launches and walks you through the steps:
- At the prompt `n) New remote`, press `n`.
- name – enter a name for the connection, for example `hostkey`. This name will be used in commands.
- Storage – from the long list, select the number corresponding to Amazon S3 Compliant Storage Providers. At the time of writing, it's number 4, but the order may change – go by the name.
- provider – select Ceph Object Storage. Even though the list has an "Other" item for any S3-compatible service, HOSTKEY runs on Ceph, so it's more correct to choose Ceph specifically.
- env_auth – press Enter to keep the default `false`. This means rclone will use the keys we enter in the next steps rather than looking them up in environment variables.
- access_key_id – your access key.
- secret_access_key – your secret key.
- region – press Enter to leave it empty. HOSTKEY doesn't use regions in the classical sense and an empty value works correctly.
- endpoint – `s3-nl.hostkey.com`. No `https://` – rclone adds the protocol automatically.
- location_constraint – leave empty.
- acl – press Enter to keep the value `private`. This means files will be accessible only to the account owner – a safe default.
- Several questions about advanced settings will follow. The default values are fine for all of them.
- The wizard will show the final configuration and ask `Keep this "hostkey" remote?` – press `y` to confirm. You'll then return to the main menu – press `q` to exit.
If you'd rather write the config by hand, add the following block to `~/.config/rclone/rclone.conf` (Linux/macOS) or `%APPDATA%\rclone\rclone.conf` (Windows):
[hostkey]
type = s3
provider = Ceph
access_key_id = your_access_key
secret_access_key = your_secret_key
region =
endpoint = s3-nl.hostkey.com
acl = private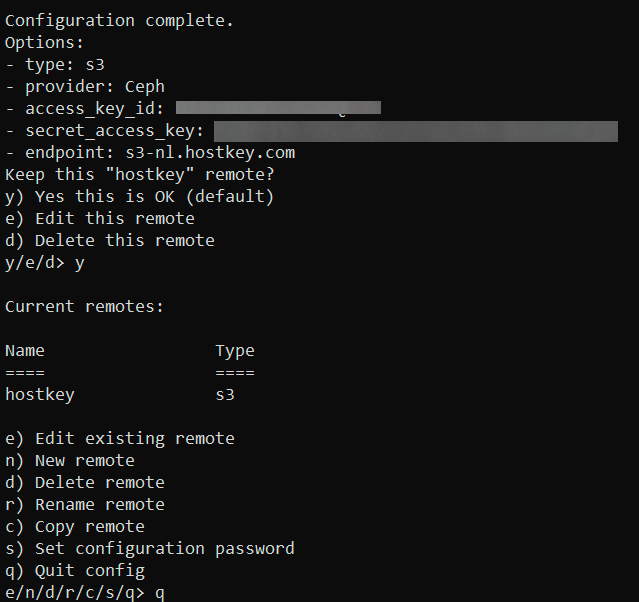
Basic commands
Note the colon after the remote name – `hostkey:`. This is required rclone syntax: without the colon, the utility interprets the name as a local folder rather than a remote. If a path contains spaces, wrap it in quotes.
In rclone syntax, the path to a remote object looks like `remote-name:path`. For example, `hostkey:my-bucket/folder/file.txt`.
List buckets:
rclone lsd hostkey:List bucket contents:
rclone ls hostkey:bucket-nameUpload a file:
rclone copy ./local-file.txt hostkey:bucket-name/Download a file:
rclone copy hostkey:bucket-name/file.txt ./Folder synchronization – what rclone is often installed for in the first place:
rclone sync ./local-folder hostkey:bucket-name/remote-folder/Unlike `aws s3 sync`, `rclone sync` by default deletes files in the destination that don't exist in the source. That's full synchronization behavior; if you don't want anything to be deleted, use `rclone copy` instead. Be especially careful with the direction: `rclone sync hostkey:bucket ./local` will wipe everything from your local folder that isn't in the bucket.
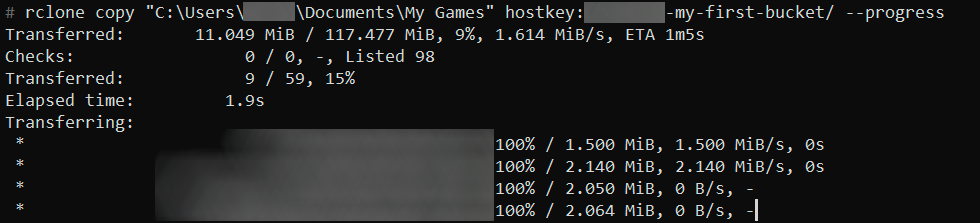
Progress and statistics during transfer:
rclone copy ./folder hostkey:bucket/ --progressOn-the-fly encryption. Rclone can create an encrypted remote on top of a regular one. Files are encrypted before sending and decrypted on download, and in the storage itself, file names look like random strings. It's configured via the same `rclone config` by selecting the `crypt` type. Useful for backing up confidential data.
Connecting via Python with boto3
The boto3 library is developed by Amazon for working with AWS from Python. Like AWS CLI, it works just fine with any S3-compatible storage – you just need to specify the endpoint. For automation in Python scripts, data processing in pipelines, or integration with a web application, this is the right choice.
Installation
pip install boto3If you already installed awscli following the instructions above, boto3 is already present and you don't need to do anything else.
Creating a client
boto3 has two working models. The high-level `resource` is more convenient for typical operations (uploading, downloading files, working with objects), while the low-level `client` gives full control and access to all API parameters. For most tasks, `resource` is enough.
Minimal connection code:
import boto3

s3 = boto3.client(
    's3',
    endpoint_url='https://s3-nl.hostkey.com',
    aws_access_key_id='your_access_key',
    aws_secret_access_key='your_secret_key',
    region_name='nl',
)
Specifying the endpoint is mandatory – without it, boto3 will go to Amazon. The region name is also required; it doesn't really affect work with HOSTKEY, but boto3 checks that it's present.
Storing credentials
Storing keys directly in the source code is a bad idea. Sooner or later, someone commits the file to a public repository and the keys can be compromised very quickly – sometimes within minutes. AWS has a dedicated monitoring system that scans GitHub for leaked keys. The level of automatic response and notifications varies between providers, so sometimes you only learn about the leak from the bill.
There are three reliable ways to keep keys separate from code.
File `~/.aws/credentials` – the same one used by AWS CLI. boto3 can read it automatically. If you've already set up a profile via `aws configure --profile hostkey`, you can just specify the profile name when creating a session:
import boto3

session = boto3.Session(profile_name='hostkey')
s3 = session.client('s3', endpoint_url='https://s3-nl.hostkey.com')
Environment variables – convenient for containers and CI/CD:
exportAWS_ACCESS_KEY_ID=your_access_key
exportAWS_SECRET_ACCESS_KEY=your_secret_key
exportAWS_DEFAULT_REGION=nl
In the code, you then don't need to specify anything beyond the endpoint:
s3 = boto3.client('s3', endpoint_url='https://s3-nl.hostkey.com')For production use, keys are usually kept in secret managers like Vault, AWS Secrets Manager, or Doppler. For personal projects, that's typically overkill.
Basic operations
List buckets:
response = s3.list_buckets()
for bucket in response['Buckets']:
    print(bucket['Name'], bucket['CreationDate'])
List objects in a bucket:
response = s3.list_objects_v2(Bucket='bucket-name')
for obj in response.get('Contents', []):
    print(obj['Key'], obj['Size'])
If there are many objects, `list_objects_v2` returns them in batches of 1000. To iterate through all of them, use a paginator:
paginator = s3.get_paginator('list_objects_v2')
for page in paginator.paginate(Bucket='bucket-name'):
    for obj in page.get('Contents', []):
        print(obj['Key'])
Upload a file:
s3.upload_file('local.txt', 'bucket-name', 'remote.txt')Download a file:
s3.download_file('bucket-name', 'remote.txt', 'local.txt')Upload from memory – without creating a temporary file:
data = b'Hello, S3!'
s3.put_object(Bucket='bucket-name', Key='hello.txt', Body=data)
Read into memory:
response = s3.get_object(Bucket='bucket-name', Key='hello.txt')
data = response['Body'].read()
Delete an object:
s3.delete_object(Bucket='bucket-name', Key='remote.txt')Generating a presigned URL. A very useful feature: you can generate a URL through which a file is accessible for a limited time without exposing your keys:
url = s3.generate_presigned_url(
    'get_object',
    Params={'Bucket': 'bucket-name', 'Key': 'remote.txt'},
    ExpiresIn=3600, # link lifetime in seconds
)
print(url)
You can hand such a link to a user, send it in an email, or post it in a chat. Anyone with the link can download the file, but after an hour it stops working. This is an alternative way to securely publish files without opening up public access to the entire bucket.
Error handling
boto3 raises exceptions of class `botocore.exceptions.ClientError` for most server-side problems. The exception has an error code and a human-readable description:
from botocore.exceptions import ClientError

try:
    s3.head_object(Bucket='bucket-name', Key='non-existent.txt')
except ClientError as e:
    code = e.response['Error']['Code']
    ifcode == '404':
        print('File not found')
    elif code == '403':
        print('Access denied')
    else:
        print('Error:', e)
Typical error codes: `NoSuchBucket`, `NoSuchKey`, `AccessDenied`, `InvalidAccessKeyId`, `SignatureDoesNotMatch`. The last one usually means the secret key was copied incompletely or with extra whitespace.
Connecting via s3cmd
s3cmd is a Python-based utility that has worked with S3 for many years. Its capabilities overlap with AWS CLI, the syntax is sometimes simpler and on some distributions it's installed by default.
Installation
Debian/Ubuntu
sudo apt install s3cmdFedora
sudo dnf install s3cmdmacOS
brew install s3cmdVia pip – anywhere:
pip install s3cmdConfiguration
Run the interactive wizard:
s3cmd --configureIt walks through several steps. Key answers for HOSTKEY:
- Access Key – your access key.
- Secret Key – your secret key.
- Default Region – `nl`.
- S3 Endpoint – `s3-nl.hostkey.com`.
- DNS-style bucket+hostname:port template – `%(bucket)s.s3-nl.hostkey.com`. This is the template for virtual-hosted addressing, which we covered in the first article.
- Encryption password – leave empty if you don't need client-side encryption.
- Use HTTPS protocol – `Yes`.
At the end, the wizard offers to test the connection – press `y`. If everything is in order, the configuration will be written to a file.
After saving the config, locate the `s3cmd.ini` file and open it in a text editor. On Windows it can end up in a non-standard location – you can find the exact path with:
dir /s/b"C:\Users\NAME\s3cmd.ini" Or, alternatively, with `where`:
where /R C:\Users\NAME s3cmd.iniFind the line:
host_bucket = %(bucket)s.s3-nl.hostkey.comAnd replace it with:
host_bucket =Without this, s3cmd will use virtual-hosted addressing and fail with an SSL certificate error when accessing bucket contents.
Basic commands
List buckets:
s3cmd lsList bucket contents:
s3cmd ls s3://bucket-name/Upload a file:
s3cmd put local.txt s3://bucket-name/On Windows, when uploading files, s3cmd prints the warning `Module python-magic is not available`. This is normal and doesn't affect operation. Full python-magic support is available only on Linux and macOS.
Download:
s3cmd get s3://bucket-name/file.txt./local.txtDelete:
s3cmd del s3://bucket-name/file.txtFolder synchronization:
s3cmd sync ./folder/ s3://bucket-name/folder/Create a bucket:
s3cmd mb s3://new-bucketDelete a bucket:
s3cmd rb s3://bucketThe syntax is more compact than AWS CLI's, but the overall feature set is smaller. For a new project, it usually makes more sense to choose AWS CLI between the two. It's actively developed, the documentation is more complete, and it's easier to find ready-made examples. s3cmd has its strengths, especially for those who've worked with it for a long time, but as a starting point with an unfamiliar tool, AWS CLI is the safer bet.
Mounting S3 as a filesystem (s3fs)
s3fs lets you mount an S3 bucket as a regular folder in the filesystem. Once mounted, you can work with the bucket using any tool that works with files: `cp`, `ls`, text editors and graphical file managers all work. At first glance it sounds like an ideal solution, but there are significant caveats.
s3fs works well in several scenarios:
- You need to give a legacy application access to data when it can only work with local files and can't be rewritten.
- Simple backups via `rsync` or `tar`, without dealing with the S3 API.
- Shared storage for rarely changing data – media files, documents, build artifacts.
When it's not suitable
In the first article, we already discussed that S3 doesn't support partial file updates. Any change to an object means a full rewrite. s3fs hides this fact from applications but doesn't change the underlying reality. When an application writes to a file in small pieces (a database, an active log file, frame-by-frame video editing), every change turns into downloading the entire object, editing it andre-uploading it. Performance will be catastrophic.
The same applies to random access. S3 can read byte ranges, but each one is a separate HTTP request. Opening a large file in Excel via s3fs and scrolling through it will be slow, while reading it entirely into memory is reasonably fast.
Operations like `ls` in large folders are slow because they translate into a bucket listing, which itself isn't the fastest operation. On a bucket with a million files, `ls` can take tens of seconds.
Installation and mounting
s3fs works only on Linux and macOS. On Windows, the equivalents are rclone-mount or WinFsp.
Installation on Linux:
Debian/Ubuntu
sudo apt install s3fsFedora
sudo dnf install s3fs-fuseArch
sudo pacman -S s3fs-fuseOn macOS via Homebrew:
brew install gromgit/fuse/s3fs-macSave your credentials in a file with the correct permissions:
echo"your_access_key:your_secret_key" > ~/.passwd-s3fs
chmod 600 ~/.passwd-s3fs
Permissions of 600 (owner-only access) are mandatory – without them, s3fs will refuse to use the file.
Create a mount point and mount the bucket:
mkdir ~/s3-mount
s3fs bucket-name ~/s3-mount \
    -o passwd_file=~/.passwd-s3fs \
    -o url=https://s3-nl.hostkey.com \
    -o use_path_request_style
The `use_path_request_style` parameter is important – without it, s3fs tries to use virtual-hosted addressing, which may not work with non-standard endpoints.
After mounting, you can work with the `~/s3-mount` folder as usual:
ls ~/s3-mount/
cp file.txt ~/s3-mount/
Unmounting:
fusermount -u ~/s3-mount    # Linux
umount ~/s3-mount           # macOS
For permanent mounting at boot, add a line to `/etc/fstab`:
bucket-name /home/user/s3-mount fuse.s3fs _netdev,allow_other,passwd_file=/home/user/.passwd-s3fs,url=https://s3-nl.hostkey.com,use_path_request_style 0 0The `_netdev` parameter tells the system this is a network mount, so it shouldn't try to attach it before the network is up.
Best practices when working with S3
A few rules that save both nerves and money. They don't depend on the provider and apply to any S3-compatible storage.
Less public access. By default, all buckets are private, and that's reasonable. Only what really needs to be public should be opened for reading and at the level of individual objects or prefixes – not the whole bucket. For temporary file publication, presigned URLs with a limited lifetime are a good fit (`generate_presigned_url` in boto3 or Generate Web URL in S3 Browser). They're safer and stop working automatically after the specified time.
Versioning on critical buckets. When an object is overwritten, the old version is preserved and can be restored. This protects against accidental deletion, scripting errors and ransomware. The cost is additional storage space, but for critical data the insurance is worth it. Versioning is enabled by a separate operation at the bucket level.
Lifecycle policies. Cold data like old backups or archive logs can be automatically moved to a cheaper storage class after 30–90 days and deleted after some additional time. On large volumes, the savings are noticeable.
Don't put everything in one prefix. When all objects are named `logs/2025-04-29/...`, you'll start hitting throttling as load grows – all requests land on a single internal index shard. It's better to distribute keys across prefixes so the load is balanced. For example, prepend a hash to the key, or use the date in reverse format so that fresh records don't end up as neighbors.
Monitoring and logging. Most S3-compatible services can write access logs of every request to a separate bucket. On production systems, this information is valuable: you can see who's accessing what, catch anomalies and figure out why the traffic bill suddenly grew.
Backups of important data in another region or with another provider. A single S3 service isn't a panacea. If something happens to the data center, the provider, or the account itself , and there is no separate copy elsewhere, the data will be lost. Cross-region replication and regular synchronization to another storage are considered standard practice for critical data.
No keys in code or in public repositories. This came up in the boto3 section, but it's worth repeating because the case is common. Keys should be kept in files with the correct permissions, in environment variables, or in dedicated secret stores. If a key leaks, revoke it in the control panel immediately and create a new one.