Hiddify is an open-source VPN solution that provides strong traffic encryption using the AES-256 algorithm. All data is transmitted over a secure TLS tunnel. Installing and configuring the application takes minutes, even for novice Ubuntu users.
Deploying Hiddify on your own server gives you additional capabilities for managing security settings and auditing traffic. Among the key benefits of Hiddify are simplicity, speed and reliable protection of user privacy. The service also offers the following features:
- Server location secrecy - the real IP address of the server is masked behind an anonymous .onion domain.
- Traffic encryption - all traffic between the user and the server is encrypted, ensuring communication confidentiality.
- Protection against censorship and blocking - content on the server is shielded from direct blocking by the IP or DNS.
- Increased security - traffic goes through a distributed P2P network, making it difficult to analyze and intercept data.
- Attack Complexity - attacking a server requires compromising the Hiddify network in its entirety.
- Easy deployment - installation is fast, just run a script from a ready-made iso-image.
- Service compatibility - you can run SMTP, HTTP servers, VPNs and other services through Hiddify.
- Scalability - Hiddify makes it easy to add new servers to your overall infrastructure.
Assembly features
Hiddify allows you to deploy a VPN infrastructure based on Ubuntu 20.04 and 22.04. The service is managed from a web interface.
- The generation of SSL certificates for domains is handled by the Hiddify panel itself.
- Installing the Hiddify VPN panel without docker in/opt.
- Installed Software: hiddify/hiddify-config.
- Application path: /opt/hiddify-config.
- After installation, the web interface of the panel is accessible via a unique link from the client area.
Initial settings in the administrator panel
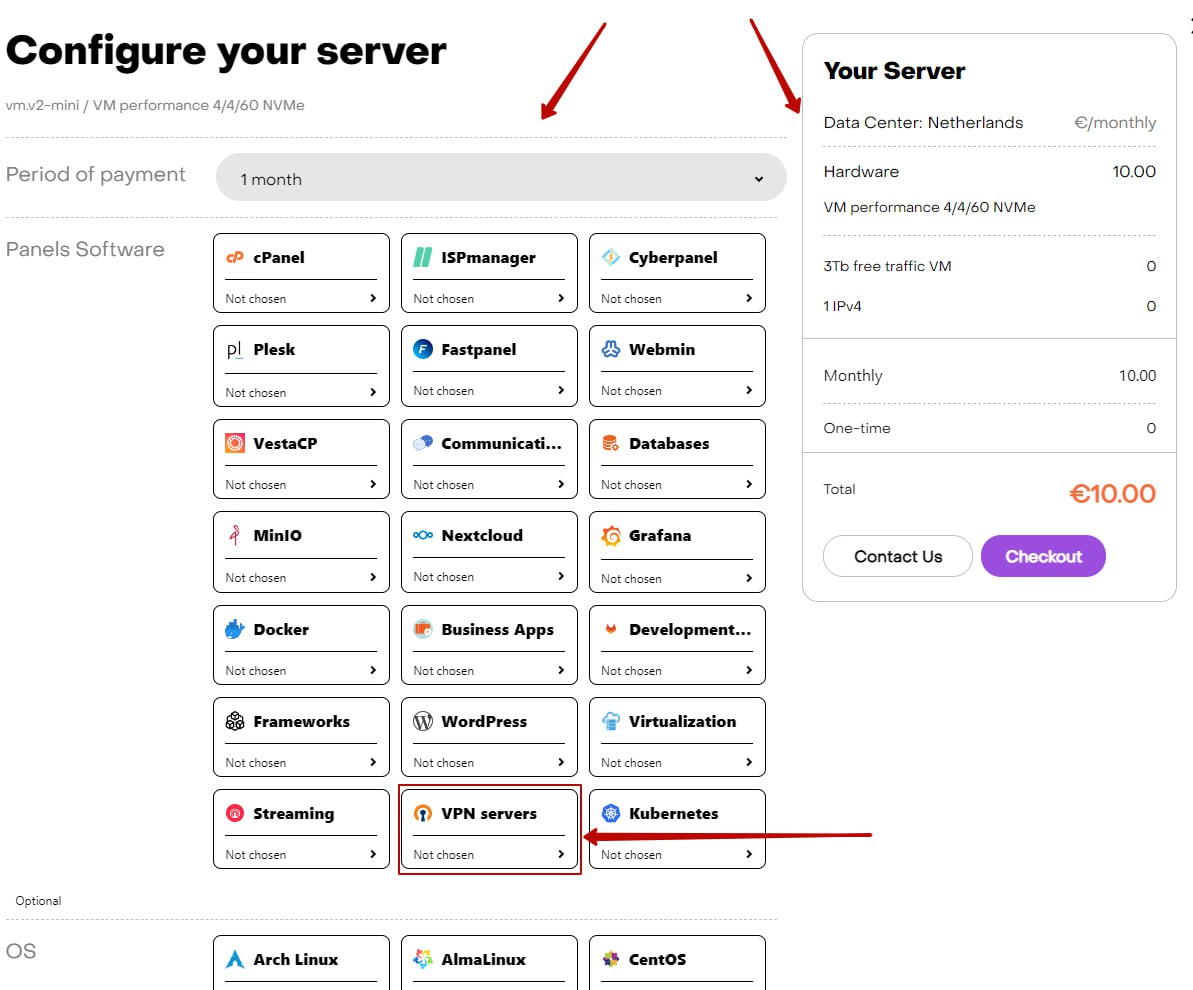
The following will describe the steps required to set up the Hiddify panel on a rented VPS. Detailed instructions on how to place an order on hostkey.com can be found here. When ordering a server, you must select VPN servers:
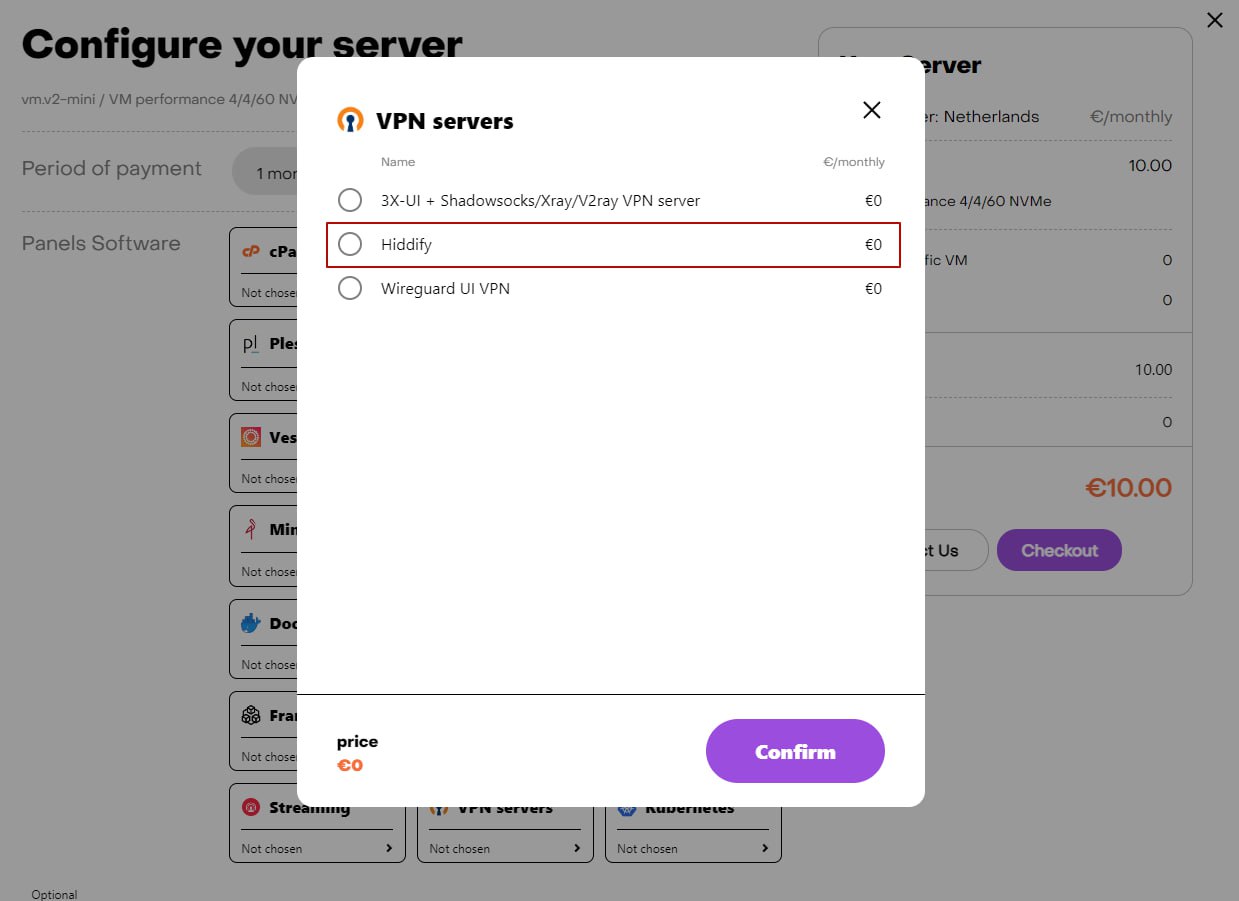
Then there's Hiddify:
In 15-20 minutes a notification about the server’s readiness to work will be sent to the e-mail specified during registration. It will contain the IP of your VPS, as well as the login and password to connect.
Access to the administrator panel is provided by the link specified in the webpanel tag.
After clicking on the link, you need to perform the following actions:
1. Select Others in the countries list.
2. In the Domain field, specify the domain name in the format vpn_ID_server.hostkey.ai, where the server ID is taken from the link to the control panel (for example, vpn48543.hostkey.ai).
3. Click the Submit button.
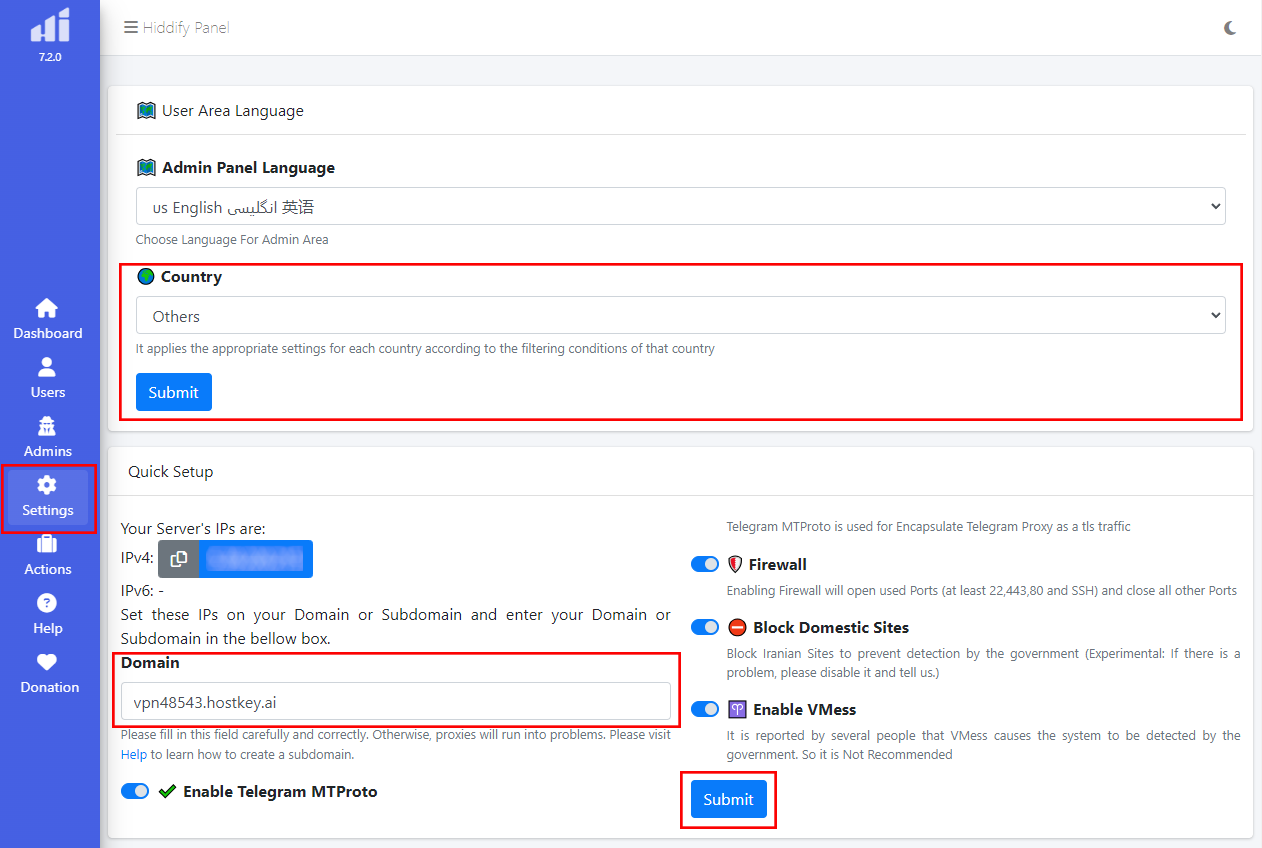
4. Wait for the server configuration process to complete.
After that, the control panel will be bound to your server and domain. Now you can start configuring the VPN server via the web interface.

Adding a new user
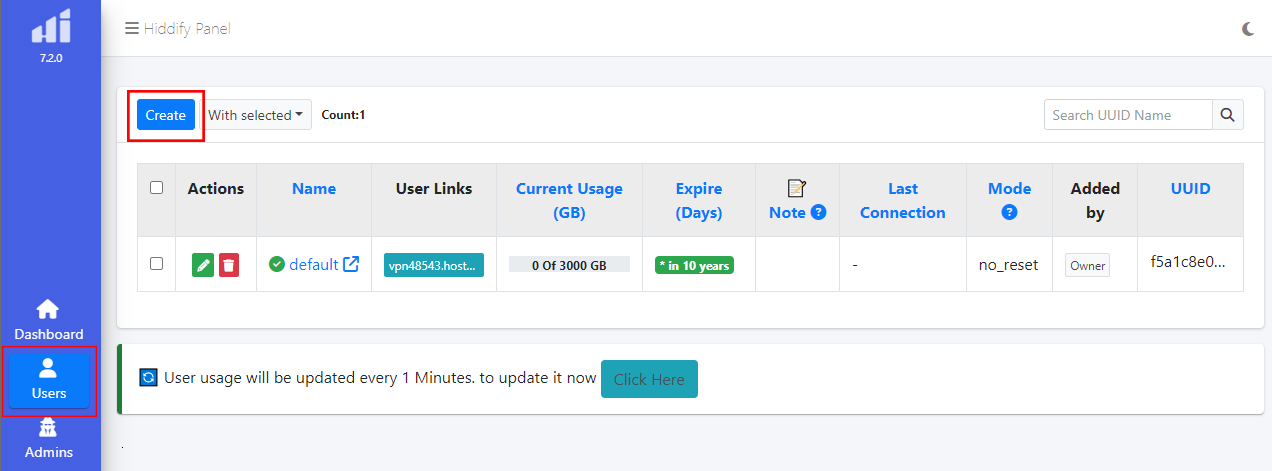
Users are managed in the Users section. To create a new user, go to that section and click the Create button:
Then fill in the data about the new user. The Name line is mandatory:
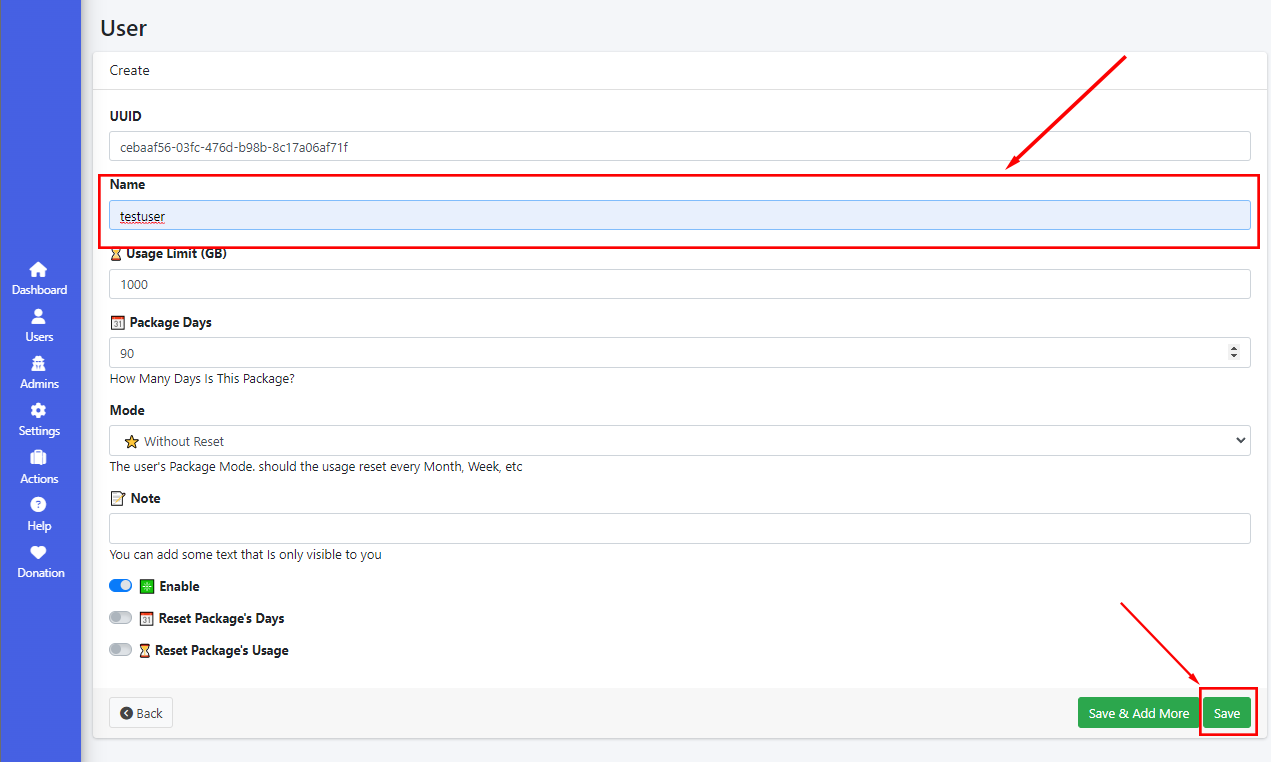
The Usage limit line allows you to set the amount of traffic for the user, and the Package Days line allows you to set the number of days the user can use Hiddify. After entering the user data, click the Save button.
HiddifyN client for PC
Link to the developers' instructions on how to use the HiddifyN client.
HiddifyN is software based on Xray. To use this client, you just need to follow a few simple steps:
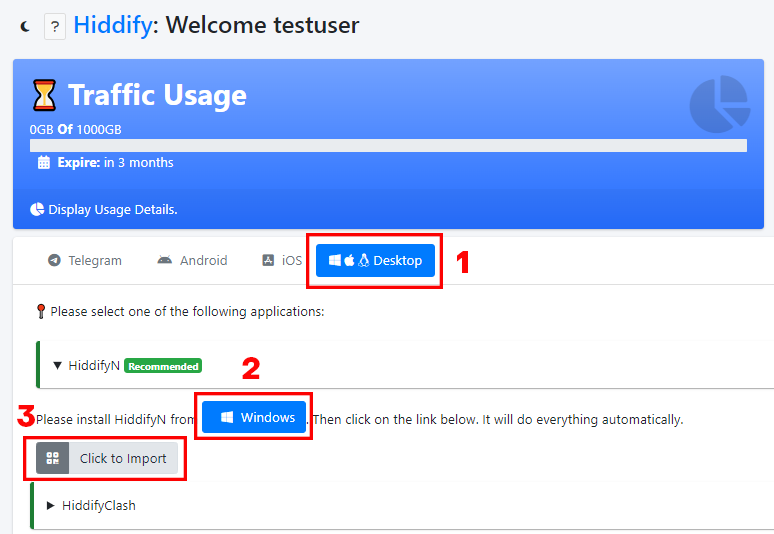
1. Download the program. In the Desktop tab, open the section associated with HiddifyN, then click on the Windows icon:
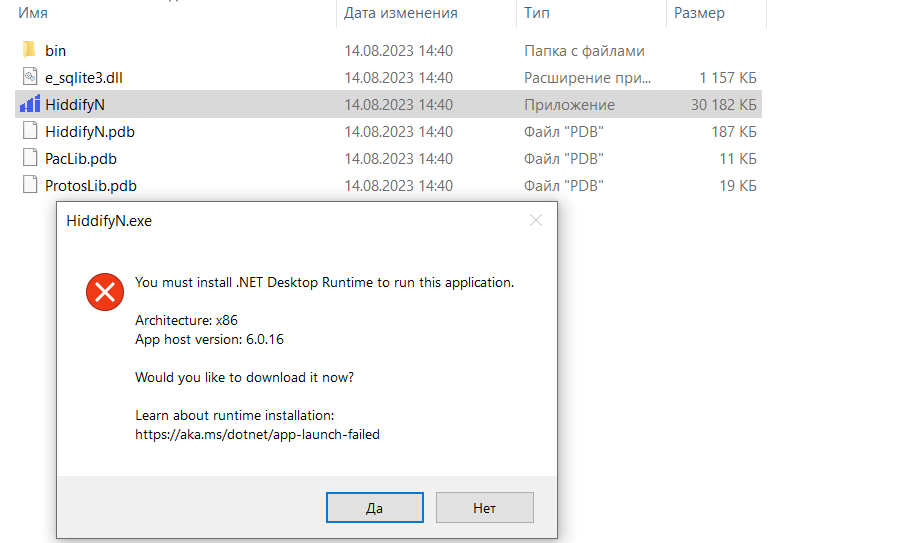
2. Install SDK, and then extract and run the downloaded HiddifyN file in the appropriate folder.
3. Add a new user profile to the application. To do this, click the Click to import button in the control panel. This action will automatically add the connection configuration to the client on the PC.
4. Select the proxy mode.
One of the most important parts of HiddifyN is the proxy modes:
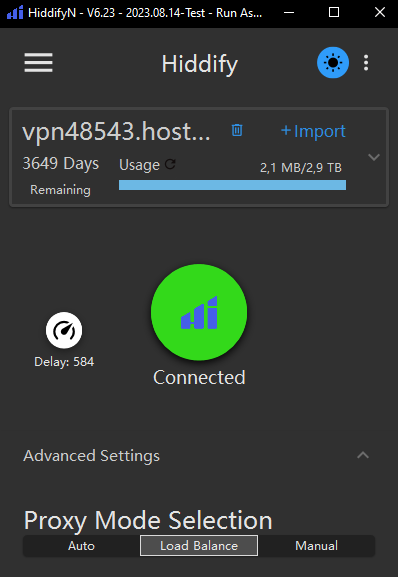
- Auto. Automatically connect to the configuration with the highest speed (lowest ping).
- Load Balance. Simultaneous connection to multiple configurations (traffic is distributed among them). This mode is useful for distributing load to multiple configurations at the same time to achieve an acceptable speed.
- Manual. Used to manually configure your system, allowing for advanced program settings.
5. Connect to VPN - Press the middle round button. The software connects to the configurations based on the selected proxy mode, and the ping associated with the configuration is displayed next to this button:
HiddifyN client for Android mobile devices
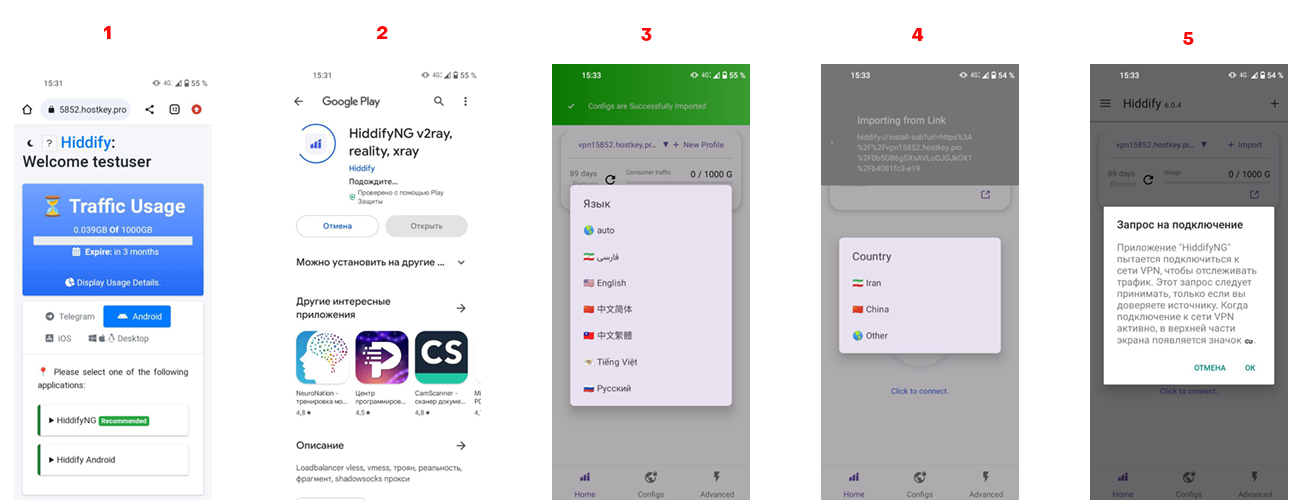
How to connect to Hiddify from Android mobile devices using the HiddifyN client. After following the link from the Hiddify control panel, you can either download the client directly from the link or use Google Play. After installing the app, you need to select your language and country. Then download the link to connect and then Click to connect:
To connect to the HiddifyN client, it is also possible to use a QR code. To do this, click on the "Tile" button (indicated by number 1 in the figure below), then scan the QR code (number 3 in the figure).
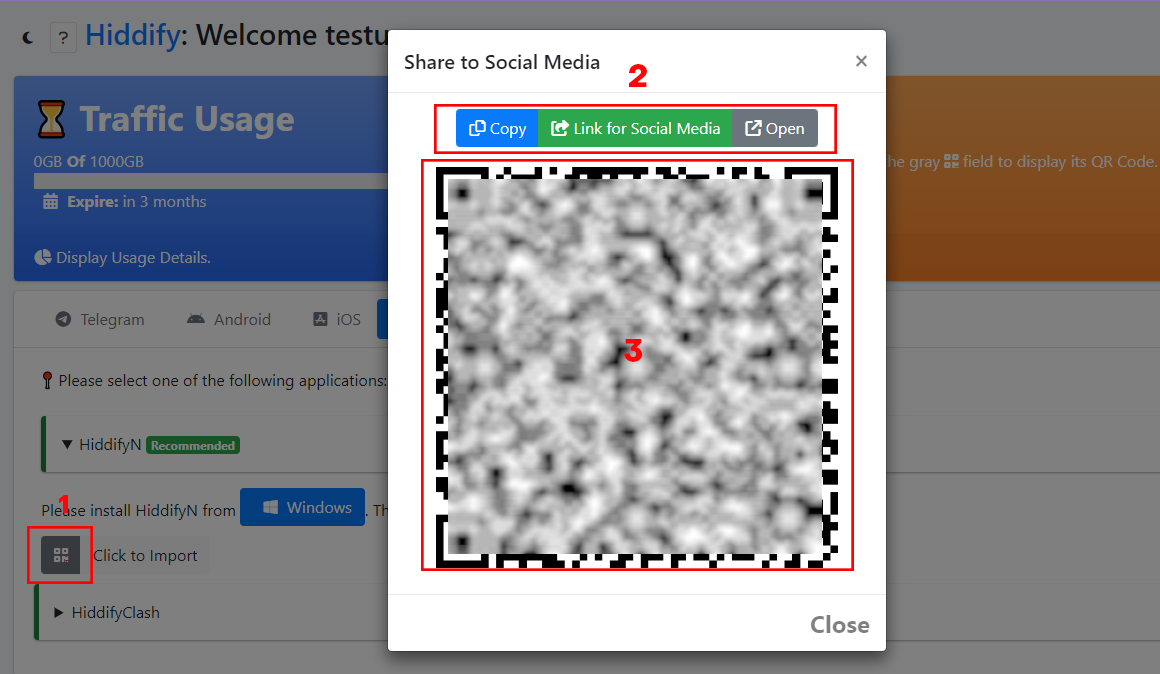
Here you can also copy the link or open it directly on your local device (number 2 in the figure). If you have problems scanning the QR code, you can use the copied link.
Speed testing
Checking the speed of your internet connection when using a VPN is important, as a VPN can reduce speed due to the additional load on the server and traffic encryption processes. To compare the speed before and after connecting to the VPN, we used our standard speed test. We compared the performance when working through Hiddify and two other popular VPN services we've talked about before (here and here): WireGuard and 3X-UI. We purposely did not select devices with very high Internet speeds to demonstrate the impact of a VPN on a typical connection from different operators.
Testing with a PC. Windows OS
| Ping (ms) | Jitter (ms) | Download (Mbps) | Upload (Mbps) | |
| Hiddify | 78.9 | 2.9 | 17.6 | 18.1 |
| WireGuard | 77.9 | 8.42 | 14.1 | 20.4 |
| 3X-UI | 90.7 | 8.28 | 13.4 | 22.9 |
Testing with a phone. Android
| Ping (ms) | Jitter (ms) | Download (Mbps) | Upload (Mbps) | |
| Hiddify | 87.5 | 10.3 | 6.28 | 61.6 |
| WireGuard | 90.2 | 13.4 | 9.0 | 58.4 |
| 3X-UI | 76.6 | 7 | 12.2 | 68.4 |
When choosing a VPN, it is important to pay attention to the connection speed, which determines the ease of working on the Internet. The VPN speed is determined by several key factors. Firstly, the bandwidth of the Internet channel; the higher it is, the faster the VPN will work. However, when using a VPN, speed losses are still inevitable.
Secondly, the remoteness of the VPN server is of great importance - the farther away it is, the higher the latency and lower the speed. The best option is to choose a VPN server as close to your location as possible.
Another factor is the server load caused by other users. The more users there are, the slower the VPN works.
The speed is also affected by the VPN protocol itself. For example, OpenVPN provides good speed, but can be blocked. SSTP, SoftEther protocols often bypass blocking, but their speed is lower.
Conclusion
Hiddify offers several advantages over VPN deployment solutions such as 3x-UI and WireGuard. First, Hiddify is easier and faster to install, and there no need to use Docker. The installation is done directly on the Ubuntu operating system. Hiddify's interface is as user-friendly and intuitive as possible for VPN management. In 3x-UI and WireGuard, the interfaces are more complex.
Hiddify supports a wide range of protocols - OpenVPN, Wireguard, IKEv2, SSH, which allows you to choose the best protocol for your needs. Hiddify is also able to generate SSL certificates automatically. Finally, Hiddify guarantees user privacy by not saving connection logs.

