Preliminary settings and connection to the server
Before starting the replication procedure, you need to apply a number of settings and connect to the first server:
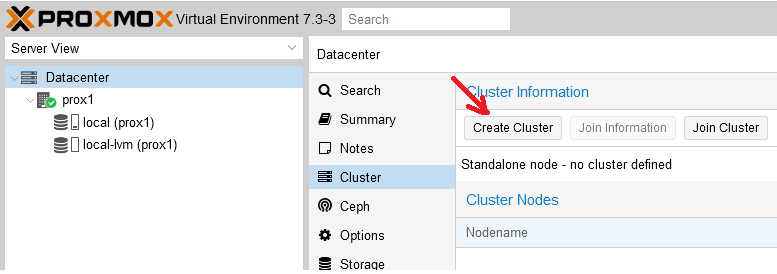
Step 1. In the control panel, go to the “Cluster” section and click the “Create Cluster” button:
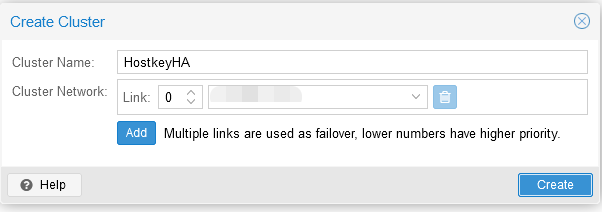
Step 2. Enter the name of the cluster and the network (or list of subnets) for the stable operation of the cluster. Then click on the “Create” button:
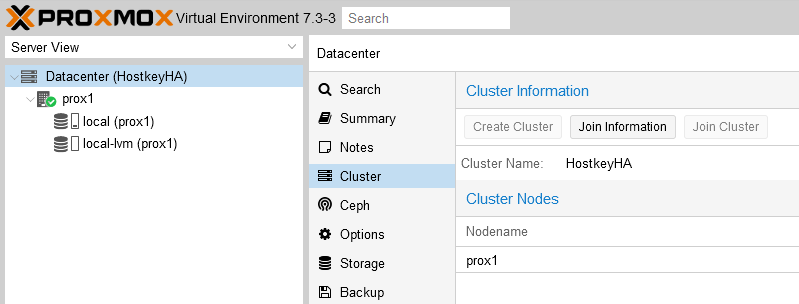
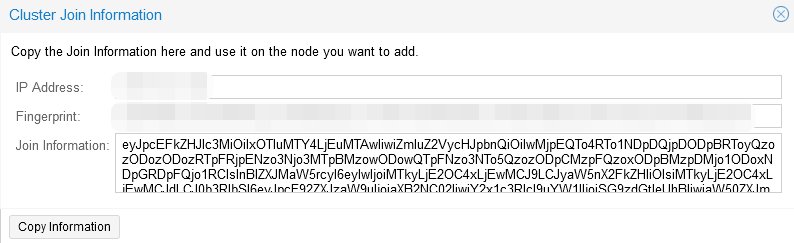
Step 3. In the “Cluster” section, go to the “Join information” tab and copy the information from the “Join information” window, this information is needed to connect the second server to the cluster:
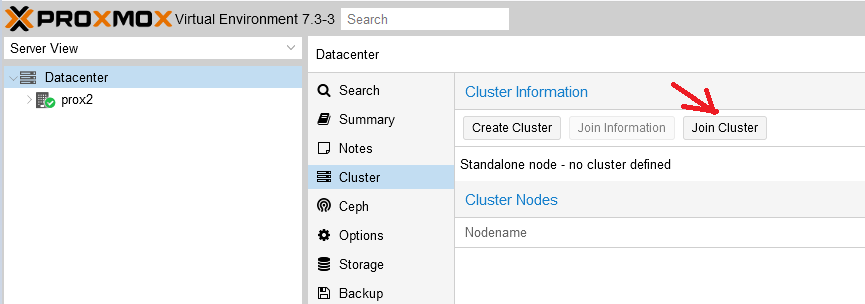
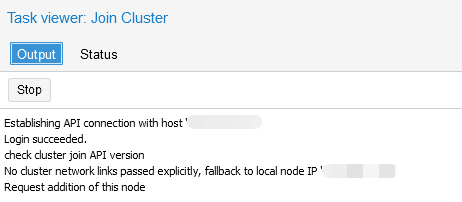
Step 4. On the second server, in the “Cluster” section, go to the “Join Cluster” tab:
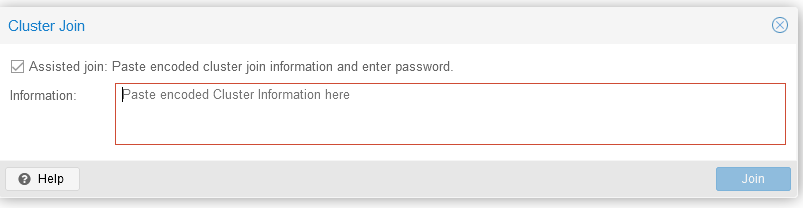
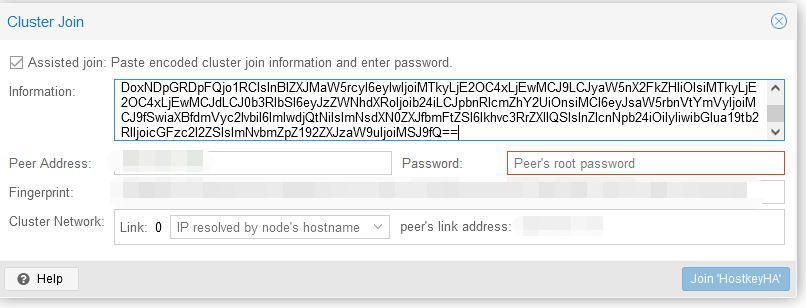
And enter the connection information copied in the previous step:
We first set the password (root) and the IP address of the server we are going to connect to, after which click on the button “Join-cluster name”:
Step 5. Wait for the connection to the cluster:
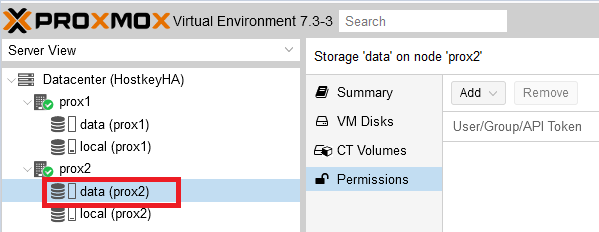
Creating a ZFS partition to set up virtual server replication
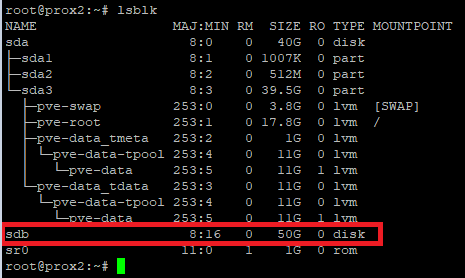
There are two disks installed on our server: the system is installed on the first one, the second one is designed to host virtual servers that will be replicated to a similar physical server. You need to go to the physical server via SSH and enter the lsblk command. The example below shows that we have an unpartitioned disk /sdb. We will use it to host servers and set up our replication:
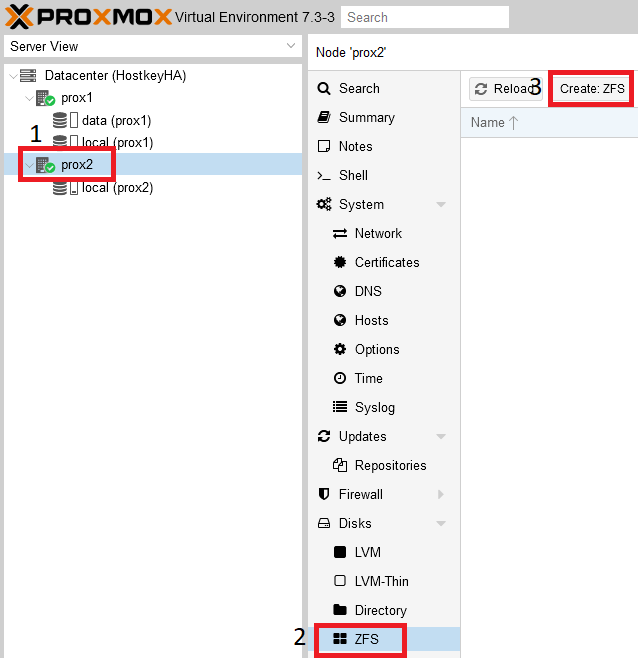
In the main server management window, select a physical server and create a ZFS partition:
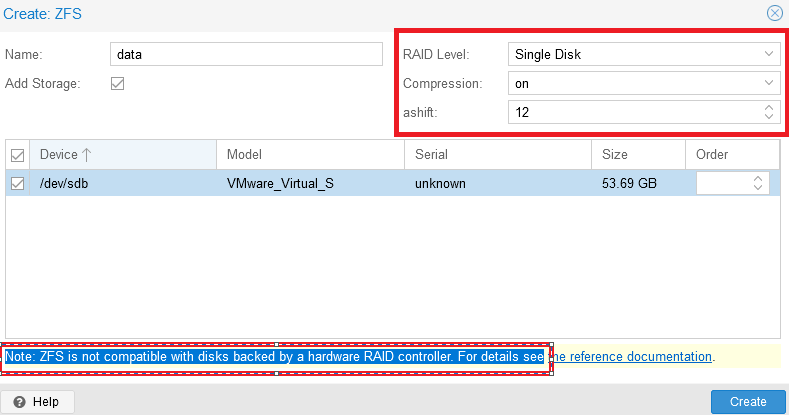
In the newly-opened window you must enter the section name in the “Name” line. The “Create:ZFS” menu is divided into several functional blocks: on the right side, you can configure RAID, and below, select the disks to be combined into a RAID group.
It is important to understand this message: “Note: ZFS is not compatible with disks backed by a hardware RAID controller”. According to this recommendation (a link to the documentation will be displayed on the screen), disks for ZFS should be presented to the system by-passing the hardware RAID controller.
After finishing the setup, you need to complete adding the disk by clicking the “Create” button:
As a result, the disk subsystem is configured on the physical servers:
After completing the above settings, you can proceed to installing the virtual server.
Setting up replication
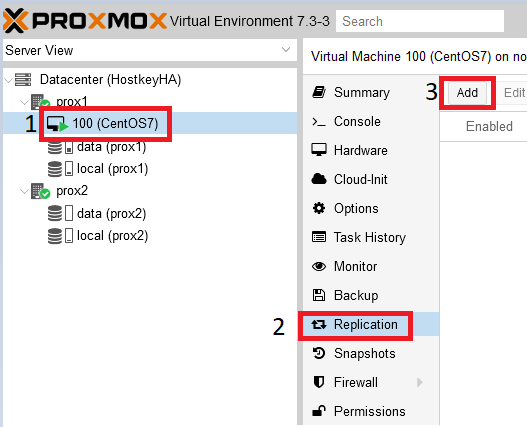
In the main server management window, you need to select the virtual server that you want to put on replication, in our case it is located on the physical server “prox1”, the name of the virtual server is “100 (CentOS 7)”.
Step 1. Go to the “Replication” section and click on the “Add” button:
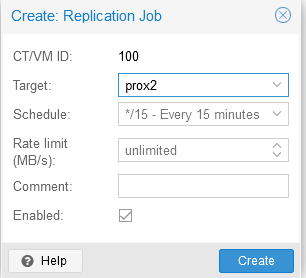
Step 2. In the window that opens, specify the physical server to which replication will be performed, as well as the replication:
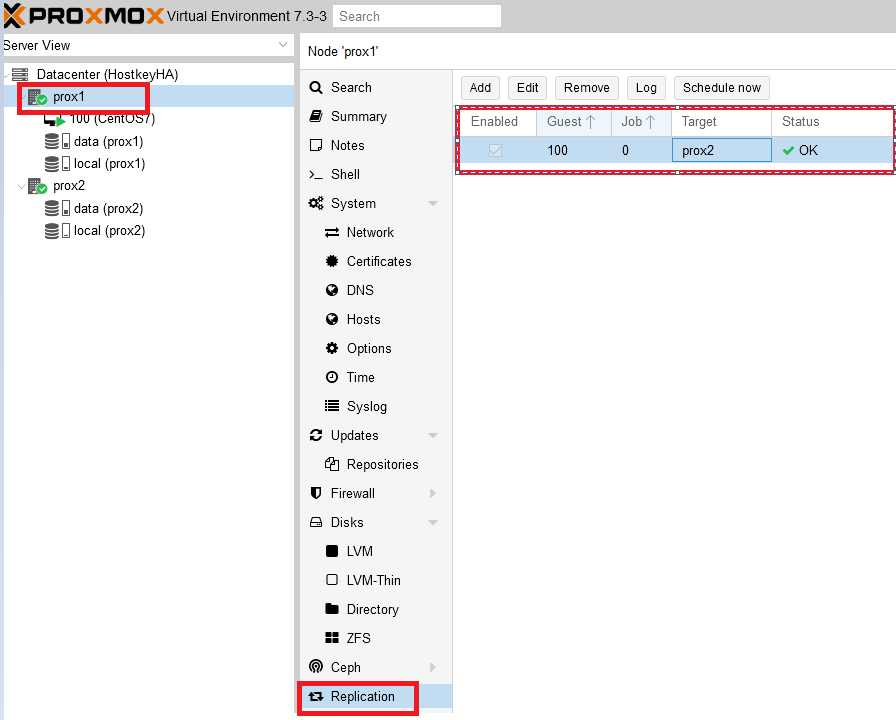
A successful replication setup means it can be seen by selecting the desired physical server and clicking on the “Replication” button. On the right side, you will see the servers set for replication, the replication time, and their current status.
Replication operation
Setting up a cluster and replication from two servers without a shared disk is good only if there are no failures, and at the time of the planned work, you can simply switch to the virtual server by right-clicking on its name and selecting “Migrate”. In case of a failure of one of the physical servers, when there are only two of them, the switchover will not occur. You will have to restore the virtual server manually. Therefore, below we have given an example of a more stable and reliable solution in the form of a cluster of three servers. To add a third server, follow the steps for adding a physical server to the cluster.
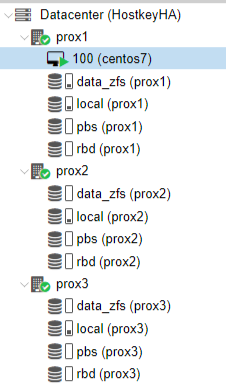
Disc information:
- data_zfs - a zfs section has been created on each server to configure the replication of virtual servers;
- local - the system is installed;
- pbs - Proxmox Backup Server;
- rbd - Ceph distributed file system.
Network setup information:
- Public network - designed to manage Proxmox servers, also required for the operation of virtual servers;
- Cluster Network -serves to synchronize data between servers, as well as the migration of virtual servers in the event of a physical server failure (the network interface must be at least 10Gbits).
Sample setup in a test environment:

After building a cluster of three servers, you can configure replication to 2 servers. Thus, three physical servers will participate in the migration. In our case, replication is configured for the prox2, prox3 servers:
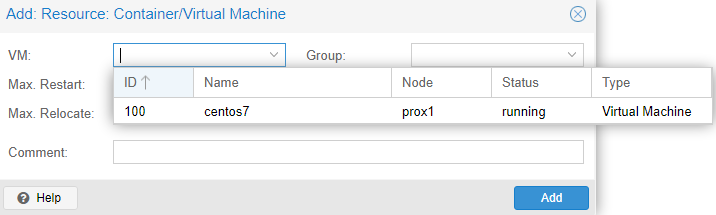
To enable the “HA” mode (High Availability, virtual server migration) on virtual servers, you need to click on “Datacenter”, select the “HA” item on the right side and click on the “Add” button:

In the newly opened window in the "VM" drop-down list, select all the servers on which you want to enable "HA" and click on the "Add" button:
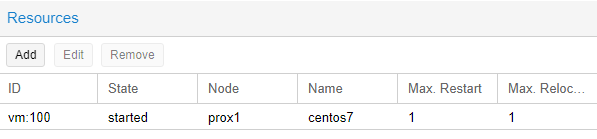
An example of a successful addition:
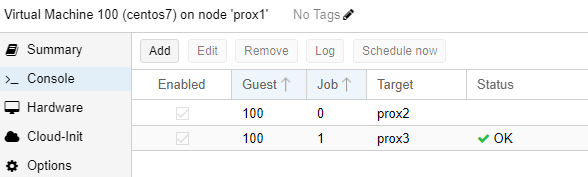
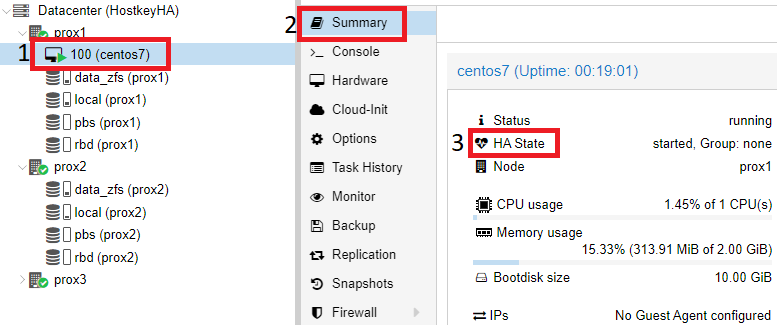
We can also check that the “HA” mode is enabled on the virtual server itself, for this you need to click on the desired virtual server (in our case, CentOS7) and select the “Summary” section on the right side.
In our example, the “HA” mode is up and running, you can disable the first server and check the VM migration to one of the available physical servers:
Checking the operation of HA in case of server failure
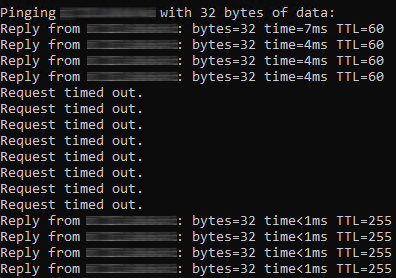
After the virtual server replication is correctly configured, we can test the operation of the cluster. In our case, we disabled all network ports on the physical server prox1. After some time (4 minutes in our case), the CentOS 7 virtual server switches over and can be accessed over the network.
An example of checking the result of the switching over and the server availability:
As a result of this step, a cluster of three servers was configured, the internal disks with ZFS and the “HA” option on the virtual server.
Switching a virtual server from one physical server to another
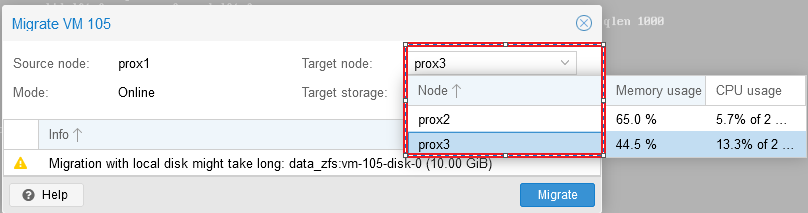
To switch a virtual server from one physical server to another, select the target server and right-click on it. In the menu that opens, select the “Migrate” item:
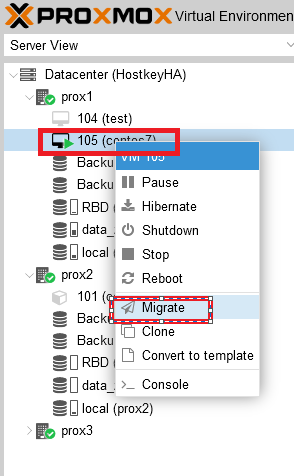
After clicking on the “Migrate” button, a window will open in which you can select the server to which we plan to migrate our virtual server, select the server and click “Migrate”:
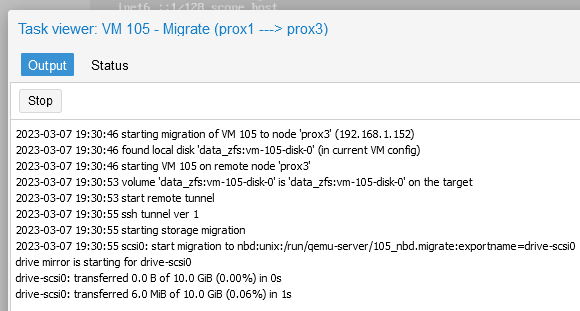
The status of the migration can be tracked in the “Task” window:
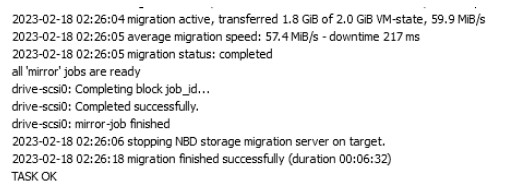
After the migration is successfully completed, the message “TASK OK” will be displayed in the “Task” window:
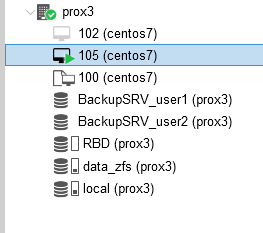
We will also see that our virtual server has been moved to the prox3 server:
Testing the operation of Ceph
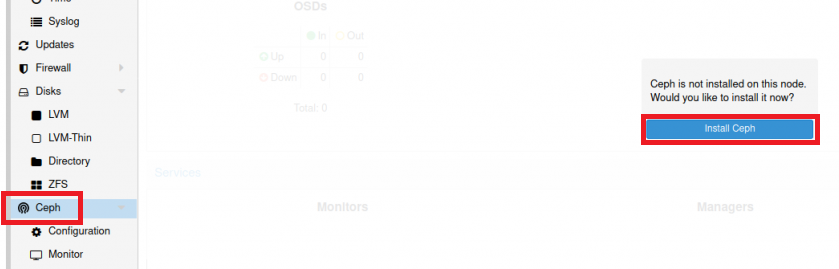
It is very easy to find a lot of materials on installing Ceph on Proxmox on the Internet, so we will briefly describe only the installation steps. To install Ceph, you need to select one of the physical servers, select the “Ceph” section and click on the “Install Ceph” button:
The Ceph version is listed by default. You must click the “Start nautilus installation” button. After installation, the system will ask you to specify the network settings. In our case, the configuration was carried out from the first server and its IP addresses are indicated as an example:
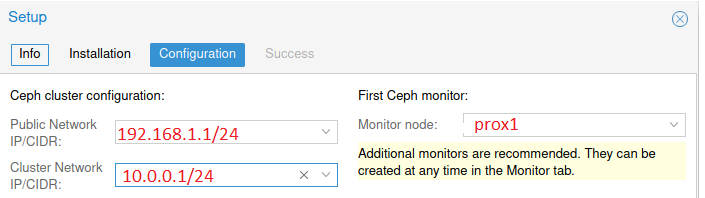
Click the “Next” and “Finish” buttons to complete the installation. The configuration is performed only on the first server, and it will be transferred to the other two servers automatically by the system.
Then you need to configure:
- Monitor - the role of the coordinator, the exchange of information between servers, it is desirable to create an odd number to avoid a split-brain situation. Monitors work in a quorum: if more than half of the monitors fail, the cluster will be blocked to prevent data inconsistency;
- OSD - is a storage unit (usually a disk) that stores data and processes client requests by exchanging data with other OSDs. Typically, each OSD has a separate OSD daemon that can run on any machine that has that disk installed;
- Pool - is a pool that unites OSDs. It will be used to store the virtual disks of the servers.
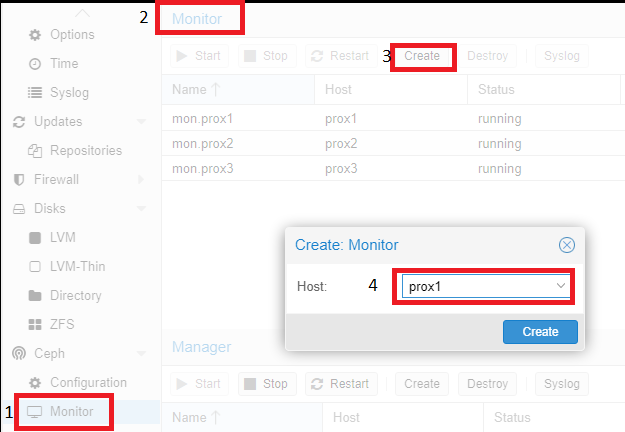
Then you need to add the servers playing the “Monitor” and “Manager” roles. To do this, click on the name of the physical server, go to the “Monitor” section, click on the “Create” item, and select the servers united in the cluster. Then, add them one by one:
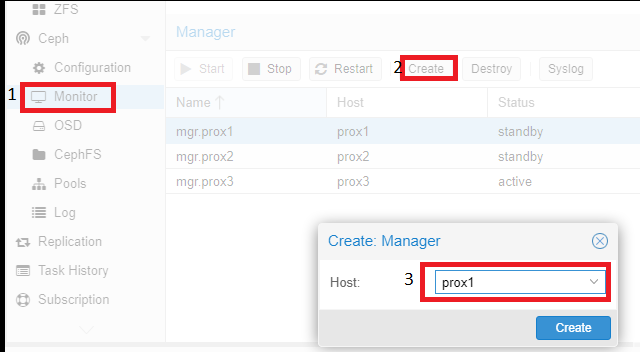
Similar actions must be performed with servers playing the “Manager” role. For the cluster to work correctly, you need more than one server playing this role.
Adding OSD disks is similar:
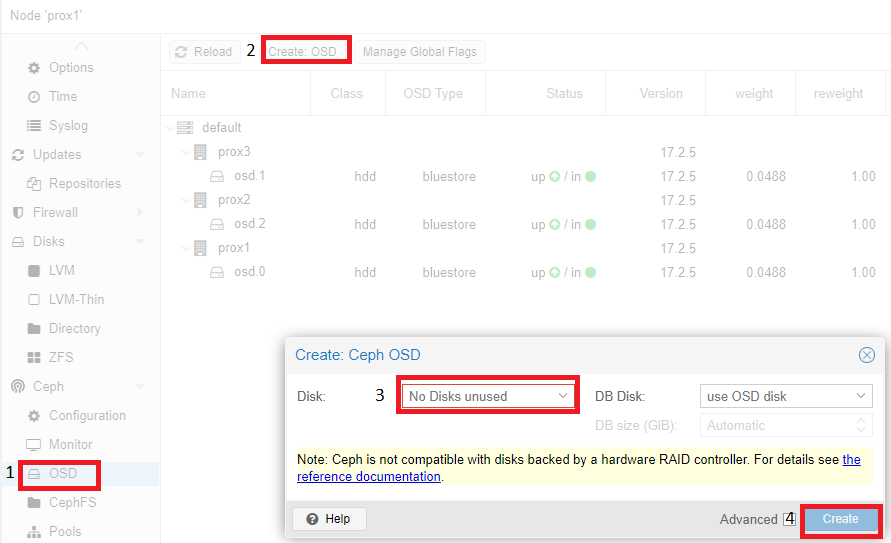
According to the recommendation (a link to the documentation will be displayed on the screen), disks should be presented to the system by-passing the hardware RAID controller. Using a hardware RAID controller can negatively affect the stability and performance of the Ceph implementation.
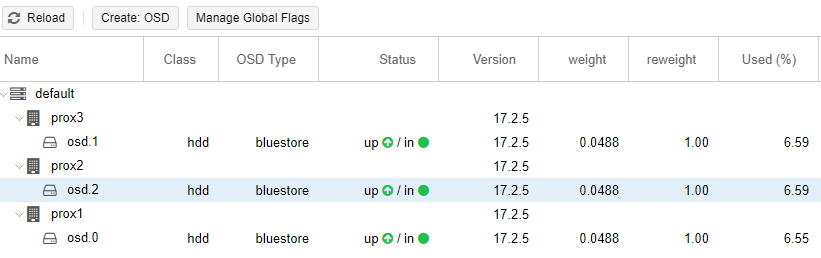
An example of a configured Ceph (on all three servers, the disk is /dev/sdc):
The last step in configuring Ceph is to create a pool, which will later be specified when creating virtual servers. To do this, click on the name of the physical server, go to the “Pools” section and apply the following settings:
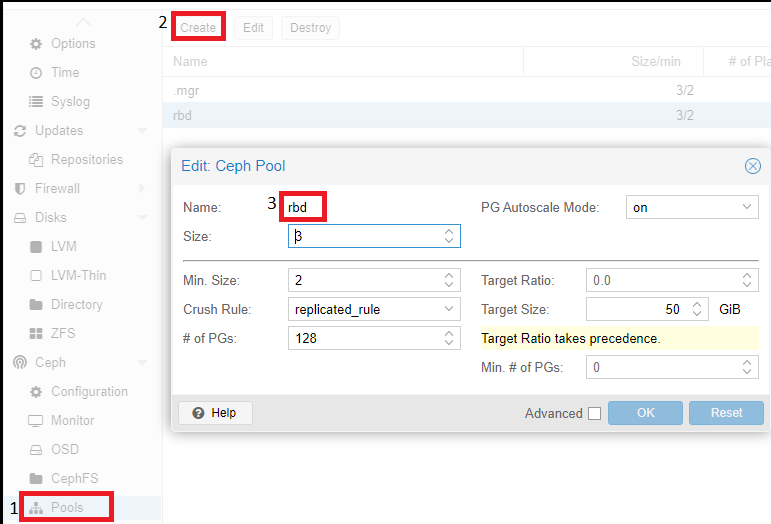
Description of the values ??of the parameters used:
If size=3 and min_size=2, then everything will be fine as long as two of the three OSD placement groups work. If only one OSD remains, the cluster will freeze the operations of this group until at least one more OSD comes online.
If size=min_size, then the placement group will be blocked when any OSD included in it crashes. Due to the high level of “smeared” data, most crashes of at least one OSD will end in freezing the entire, or almost the entire, cluster. Therefore, the "Size" parameter must always be at least one point greater than the "Min_Size" parameter.
If Size=1, the cluster will work, but the failure of any OSD will mean permanent data loss. Ceph allows you to set this parameter to one, but even if the administrator does this for a specific purpose and for a short time, he should assume personal responsibility for any potential problems.
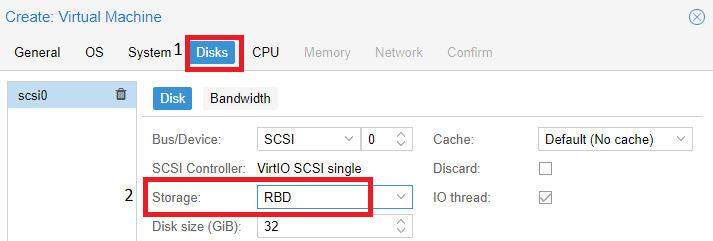
The Pool (rbd) we created above is used when creating the virtual machine. In the “Disks” section, it will contain our virtual server disks:
Conclusion
Our instructions allow you to set up Proxmox replication while avoiding any unnecessary problems. The proposed method is based both on the Proxmox documentation and on our experience with this virtualization system. Proxmox replication provides an opportunity to provide higher data security as it allows you to back up data on another server. Thus, you can be sure that the data will always be available and protected. We would also like to draw your attention to the fact that at the time of testing, a cluster that included three servers showed reliable and stable operation. In the case of the implementation of a cluster of two servers and local disks, the cluster did not work correctly and automatic switching did not occur in the event of a failure of one of the servers. We set up Ceph as a test case and did not actually use it in the production environment.