
Author: Author - Sultan Usmanov, DevOps specialist from Hostkey
Today, most companies widely use virtualization in their infrastructure, which allows them to host various company services and efficiently use the resources of physical servers. In this regard, we decided to implement VMware ESXi virtualization. When choosing the installation method, we considered two options: Legacy and UEFI.
To realize the deployment, we used Foreman —is an open source tool designed to manage the complete lifecycle of systems. It provides the ability to configure and monitor physical and virtual servers.
Legacy installation mode
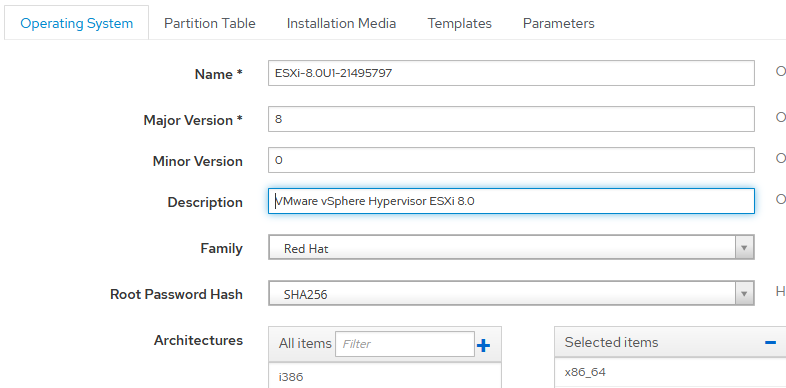
Let's look at the installation using the hypervisor VMware ESXi 8.0 as an example. An operating system was created:
The templates are then attached:
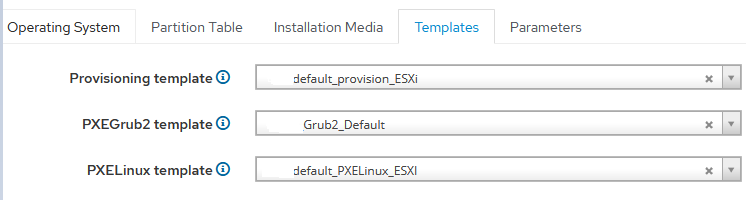
Description by templates
The template is default_provision_ESXi. Based on the example with of Foreman's official website (Create the Kickstart Template section) and modified for our deploys:
<%#
kind: provision
name: default_provision_ESXi
model: ProvisioningTemplate
oses:
- ESXi
-%>
#Accept VMware License agreement
accepteula
# Set the root password
rootpw <%= host_param('password')%>
# Install ESXi on the first disk (Local first, then remote then USB)
install --firstdisk=local --overwritevmfs --ignoreprereqwarnings --ignoreprereqerrors --forceunsupportedinstall
# Set the keyboard
#keyboard French
#vmserialnum --esx=PUT IN YOUR LICENSE KEY
# Set the network
network --bootproto=dhcp
# reboot the host after installation is completed
reboot
%pre --interpreter=busybox
#esxcli network firewall set --enabled false
# run the following command only on the firstboot
%firstboot --interpreter=busybox
sleep 10
# enable & start remote ESXi Shell (SSH)
vim-cmd hostsvc/enable_ssh
vim-cmd hostsvc/start_ssh
# enable & start ESXi Shell (TSM)
vim-cmd hostsvc/enable_esx_shell
vim-cmd hostsvc/start_esx_shell
# supress ESXi Shell shell warning — Thanks to Duncan (http://www.yellow-bricks.com/2011/07/21/esxi-5-suppressing-the-localremote-shell-warning/)
esxcli network firewall set --enabled false
esxcli system settings advanced set -o /UserVars/SuppressShellWarning -i 1
#FQDN="${HostName}.${SuffixDNS}"
# set static IP + default route + DNS
sleep 10
esxcli network ip interface ipv4 set --interface-name=vmk0 --type=static --ipv4=<%= host_param('ip')%> --netmask=<%= host_param('netmask')%>
esxcli network ip route ipv4 add --gateway <%= host_param('gateway')%> --network 0.0.0.0/0
esxcli network ip dns server add --server <%= @host.subnet.dns_primary %>
# Set VLAN ID
#esxcli network vswitch standard portgroup set --portgroup-name "Management Network" --vlan-id 50
#Disable ipv6
esxcli network ip set --ipv6-enabled=0
# set suffix and FQDN host configuration
esxcli system hostname set --fqdn=<%= @host.name %>
esxcli network ip dns search add --domain=<%= @host.name %>}
#user creation
esxcli system account add -i user -p <%= host_param('password')%> -c <%= host_param('password')%>
esxcli system permission set --id user -r Admin
# NTP Configuration (thanks to http://www.virtuallyghetto.com)
cat > /etc/ntp.conf << __NTP_CONFIG__
restrict default kod nomodify notrap noquerynopeer
restrict 127.0.0.1
server <%= host_param('ntp_server1')%>
server <%= host_param('ntp_server2')%>
__NTP_CONFIG__
/sbin/chkconfig ntpd on
# rename local datastore to something more meaningful
vim-cmd hostsvc/datastore/rename datastore1 "Local — $(hostname -s)"
esxcli network firewall set --enabled true
# restart a last time
reboot
This template does the following:
- Specifies the password for the root user.
- Installs the system on the first local disk, ignores errors.
- Sets network settings.
- Specifies the name of the server.
- Adds an additional user with root privileges and password.
- Configures time servers.
- Changes the name of the repository.
- Configures the firewall.
Template— default_PXELinux_ESXi. Based on an example with of Foreman's official website (Section Create provisioning templates) and tweaked for our deployment:
TIMEOUT 10
DEFAULT default_PXELinux_ESXI

LABEL default_PXELinux_ESXI
		KERNEL boot/esxi/8.0/mboot.c32
		APPEND -c boot/esxi/8.0/boot2.cfg ks=http://address of the server from which we get the file with autosettings/unattended/provision
	IPAPPEND 2
Template Content:
- template name;
- bootloader location;
- the location of the configuration file.
When considering installing the Legacy operating system image, we placed it under the path /var/lib/tftpboot/tftpboot/boot/esxi/8.0. Before we can transfer the unpacked system image to our Foreman, we need to extract the contents from the ISO image. It is also important to rename all files and folders to lowercase, as the installer may not detect files if their names contain capital letters. Special attention should be paid to the boot.cfg configuration file, which should be formatted as follows to ensure correct operation:
bootstate=0
title=Loading ESXi installer
timeout=5
prefix=
kernel=./b.b00
kernelopt=runweasel cdromBoot  allowLegacyCPU=true
modules=./jumpstrt.gz --- ./useropts.gz --- ./features.gz --- ./k.b00 --- ./uc_intel.b00 --- ./uc_amd.b00 --- ./uc_hygon.b00 --- ./procfs.b00 --- ./vmx.v00 --- ./vim.v00 --- ./tpm.v00 --- ./sb.v00 --- ./s.v00 --- ./atlantic.v00 --- ./bcm_mpi3.v00 --- ./bnxtnet.v00 --- ./bnxtroce.v00 --- ./brcmfcoe.v00 --- ./cndi_igc.v00 --- ./dwi2c.v00 --- ./elxiscsi.v00 --- ./elxnet.v00 --- ./i40en.v00 --- ./iavmd.v00 --- ./icen.v00 --- ./igbn.v00 --- ./intelgpi.v00 --- ./ionic_en.v00 --- ./irdman.v00 --- ./iser.v00 --- ./ixgben.v00 --- ./lpfc.v00 --- ./lpnic.v00 --- ./lsi_mr3.v00 --- ./lsi_msgp.v00 --- ./lsi_msgp.v01 --- ./lsi_msgp.v02 --- ./mtip32xx.v00 --- ./ne1000.v00 --- ./nenic.v00 --- ./nfnic.v00 --- ./nhpsa.v00 --- ./nmlx5_co.v00 --- ./nmlx5_rd.v00 --- ./ntg3.v00 --- ./nvme_pci.v00 --- ./nvmerdma.v00 --- ./nvmetcp.v00 --- ./nvmxnet3.v00 --- ./nvmxnet3.v01 --- ./pvscsi.v00 --- ./qcnic.v00 --- ./qedentv.v00 --- ./qedrntv.v00 --- ./qfle3.v00 --- ./qfle3f.v00 --- ./qfle3i.v00 --- ./qflge.v00 --- ./rdmahl.v00 --- ./rste.v00 --- ./sfvmk.v00 --- ./smartpqi.v00 --- ./vmkata.v00 --- ./vmksdhci.v00 --- ./vmkusb.v00 --- ./vmw_ahci.v00 --- ./bmcal.v00 --- ./clusters.v00 --- ./crx.v00 --- ./elx_esx_.v00 --- ./btldr.v00 --- ./esx_dvfi.v00 --- ./esx_ui.v00 --- ./esxupdt.v00 --- ./tpmesxup.v00 --- ./weaselin.v00 --- ./esxio_co.v00 --- ./loadesx.v00 --- ./lsuv2_hp.v00 --- ./lsuv2_in.v00 --- ./lsuv2_ls.v00 --- ./lsuv2_nv.v00 --- ./lsuv2_oe.v00 --- ./lsuv2_oe.v01 --- ./lsuv2_sm.v00 --- ./native_m.v00 --- ./qlnative.v00 --- ./trx.v00 --- ./vdfs.v00 --- ./vds_vsip.v00 --- ./vmware_e.v00 --- ./vsan.v00 --- ./vsanheal.v00 --- ./vsanmgmt.v00 --- ./tools.t00 --- ./xorg.v00 --- ./gc.v00 --- ./imgdb.tgz --- ./basemisc.tgz --- ./resvibs.tgz --- ./esxiodpt.tgz --- ./imgpayld.tgz
build=8.0.1-0.0.21495797
updated=0
The process of adding and configuring an operating system is also described at the Foreman website in the ESXi installation in Legacy BIOS mode section. Despite the developers' recommendations, we have not corrected the bootloader or created a separate installation option. The configuration file is /usr/share/foreman/app/models/concerns/pxe_loader_support.rb.
def all_loaders_map(precision = 'x64')
{
"None" => "",
"PXELinux BIOS" => "pxelinux.0",
"PXELinux UEFI" => "pxelinux.efi",
"PXELinux Alt BIOS" => "syslinux386/pxelinux.0", # Add this line
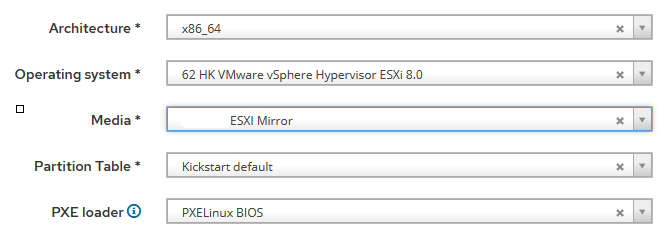
...In our project we used a universal boot loader, which is compatible with all operating systems. However, we specified RedHat in the Family section when creating the operating system. Thanks to this solution we did not need to make any changes or modifications:
The contents of the file in Legacy: /var/lib/tftpboot/pxelinux.cfg/ MAC-address:
TIMEOUT 10
DEFAULT default_PXELinux_ESXI
LABEL default_PXELinux_ESXI
KERNEL boot/esxi/8.0/mboot.c32
APPEND -c boot/esxi/8.0/boot2.cfg ks=http://address of the server from which we get the file with autosettings/unattended/provision
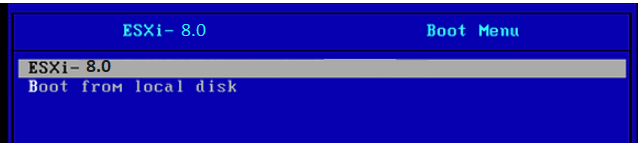
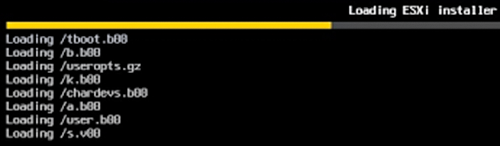
IPAPPEND 2After the server reboots, the installation process begins:
The system then accesses the server hosting the kickstart file (ks=http://server’s address/unattended/provision).This file contains the auto settings specified in the APPEND section of the default_PXELinux_ESXI file.
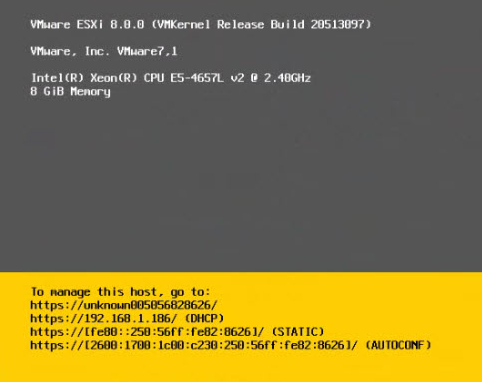
If the hardware is supported by the ESXi hypervisor, the operating system will be installed without errors and a reboot will occur. The result is a fully customized operating system with the two users we specified in the template default_provision_ESXi:

Installing in UEFI mode
VMware ESXi operating system is created once and can be used to install in either Legacy or UEFI mode. In the previously presented screenshots we indicated the use of Grub2_Default template, but did not provide a description on it. It is used to check and boot the system in UEFI mode. Foreman checks the operating system name: if it contains the ESXi name, the necessary parameters are passed as variables and the LiveCD is booted.
After the LiveCD is loaded, a script containing the following checks is executed:
- Disk Type.
- Search for the disk with the smallest size, but at least 20 GB.
- Check if there is a logical volume or volume group on the disk. If such settings are present, they are deleted to clean up the disk.
After preparing the disk, the system creates a partition to host the UEFI bootloader. Below is a part of the script:
    parted -s /dev/${INST_DRIVE} mklabel gpt mkpart fat32 1MiB 1GiB set 1 esp on
	EFI_PART=$(lsblk -l | grep "${INST_DRIVE}" | grep part | awk '{print $1}')
	mkdir -p /mnt/{iso,efipart,wim}
	wget ${medium_uri}/${branch}/esxi${os_version}pe.iso
	mount -o loop esxi${os_version}pe.iso /mnt/iso
	mkfs.fat -F32 /dev/$EFI_PART
	mount /dev/$EFI_PART /mnt/efipart
	mkdir -p /mnt/efipart/EFI/redhat/
	mkdir -p /mnt/efipart/kickstart
	rsync -r /mnt/iso/ /mnt/efipart/

	cp /mnt/efipart/EFI/BOOT/BOOTX64.EFI /mnt/efipart/EFI/redhat/grubx64.efi
	cp /mnt/efipart/EFI/BOOT/CRYPTO64.EFI /mnt/efipart/EFI/redhat/crypto64.efi
	cp /mnt/efipart/EFI/BOOT/SAFEBOOT.EFI /mnt/efipart/EFI/redhat/safeboot.efi
	cp /mnt/efipart/boot.cfg /mnt/efipart/EFI/redhat/boot.cfg

	curl -s "http://${foreman_fqdn}/unattended/provision?token=${foreman_token}" >> /mnt/efipart/kickstart/ks.cfg
	tar -czf /mnt/efipart/kickstart.gz --directory=/mnt/efipart kickstart

	###sed -i "s#kernelopt=runweasel cdromBoot#kernelopt=ks=file://kickstart/ks.cfg#g" /mnt/efipart/EFI/redhat/boot.cfg ##for 7.3
	sed -i "s#^kernelopt.*#kernelopt=ks=file://kickstart/ks.cfg#g" /mnt/efipart/EFI/redhat/boot.cfg
	sed -ie 's#^modules.*$#& --- /kickstart.gz#g' /mnt/efipart/EFI/redhat/boot.cfg

	umount /mnt/iso
	rm esxi${os_version}pe.iso
	/usr/bin/env wget --no-proxy --quiet --output-document=/dev/null --no-check-certificate "http://${foreman_fqdn}/unattended/built?token=${foreman_token}"
	umount /mnt/efipart
sync
fi
reboot
What this script does:
- It creates a 1 GB FAT32 partition on the disk.
- Creates mount points: ISO, EFI part, WIM in /mnt partition.
- Copies an ISO image of ESXi 8.0 from our mirror and mounts it in the /mnt/iso.
- Creates a FAT32 partition and mounts to the partition /mnt/efipart.
- A directory structure is created for the Foreman loader to work correctly: /mnt/efipart/EFI/redhat/ and /mnt/efipart/kickstart.
- Copies the contents of the ISO image to the /mnt/efipart/.
-
The previously created directories are copied to:
- cp /mnt/efipart/EFI/BOOT/BOOTX64.EFI /mnt/efipart/EFI/redhat/grubx64.efi — EFI loader;
- cp /mnt/efipart/EFI/BOOT/CRYPTO64.EFI /mnt/efipart/EFI/redhat/crypto64.efi — cryptographic module;
- cp /mnt/efipart/EFI/BOOT/SAFEBOOT.EFI /mnt/efipart/EFI/redhat/safeboot.efi — secure boot verification file. The machine refuses to load any UEFI driver or application if the operating system boot loader does not have a cryptographic signature;
- cp /mnt/efipart/boot.cfg /mnt/efipart/EFI/redhat/boot.cfg — configuration file with boot parameters, specified modules, kernel parameters.
- Downloads a predefined template from our Forema default_provision_ESXi with all the server settings and puts it in a file/mnt/efipart/kickstart/ks.cfg.
- Packs it into an archive with the name kickstart.gz and places it with the standard modules ESXI in the UEFI section — /mnt/efipart.
- Changing the kernelopt settings from standard — runweasel cdromBoot to the behest of our kickstart file ks.cfg in boot.cfg.
- Adds to boot.cfg file new module information kickstart.gz.
- Unmounts the partition/mnt/iso.
- Deletes the ISO image.
- Sends the request to Foreman and puts it into Installed status.
- Unmounts the partition /mnt/efipart.
- Sends the server to reboot.
After rebooting, the system detects the UEFI partition and starts booting from it. Foreman's boot menu then appears and searches for the partition, in this case — redhat.
An example of the boot menu is shown below:
set default=local
set timeout=20
echo Default PXE local template entry is set to 'local'

insmod part_gpt
insmod fat
insmod chain

echo "VMWare hosts with QuickBoot feature enabled may not find the local ESP"
echo "partition due to not initializing all the EFI devices. To workaround, upgrade"
echo "to the latest grub2 (*) and uncomment "connectefi scsi" statement in the"
echo "grub2_chainload template."
echo
echo "Virtual or physical hosts using Software RAID for the ESP partition may try"
echo "booting on the Software RAID, which will fail. To workaround, upgrade to the"
echo "latest grub2 (*) and add "--efidisk-only" argument to the "search" command in"
echo "the grub2_chainload template."
echo
echo "(*) grub2-efi-x64-2.02-122.el8 (upstream doesn't have the patches yet)"
echo
#connectefi scsi

menuentry 'Chainload Grub2 EFI from ESP' --id local_chain_hd0 {
	echo "Chainloading Grub2 EFI from ESP, enabled devices for booting:"
	ls
	echo "Trying /EFI/fedora/shim.efi "
	unset chroot
	# add --efidisk-only when using Software RAID
	search --file --no-floppy --set=chroot /EFI/fedora/shim.efi
	if [ -f ($chroot)/EFI/fedora/shim.efi ]; then
		chainloader ($chroot)/EFI/fedora/shim.efi
		echo "Found /EFI/fedora/shim.efi at $chroot, attempting to chainboot it..."
		sleep 2
		boot
	fi
	echo "Trying /EFI/fedora/grubx64.efi "
	unset chroot
	# add --efidisk-only when using Software RAID
	search --file --no-floppy --set=chroot /EFI/fedora/grubx64.efi
	if [ -f ($chroot)/EFI/fedora/grubx64.efi ]; then
		chainloader ($chroot)/EFI/fedora/grubx64.efi
		echo "Found /EFI/fedora/grubx64.efi at $chroot, attempting to chainboot it..."
		sleep 2
		boot
	fi
	echo "Trying /EFI/redhat/shim.efi "
	unset chroot
	# add --efidisk-only when using Software RAID
	search --file --no-floppy --set=chroot /EFI/redhat/shim.efi
	if [ -f ($chroot)/EFI/redhat/shim.efi ]; then
		chainloader ($chroot)/EFI/redhat/shim.efi
		echo "Found /EFI/redhat/shim.efi at $chroot, attempting to chainboot it..."
		sleep 2
		boot
	fi
	echo "Trying /EFI/redhat/grubx64.efi "
	unset chroot
	# add --efidisk-only when using Software RAID
	search --file --no-floppy --set=chroot /EFI/redhat/grubx64.efi
	if [ -f ($chroot)/EFI/redhat/grubx64.efi ]; then
		chainloader ($chroot)/EFI/redhat/grubx64.efi
		echo "Found /EFI/redhat/grubx64.efi at $chroot, attempting to chainboot it..."
		sleep 2
		boot
	fi
	echo "Trying /EFI/centos/shim.efi "
	unset chroot
	# add --efidisk-only when using Software RAID
	search --file --no-floppy --set=chroot /EFI/centos/shim.efi
	if [ -f ($chroot)/EFI/centos/shim.efi ]; then
		chainloader ($chroot)/EFI/centos/shim.efi
		echo "Found /EFI/centos/shim.efi at $chroot, attempting to chainboot it..."
		sleep 2
		boot
	fi
	echo "Trying /EFI/centos/grubx64.efi "
	unset chroot
	# add --efidisk-only when using Software RAID
	search --file --no-floppy --set=chroot /EFI/centos/grubx64.efi
	if [ -f ($chroot)/EFI/centos/grubx64.efi ]; then
		chainloader ($chroot)/EFI/centos/grubx64.efi
		echo "Found /EFI/centos/grubx64.efi at $chroot, attempting to chainboot it..."
		sleep 2
		boot
	fi
	echo "Trying /EFI/rocky/shim.efi "
	unset chroot
	# add --efidisk-only when using Software RAID
	search --file --no-floppy --set=chroot /EFI/rocky/shim.efi
	if [ -f ($chroot)/EFI/rocky/shim.efi ]; then
		chainloader ($chroot)/EFI/rocky/shim.efi
		echo "Found /EFI/rocky/shim.efi at $chroot, attempting to chainboot it..."
		sleep 2
		boot
	fi
	echo "Trying /EFI/rocky/grubx64.efi "
	unset chroot
	# add --efidisk-only when using Software RAID
	search --file --no-floppy --set=chroot /EFI/rocky/grubx64.efi
	if [ -f ($chroot)/EFI/rocky/grubx64.efi ]; then
		chainloader ($chroot)/EFI/rocky/grubx64.efi
		echo "Found /EFI/rocky/grubx64.efi at $chroot, attempting to chainboot it..."
		sleep 2
		boot
	fi
	echo "Trying /EFI/debian/grubx64.efi "
	unset chroot
	# add --efidisk-only when using Software RAID
	search --file --no-floppy --set=chroot /EFI/debian/grubx64.efi
	if [ -f ($chroot)/EFI/debian/grubx64.efi ]; then
		chainloader ($chroot)/EFI/debian/grubx64.efi
		echo "Found /EFI/debian/grubx64.efi at $chroot, attempting to chainboot it..."
		sleep 2
		boot
	fi
	echo "Trying /EFI/ubuntu/grubx64.efi "
	unset chroot
	# add --efidisk-only when using Software RAID
	search --file --no-floppy --set=chroot /EFI/ubuntu/grubx64.efi
	if [ -f ($chroot)/EFI/ubuntu/grubx64.efi ]; then
		chainloader ($chroot)/EFI/ubuntu/grubx64.efi
		echo "Found /EFI/ubuntu/grubx64.efi at $chroot, attempting to chainboot it..."
		sleep 2
		boot
	fi
	echo "Trying /EFI/sles/grubx64.efi "
	unset chroot
	# add --efidisk-only when using Software RAID
	search --file --no-floppy --set=chroot /EFI/sles/grubx64.efi
	if [ -f ($chroot)/EFI/sles/grubx64.efi ]; then
		chainloader ($chroot)/EFI/sles/grubx64.efi
		echo "Found /EFI/sles/grubx64.efi at $chroot, attempting to chainboot it..."
		sleep 2
		boot
	fi
	echo "Trying /EFI/opensuse/grubx64.efi "
	unset chroot
	# add --efidisk-only when using Software RAID
	search --file --no-floppy --set=chroot /EFI/opensuse/grubx64.efi
	if [ -f ($chroot)/EFI/opensuse/grubx64.efi ]; then
		chainloader ($chroot)/EFI/opensuse/grubx64.efi
		echo "Found /EFI/opensuse/grubx64.efi at $chroot, attempting to chainboot it..."
		sleep 2
		boot
	fi
	echo "Trying /EFI/Microsoft/boot/bootmgfw.efi "
	unset chroot
	# add --efidisk-only when using Software RAID
	search --file --no-floppy --set=chroot /EFI/Microsoft/boot/bootmgfw.efi
	if [ -f ($chroot)/EFI/Microsoft/boot/bootmgfw.efi ]; then
		chainloader ($chroot)/EFI/Microsoft/boot/bootmgfw.efi
		echo "Found /EFI/Microsoft/boot/bootmgfw.efi at $chroot, attempting to chainboot it..."
		sleep 2
		boot
	fi
	echo "Partition with known EFI file not found, you may want to drop to grub shell"
	echo "and investigate available files updating 'pxegrub2_chainload' template and"
	echo "the list of known filepaths for probing. Available devices are:"
	echo
	ls
	echo
	echo "If you cannot see the HDD, make sure the drive is marked as bootable in EFI and"
	echo "not hidden. Boot order must be the following:"
	echo "1) NETWORK"
	echo "2) HDD"
	echo
	echo "The system will poweroff in 2 minutes or press ESC to poweroff immediately."
	sleep -i 120
	halt
}

menuentry 'Chainload into BIOS bootloader on first disk' --id local_chain_legacy_hd0 {
	set root=(hd0,0)
	chainloader +1
	boot
}

menuentry 'Chainload into BIOS bootloader on second disk' --id local_chain_legacy_hd1 {
	set root=(hd1,0)
	chainloader +1
	boot
}

common="rootflags=loop root=live:/fdi.iso rootfstype=auto ro rd.live.image acpi=force rd.luks=0 rd.md=0 rd.dm=0 rd.lvm=0 rd.bootif=0 rd.neednet=0 nokaslr nomodeset proxy.url=https://foreman.hostkey.com proxy.type=foreman BOOTIF=01-$net_default_mac"

if [ ${grub_platform} == "pc" ]; then
	menuentry 'Foreman Discovery Image' --id discovery {
		linux boot/fdi-image/vmlinuz0 ${common}
		initrd boot/fdi-image/initrd0.img
	}
else
	menuentry 'Foreman Discovery Image EFI' --id discovery {
		linuxefi boot/fdi-image/vmlinuz0 ${common}
		initrdefi boot/fdi-image/initrd0.img
	}
fi
After Foreman went through the menu and saw that we had a section redhat on the disk, the system starts the ESXi installation, unpacking the modules that were copied to the /mnt/efipart,as well as our kickstart.gz — kickstart/ks.cfg and accepts this configuration file, which specifies how the operating system will be installed and configured:
If the hardware is supported by the ESXi hypervisor, the operating system will install without errors and reboot. The result is a fully configured operating system with the two users we specified in the template default_provision_ESXi:
Conclusion
ESXi-Foreman PXE Deployment is a powerful tool for automating the installation and configuration of ESXi virtual servers. This combination allows administrators to greatly simplify the process of deploying and managing virtualization infrastructure.
ESXi-Foreman provides centralized management and control over all stages of the deployment, from booting the operating system to installing the necessary software. By utilizing PXE boot, administrators can remotely deploy ESXi servers without the need for physical access to each host.
This approach also contributes to a more efficient and standardized deployment process, which in turn reduces potential errors and reduces the time spent installing and configuring servers. In addition, ESXi-Foreman provides extensive automation capabilities and integration with other tools and systems, making it a flexible and scalable solution for a variety of virtualization scenarios.