
Author — Sultan Usmanov, DevOps specialist at Hostkey
We at Hostkey had to migrate a number of servers from the old oVirt Engine version 4.2 infrastructure to the new oVirt Engine version 4.5 infrastructure. This migration does not simply represent a small change owing to a minor release, rather a lot has changed:
- there are new features and improvements in the API;
- The transition to EL8 has been carried out.
Due to the platform change, we also decided to upgrade the hardware of the virtualization hosts and make the upgrade while migrating the machines to the new installation. We will talk about our experience in this article.
Several migration options were considered and applied:
- Working with Export Domain in oVirt.
- Creation of automation for machine migration via OVA export/import via oVirt API.
The first option is relatively easy to implement, but it is impossible to automate the server migration process. The second option requires a little more time, but allows you to automate the migration. Accordingly, it all depends on how much equipment needs to be transferred.
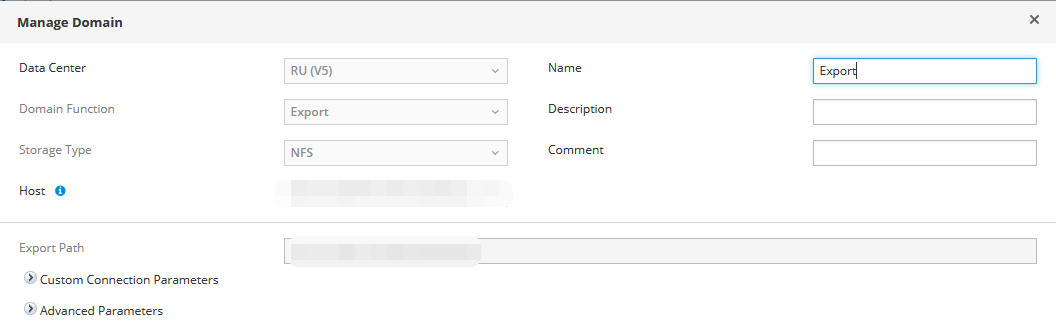
An Export Domain is a storage domain. There are a lot of resources on the Internet dedicated to the operation of Export Domains in oVirt. It is mainly used to move VMs to different datacenters or oVirt environments, and only when the VMs are backed up (this domain can exclusively use the NFS protocol). It is NFS-based and only one Export Domain can be added to the datacenter. To add an Export Domain to the infrastructure, you must first install the server and deploy the NFS service on it, as well as grant the necessary rights to the directory specified in the Export Path section in the settings.
The procedure for adding an Export Domain on the oVirt Engine server, from which we plan to export
An example of adding an Export Domain to the oVirt web interface:
In event of successful addition, the Active status will be shown:

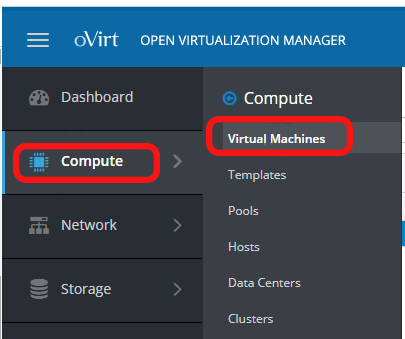
To export a virtual server to an Export Domain, it is necessary to go to the Compute - Virtual Machines section:
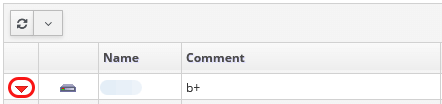
Next, you need to prepare the server for export: find it and turn it off. Example of a disabled server:
After that, in the same window on the right side, under the user icon, you should click on the “burger” and select the Export to Export Domain section:
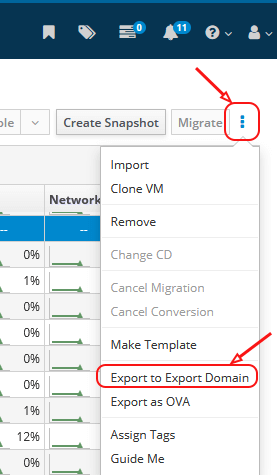
Next, you need to specify the Export Domain, where to export the server, and wait for the export to complete.
After that, you need to go to the Compute - Data Centers section, select the Data Centers where we have attached our Export Domain, select it and put it into Maintenance mode.
1. Select the Data Center you need and enter it:
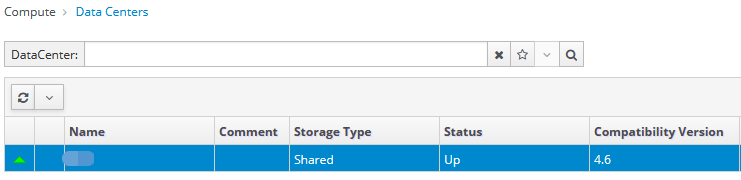
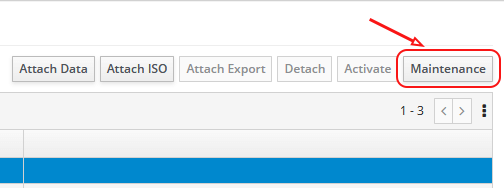
2. Select our Export Domain and click on the Maintenance button in the upper right corner:
3. In the picture below, you can see the status of the Export Domain in Maintenance mode:

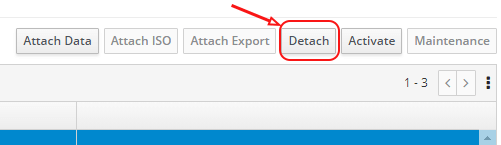
4. In Maintenance mode, click on Detach and indicate the reason why we are disconnecting the disk:
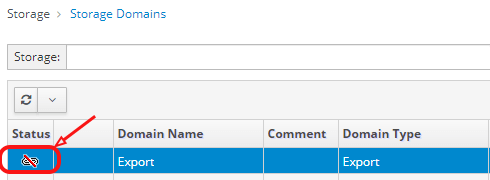
5. After disabling it in the Storage section- Storage Domains section on our Export Domain, we should see an icon indicating that the section is disabled:
Next, you need to go to the oVirt Engine, where we plan to transfer our virtual server, and do the same steps, but already attach the Export Domain.
Procedure of adding an Export Domain on the oVirt Engine server on which we plan to migrate
1. We select the Data Center we need, where we plan to import our server, go to the Compute - Data Centers section and click on the one we need:

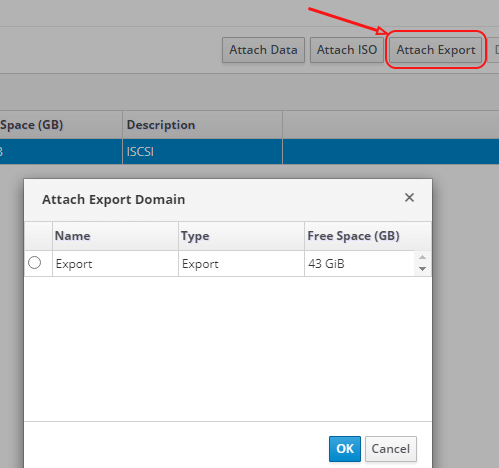
2. In the opened window in the Storage section, click on Attach Export and select Export Domain, click on OK:
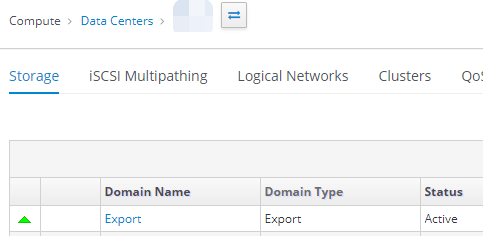
3. After 5–15 seconds (the status and execution time can be viewed in the Task menu) in the Compute - Data Centers section, we go to our Data Centers, then to the Storage section. The Export Domain point should appear there:
4. Click on it and go to the VM Import section:
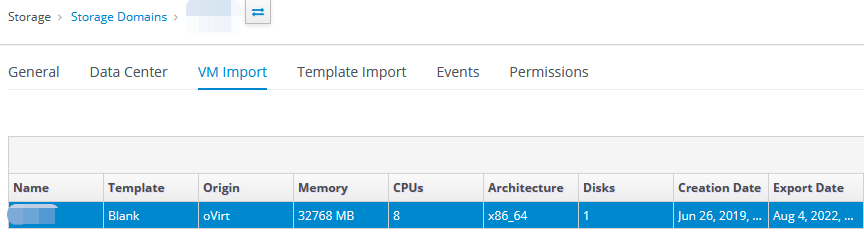
5. Select the needed virtual server and click on Import on the right side:
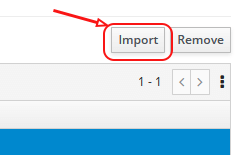
6. The window for importing virtual servers will open, in which you need to select the following:
- Target Cluster;
- CPU Profile, if it was configured.
Then select the needed server and click on the Import button:

7. Go to the Compute - Virtual Machines section and wait for the import of the virtual server to finish. Make any changes, if needed, and then start the server.
This completes the procedure for exporting and importing a virtual server using an Export Domain.
Writing a script and Playbook in Ansible for migration via OVA.
Since the servers were exported from oVirt Engine version 4.2 to newer versions of oVirt Engine, 4.4 and 4.5, it was not possible to work only with Ansible Playbook: version 4.2 does not support exporting virtual servers in OVA format. We decided to export the virtual servers from the old version of the Engine using the API. For the new server, the import was done using Ansible Playbook and ready-made Python scripts.
Below are examples of writing a script in Bash and an Ansible Playbook option.
The Bash script receives the following information as input:
- Engine source and destination;
- Guest_id (virtual server name);
- host_name_dst (destination server).
The received data is placed in a file with variables vars/var.yml, which will be used by Ansible Playbook in the future.
To export, you first need to install the server and deploy the NFS service on it. Grant the necessary rights to the directory (we wrote - rw,async,no_subtree_check,anonuid=36,anongid=36,all_squash). In the future, we will mount it to the /mnt/nfs partition on the Engine servers, as well as on the physical host from which we plan to export the virtual server.
#!/usr/bin/env bash
 ##Source
 engine_fqdn_src=enginesrc.test.local
 engine_api_src="https://${engine_fqdn_src}/ovirt-engine/api"
 guest_id=$1
 ##Destination
 engine_fqdn_dst=enginedst.test.local
 engine_api_dst="https://${engine_fqdn_dst}/ovirt-engine/api"
 host_name_dst=$2

 ##Common vars
 engine_user=admin@internal
 engine_pass=pass
 export_path=/mnt/nfs/
	OVIRT_SEARCH() {
	 local engine_api=$1
	 local api_target=$2
		local search
	 if [[ ! -z $3 ]]&&[[ ! -z $4 ]];then
		 local search="?search=$3=$4"
	 fi
		curl -ks --user "$engine_user:$engine_pass" \
		 -X GET -H 'Version: 4' -H 'Content-Type: application/JSON' \
		 -H  'Accept: application/JSON' "${engine_api}/${api_target}${search}" |\
		 jq -Mc
 }

 ##Sourc
 vm_data=$(OVIRT_SEARCH $engine_api_src vms name $guest_id)
 disk_data=$(OVIRT_SEARCH $engine_api_src disks name $guest_id)
 vm_id=$(echo $vm_data | jq -r '.vm[].id')
 host_id=$(echo $vm_data | jq -r '.vm[].host.id')
 host_name_src=$(OVIRT_SEARCH $engine_api_src hosts/$host_id | jq -r '.name')

 ##Destination
 host_data_dst=$(OVIRT_SEARCH $engine_api_dst hosts name $host_name_dst)
 host_address_dst=$(echo $host_data_dst | jq -r '.host[].address')
 cluster_id_dst=$(echo $host_data_dst | jq -r '.host[].cluster.id' )
 data_center_id_dst=$(OVIRT_SEARCH $engine_api_dst clusters/$cluster_id_dst | jq -r '.data_center.id')
 data_domain_name_dst=$(OVIRT_SEARCH $engine_api_dst datacenters/$data_center_id_dst/storagedomains | jq -r '.storage_domain[].name')
 cluster_name_dst=$(OVIRT_SEARCH $engine_api_dst  clusters/$cluster_id_dst | jq -r '.name')

 post_data="<action><host><name>${host_name_src}</name></host><directory>${export_path}</directory><filename>${guest_id}</filename></action>"
 post_data_shutdown="<action/>"
 post_data_vmname="<vm><name>${guest_id}-</name></vm>"

 ##Shutdown vm
 curl -ks --user "$engine_user:$engine_pass" \
 -X POST -H 'Version: 4' \
 -H 'Content-Type: application/xml' -H 'Accept: application/xml' \
 --data $post_data_shutdown \
 ${engine_api_src}/vms/${vm_id}/shutdown

 ##Change vm name
 curl -ks --user "$engine_user:$engine_pass" \
 -X PUT -H 'Version: 4' \
 -H 'Content-Type: application/xml' -H 'Accept: application/xml' \
 --data $post_data_vmname \
 ${engine_api_src}/vms/${vm_id}

 ##Export vm
 curl -ks --user "$engine_user:$engine_pass" \
 -X POST -H 'Version: 4' \
 -H 'Content-Type: application/xml' -H 'Accept: application/xml' \
 --data $post_data \
 ${engine_api_src}/vms/${vm_id}/export

 ## Put result in var/var.yml
 cat << EOF > vars/var.yml
 url_src: htps://$engine_src/ovirt-engine/api
 url_dst: https://$engine_dst/ovirt-engine/api
 #username:
 #password:
 insecure: true

 ## VM Parameters:
 cluster_name: $cluster_name_dst
 disk_id: $disk_id
 vm_id: $vm_id
 disk_format: "qcow2"
 data_domain: $cluster_name_dst
 vm_name: $guest_id
 EOF
Ansible Playbook to import a virtual server
Below is an example of a Playbook that takes data from the vars/var.yml file and substitutes it according to the variables specified in the file. The purpose of the Playbook is to create a configuration file that is used by the engine server to import the OVA file. After that, the following Python script (upload_ova_as_vm_or_template.py) is launched, which imports the server with all its settings. Next, the config file and the file with the system image are cleared. After that, the graphical interface is configured and the server is started.
- hosts: engine_dst

  tasks:

  — name: Obtain SSO token
    ovirt_auth:
      url: "{{ url_dst }}"
      username: "{{ username }}"
      password: "{{ password }}"
      insecure: "{{ insecure }}"

  — name:  Wait for export to be finished
    include_tasks: tasks/check_ova_export_status.yml

  — name: Ovirt config file creation
    include_tasks: tasks/ovirt_conf_creation.yml
    tags:
      — ovirt_config_creation

  — name: Upload disk image
    command: "python3 /usr/share/doc/python3-ovirt-engine-sdk4/examples/upload_ova_as_vm_or_template.py -c engine --sd-name {{ data_domain }} /mnt/nfs/{{ vm_name }} --cluster-name {{ cluster_name }}"

  — name: Remove config
    file:
      path: "/root/.config/ovirt.conf"
      state: absent

  — name: Remove disk image from NFS
    file:
      path: /mnt/nfs/{{vm_name}}
      state: absent

  — name: Change VM Name
    ovirt_vm:
      auth: "{{ ovirt_auth }}"
      id: "{{ vm_id }}"
      name: "{{ vm_name }}"

  — name: Set console configuration for both Spice and VNC
    ovirt_vm:
      auth: "{{ ovirt_auth }}"
      name: "{{ vm_name }}"
      graphical_console:
        protocol:
          - spice
          - vnc

  — name: Run VM
    ovirt_vm:
      auth: "{{ ovirt_auth }}"
      cluster: "{{ cluster_name }}"
      state: running
      name: "{{ vm_name }}"

  — name: Revoke SSo token
    ovirt_auth:
      state: absent
      ovirt_auth: "{{ ovirt_auth }}"
Playbook also uses Tasks. Their description is as follows:
1) The task that checks the virtual server export status is - check_ova_export_status.yml.
- name: Check ova export status
  shell: |
    counter=7

    while true;do
    if [[ $(ls -l /mnt/nfs/ | grep -Pc '\b{{ vm_name }}$\b') -eq 1 ]];then
    let "successes+=1"
    else
    successes=0
    fi
    if [[ $successes -eq $counter ]];then
    break
    fi
    sleep 10
    done
2) The task that is responsible for creating the configuration file is further used by the regular Python oVirt script to import the virtual server. As part of this task, a directory is created and the prepared configuration file from the template which is located in the templates section.
- name: create config directory if absent
  file:
    path: "/root/.config/"
    state: directory

- name: ovirt config creation
  template:
    src: ../templates/ovirt.conf.j2
    dest: "/root/.config/ovirt.conf"
    owner: root
    group: root
    mode: '0644'
Example of ovirt.conf.j2 configuration file located in templates:
# Example configuration file.
#
# Example scripts will read this configuration from:
#
#   ~/.config/ovirt.conf.
#
# You can keep multiple configuration sections in this file.
#
# To use configuration "engine1" use:
#
#   ./example_script.py --config engine1 ...

# This engine configuration section shows all available options.
[engine]

# oVirt engine API URL (required).
engine_url = https://{{ engine_fqdn_dst }}

# oVirt engine API username (required).
username = {{ username }}

# oVirt enigne API password. If not specified the example script will get the
# password from stdin (optional).
password =  {{ password }}

# Verify server certificate and host name (optional, default yes).
secure = yes

# CA certificated for verifying for verifying server. No need to specify if the
# certificate was added to the host trust store (optional, default empty).
cafile = /etc/pki/ovirt-engine/ca.pem

# This engine configuration section uses only the required options, and disable
# server certificates verification.
#[engine2]
#engine_url = https://engine2
#username = admin@internal
#secure = no
This migration automation can be transferred to Jenkins or another similar service even by a junior specialist and it can also expanded with additional actions to update the equipment database, etc. Through Ansible it is easy to organize the addition and verification of an NFS-mount, for example, through autofs, by making a migration mechanism suitable for a large number of virtualization hosts, as was the case for us. If you are not familiar with Ansible and writing a Playbook is difficult, you can use a common tool to assist you - Export Domain.
These options were used to export and import servers. The approach described above allowed us to develop and apply a convenient scheme for migrating servers from the old oVirt Engine version 4.2 infrastructure to the new oVirt Engine version 4.5 infrastructure. The migration time for each server depends on the size of the hard drive. For example, a server with 9 GB can be migrated in 11 minutes, including all the additional settings that may be required for migration.