Open WebUI is an open-source web interface designed to work seamlessly with various LLM interfaces like Ollama and others OpenAI's API-compatible tools. It offers a wide range of features, primarily focused on streamlining model management and interactions. You can deploy it both on a server and locally on your personal machine, effectively creating a powerful AI workstation right at your desk.
The platform allows users to easily interact with and manage their Language Model (LLM) through an intuitive graphical interface, accessible from both desktop and mobile devices. It even includes voice control functionality similar to OpenAI's chat style interaction.
Since Open WebUI continues to evolve thanks to its active user and developer community constantly adding improvements and new features, documentation sometimes lags behind. Therefore, we've compiled 10 essential tips to help you unlock the full potential of Ollama, Stable Diffusion, and Open WebUI itself. All examples are provided for the English interface, but you can easily find the corresponding sections in other languages.
Tip 1: Install any Ollama model from the supported list
To install an Ollama model, visit https://ollama.com/library and search for your desired model. If the model name doesn't start with a slash (/), it's been uploaded and verified by the Ollama developers. Models with slashes in their names were uploaded by the community.
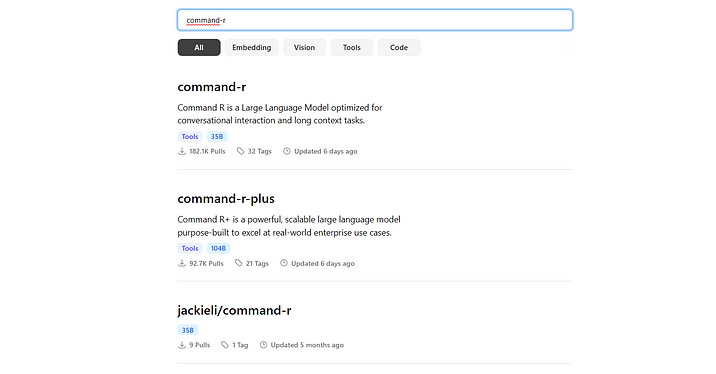
Pay attention to the tags associated with each model:
- The last tag indicates its size in billions of parameters.
- A higher number signifies a more powerful model, but also requires more memory.
You can also filter models by type:
- Tools: General-purpose models for question-answering and specialized tasks like mathematics.
- Code: Models trained specifically for code generation.
- Embedding: Models used to transform complex data structures into simpler representations. These are essential for tasks like information retrieval from documents, web search analysis, and building Retrieval Augmented Generation (RAG) systems.
- Vision: Multimodal models capable of analyzing images and answering related questions.
To install a model in Open WebUI, follow these steps:
- Navigate to the model’s card, select its size and compression from the dropdown menu, and copy the command ollama run gemma2.
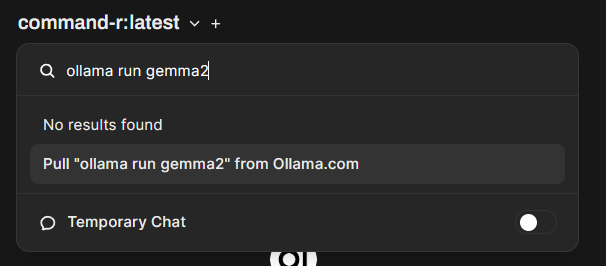
- In Open WebUI paste this command into the search bar that appears when you click on the model's name.
- Click on the prompt taht says “Pull 'ollama run gemma2' from Ollama.com”. After some time (depending on the model size), it will be downloaded and installed in Ollama.
Tip 2: Run models larger than your GPU memory
Some users are concerned that their chosen model may exceed their available video memory. However, Ollama (along with the underlying llama.cpp) can operate in GPU Offload mode, which allows neural network layers to be divided during calculations between the GPU and CPU, and cached in RAM and on disk drives.
While this approach impacts processing speed, it allows even large models to run. For example, on a server with a 4090 GPU (24GB VRAM) and 64GB of RAM, the Reflection 70b model was launched, albeit slowly, processing around 4–5 characters per second. In contrast, the Command R 32b model worked at an excellent speed. Even on local machines with 8GB of VRAM, gemma2 9B functions well, despite not fully fitting into memory.

Tip 3: Delete and update models directly within Open WebUI
Ollama models are regularly updated and improved, so it's recommended to download the latest versions periodically. You can manage all your Ollama models by navigating to Settings — Admin Settings — Models (click on your username in the bottom left corner and follow menu options). To update all models at once, click the button in the Manage Ollama Models section. If you wish to delete a specific model,select it from the dropdown menu under Delete a model and click the trash icon.

Tip 4: Adjust context size globally or for individual chats
Open WebUI defaults to a 2048-character context size for Ollama models, which can lead to the model forgetting ongoing conversations quickly. Similarly, parameters like "Temperature" affect responsiveness.
To increase context size or temperature only for the current chat, click on the settings icon next to your account circle in the top right corner and adjust the values. Remember that larger contexts require more data processing, potentially slowing down the response time.
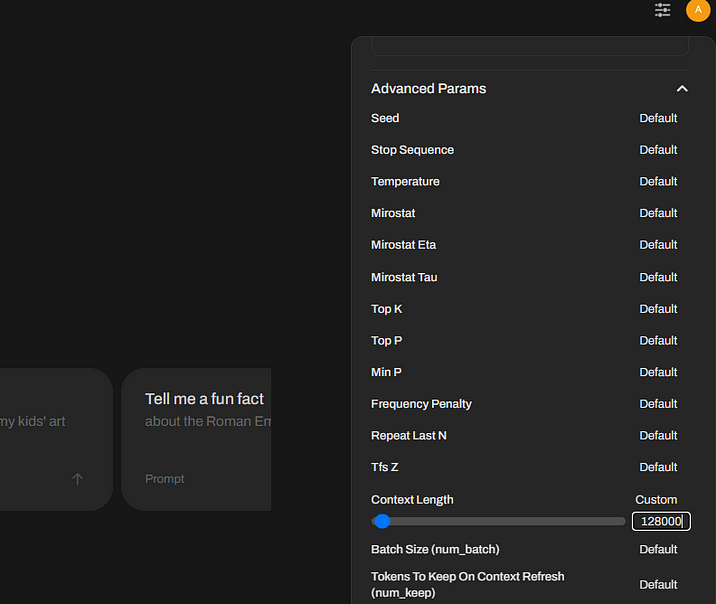
For global parameter changes, click on your username in the bottom left corner, choose Settings — General, then expand the Advanced Parameters submenu by clicking Show and modify the desired settings.
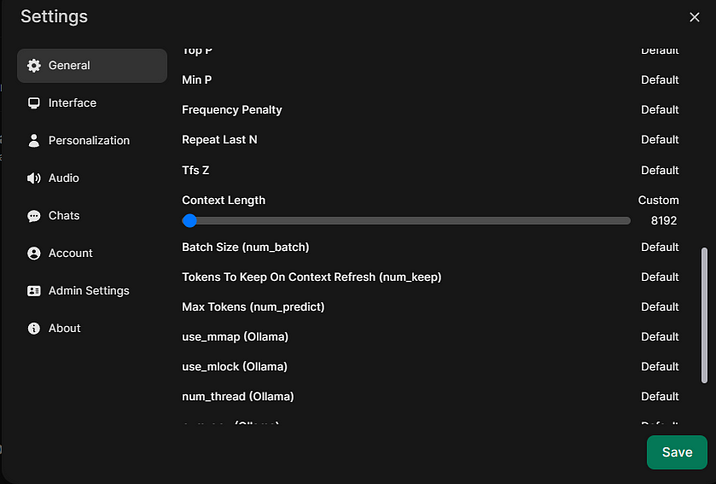
Tip 5: Enable internet access for model responses
When asking questions, you can instruct the model to use information from specific websites or search the internet through a search engine.
For the first case, include the target website's URL in your chat message prefixed with #. Press Enter and wait for the page to load before submitting your query.

For the second option, configure the web search provider and parameters in Settings — Admin Settings — Web Search (consider using free duckduckgo or obtaining a Google API key). Remember to save the settings by clicking the green Save button in the bottom right corner.
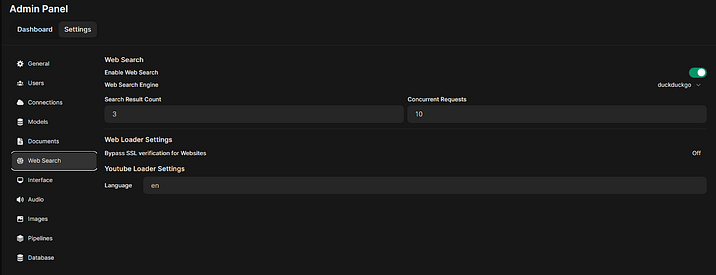
Then, enable the Web Search toggle button before your query within the chat window.

Keep in mind that web searches take time and depend on the embedding model's performance. If no results are found, you might see a message stating 'No search results found'. In such cases, consider the next tip.
Tip 6: Improve document and website search functionality
By default, Open WebUI utilizes SentenceTransformers library models. However, even these need activation by downloading the model alongside the Embedding Models section under Settings — Admin Settings — Documents.

For enhanced document and web search, as well as RAG (Retrieval Augmented Generation) performance, install an embedding model directly in Ollama as described in Tip 1. We recommend using paraphrase-multilingual (https://ollama.com/library/paraphrase-multilingual). After installation, change the Embedding Model Engine to Ollama and select paraphrase-multilingual:latest under Embedding Models in the same settings section. Remember to save your changes by clicking the Save green button.

Tip 7: Enable temporary chats for non-persistent communication.
Open WebUI saves all user chats, allowing for easy retrieval later. However, this might not always be desirable, especially during tasks like translations or other activities where persistent storage is unnecessary and can clutter the interface.
To address this, activate Temporary Chat mode by opening the Models menu at the top and toggling it on. To revert to the default chat saving behavior, simply turn it off.
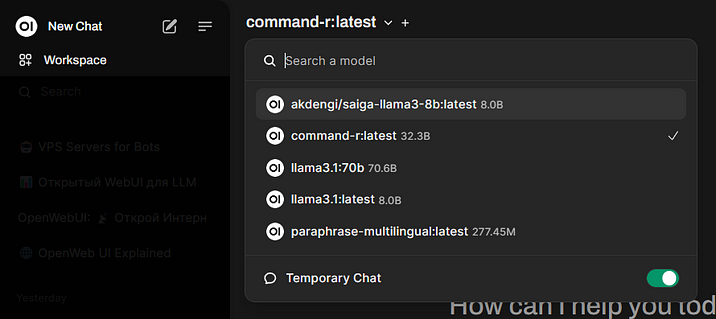
Tip 8: Install Open WebUI on Windows without Docker
Previously, using Open WebUI on Windows was challenging due to the distribution as a Docker container or source code. Now, you can install it directly through pip after setting up Ollama (prerequisite it). All you need is Python 3.11 and running the following command in the Windows Command Prompt:
pip install open-webui
After installation, launch Ollama, then type in the command prompt:
open-webui serve
Finally, open the web interface in your browser by typing https://127.0.0.1:8080.
If you encounter an error like
OSError: [WinError 126] Module not found. Error
Loading “C:\Users\username\AppData\Local\Programs\Python\Python311\Lib\site-packages\torch\lib\fbgem.dll' or one of its Dependencies.
when starting open-webui, download and copy libomp140.x86_64.dll from https://www.dllme.com/dll/files/libomp140_x86_64/00637fe34a6043031c9ae4c6cf0a891d/download to the /windows/system32 directory.
Note that this method might cause conflicts with applications requiring a different Python version (e.g., WebUI-Forge).
Tip 9: Generate images directly within Open WebUI
To achieve this, you'll need to install Automatic1111's web interface (now called Stable Diffusion web UI) and the necessary models (refer to the instructions at https://hostkey.com/documentation/technical/gpu/stablediffusionwebui/). Then, configure it to work seamlessly with Open WebUI.
For added convenience, consider integrating an image generation button directly into the chat interface using external tools. Here is how:
- Visit https://openwebui.com/, register, and navigate to the Image Gen tool (https://openwebui.com/t/justinrahb/image_gen/).
- Click Get, enter your Open WebUI URL, and then select Import to WebUI.
- Save the settings in the bottom right corner.
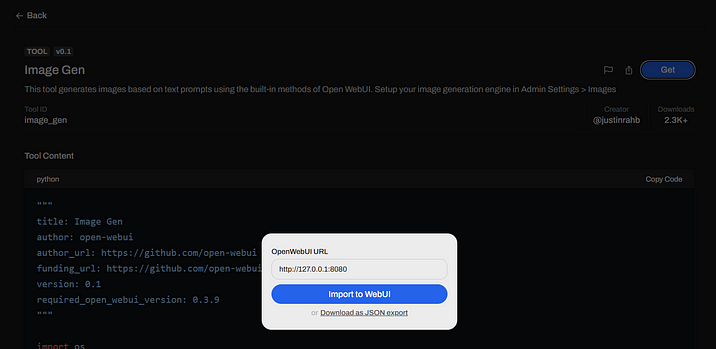
Once configured, the Image Gen toggle button will appear in the chat, enabling you to generate images directly through Stable Diffusion. The traditional "Repeat" method will still work as well.

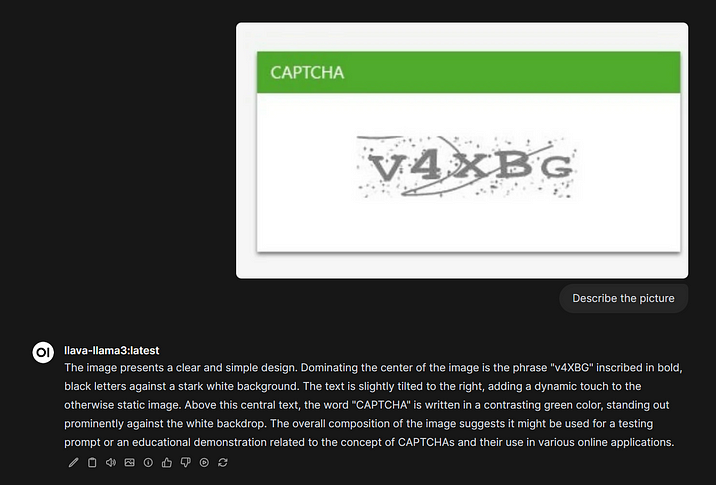
Tip 10: Leverage Open WebUI's image recognition capabilities
Open WebUI also supports Vision models for image analysis. To use one:
- Choose and install a suitable model like llava-llama3 (available here) .
- In the chat bar click the Plus button, select Upload Files, and upload your image.
- Ask the model to analyze it and then use the output for further processing with other models.
This is just the tip of the iceberg! Open WebUI offers an extensive range of functionalities beyond these tips, including custom model/chatbot creation, API access, automation through tools and functions that filter user requests, clean up code outputs, or even play Doom! If you're interested in exploring further, leave a comment below.

