
Author: Ivan Bogdanov, Technical Writer
Video call services have become an integral part of our lives, but they can often present various surprises, ranging from issues with accessibility to regional limitations. This problem is particularly acute for those whose relatives live abroad and who are unable to use domestic communication solutions.
Corporate products like Zoom and Teams, as well as Google Meet, are certainly available in most countries. Additionally, each country usually has its own national alternatives. However, international calls can still encounter problems with both service accessibility and call stability. We’ve already discussed one solution to this issue, which is to set up one’s own Jitsi Meet instance. However, for small development teams or gaming communities, this may be an overkill.
Another option is to set up your own server for voice communication. Mumble is an open-source VoIP solution that has been around since 2005. It was originally designed for small gaming communities that required minimal latency. Today, it’s used by remote teams, families, and any group in need of stable voice communications.
Mumble’s architecture is simple: it consists of a server and client applications for various platforms. The server does not store conversation history by default, does not collect users’ data, and does not display advertisements. It routes encrypted voice traffic between clients without having access to its content. A text chat is available, but it’s basic and intended only for exchanging short messages; it’s neither as comprehensive as a messaging service like Telegram nor as a video conferencing platform like Google Meet.
However, Mumble has its limitations: it only supports voice communication and does not offer video calls. Its client interface looks somewhat outdated (from around 2005). There is no integration with calendars, and no built-in screen sharing feature. For large conferences with over 50 participants, specialized solutions are more suitable. But for stable voice communication among a family or a small team, Mumble is more than sufficient. Setting up your own server costs around 33,9 Euro per year, which is significantly cheaper than using commercial services with subscription fees.
What’s Needed to Get Started
We’ll need a VPS with Ubuntu 22.04 pre-installed. The minimum configuration requires 1 CPU core and 1 GB of RAM, which costs around 3,25 Euro per month with most hosting providers. You can use any provider, but in this article I’ll demonstrate the process using a VPS with Mumble pre-installed in a Docker container (this is the out-of-the-box solution available with many providers). If you use another hosting provider, the installation process may vary; you’ll need to set up Docker and deploy the container yourself.
Mumble client applications are available for Windows, macOS, Linux, Android, and iOS. They are all free to use and can connect to any Mumble server. The quality of implementation varies: desktop clients are stable, while mobile versions can sometimes be glitchy, but overall they function well.
Basic knowledge of Linux is required, but everything necessary to get started will be described below.
Setting Up the Server
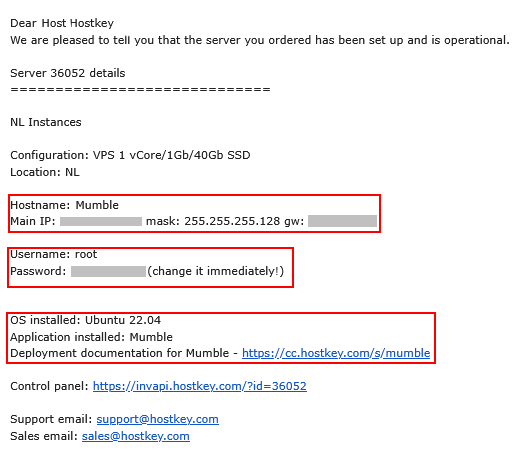
After purchasing the VPS, you’ll receive the necessary information for SSH access via email: the server’s IP address, root login credentials, and a temporary password. The server is usually set up in 5–10 minutes. In my case, I used an automated installation process that automatically installed Docker and deployed a container with the latest version of Mumble. The VPS already has Ubuntu 22.04 LTS pre-installed, along with Docker with the ajmandourah/mumble image; the server’s basic configuration is also already in place. Mumble listens on port 64738 over TCP and UDP (this standard port can be changed if necessary).
Getting the Administrator Password
Mumble works fine without a SuperUser password, but without it we won’t be able to manage the server. The password is automatically generated upon the first starting of the container and is written to the log file.
Connect to the server via SSH:
ssh root@YOUR_SERVER_IP_ADDRESSView the Docker container running Mumble:
docker psThe output will look something like this:
CONTAINER ID   IMAGE                COMMAND       PORTS
			a1f296c17976   ajmandourah/mumble   "/start.sh"   0.0.0.0:64738->64738/tcp, 0.0.0.0:64738->64738/udp
Note the CONTAINER ID (the first column).

Find the password in the log file:
docker exec -it <Container_ID> /bin/bash
tail -100 /mumble/mumble-server.log | grep "Password for 'SuperUser'"
The output might look like this:
<W>2025-12-19 10:15:23.456 Password for 'SuperUser' set to 'aB3dE7gH9kL2'Save this password. If you want to change it, use the following command:
docker exec -it <Container_ID> murmurd -ini /etc/mumble-server.ini -supw NewPassword123Or directly inside the container:
murmurd -ini /etc/mumble-server.ini -supw NewPassword123To exit the container, use:
exitCheck that the server is running:
docker ps
docker stats --no-stream
The output should show the container’s resource usage: around 15–20 MB of RAM used and nearly 0% CPU usage (in idle mode, with no users connected).

How Many Users Can the Server Support?
Mumble’s specifications indicate its theoretical limits:
docker exec -it <Container_ID> murmurd -limitsOutput:
Managed to open 1014 descriptors
Managed to spawn 126 threads
Each client uses approximately 2 network connections (one for data and one for control), which theoretically allows up to around 500 clients. In practice, performance is limited by the server’s CPU and network bandwidth. A realistic estimate for a VPS costing around 3,25 Euro per month is: 20–30 users with occasional calls is comfortable; 30–50 users is acceptable if not everyone talks at the same time; more than 50 users would require a more powerful VPS. For family use, a minimal server configuration is sufficient.
Connecting to the Server
Download the Mumble client from the official website or from app stores for mobile devices. For Android, there’s also Plumble, which often works more stably than the official client.
Mumble’s default interface is in English. To change the language settings:
- Close the server list.
- Go to Configure > Settings > User Interface > Language.
- Select any other language from the drop-down menu, then click Apply and OK.
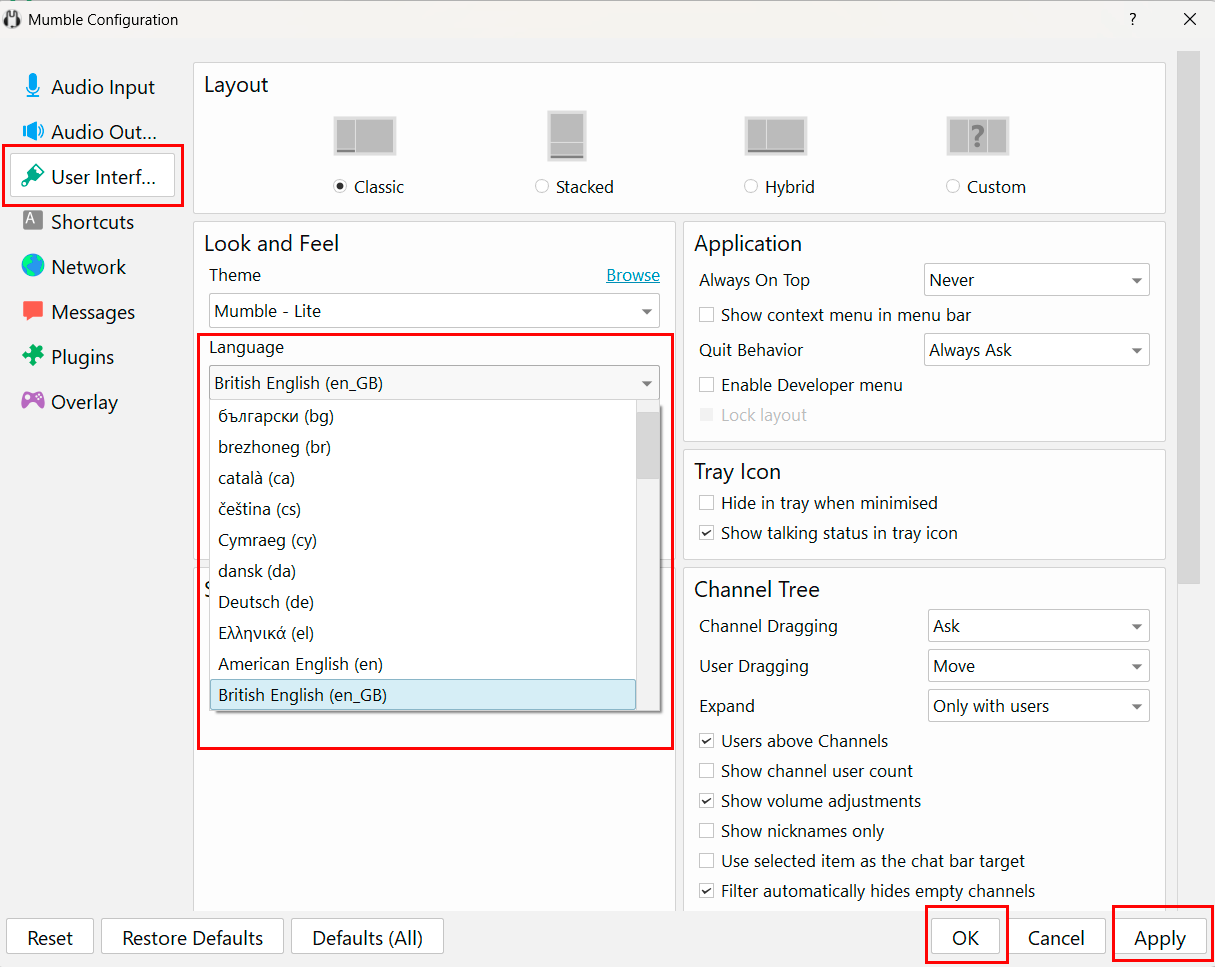
The app will restart with a new interface.
To connect to the server click Add New and enter the following information:
- Name: anything, for example, “My Server”.
- Server Address: your VPS’s IP address.
- Port: 64738 (by default).
- Username: “SuperUser”.
- Password: the password you obtained from the log files.
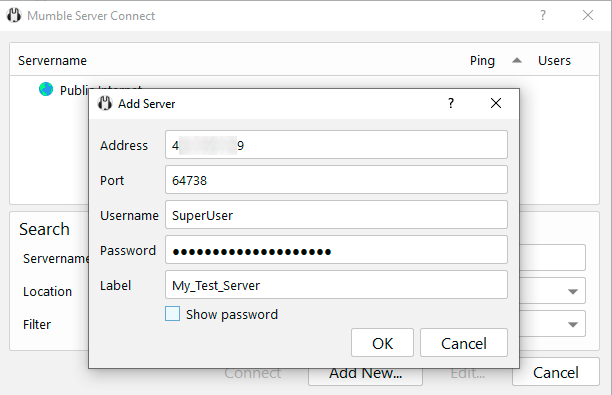
After entering the information, click OK. Upon first connection, you’ll see a warning about the self-generated SSL certificate; this is normal for a new server. Click Yes. After connecting, you’ll be in the root channel with the SuperUser username and an administrator icon.
To allow regular users to connect, they need to add your server to their Mumble client by entering the server’s IP address, port 64738, and creating a username for themselves. No password is required; Mumble automatically generates a unique cryptographic certificate upon the first connection.
Creating Channel Structures
By default, there is only a root channel. For convenience, let’s create several sub-channels. Right-click on the root channel and select “Add” > then enter the name of the new channel.
Access rights can be configured through the channel’s context menu > Edit > Access Rights (ACL). There, you can set a password for the channel or restrict access to specific user groups. By default, all registered users can join any channel and speak, which is fine for most situations.
Temporary channels are a useful feature for impromptu meetings. Create a channel, check the Temporary Channel option in its settings, and users will be able to create their own sub-channels within it; these sub-channels will automatically be deleted once everyone exits.
Adding Users
Mumble does not use login credentials (usernames and passwords) by default; instead, it relies on client certificates. When a user connects to the server for the first time, the client automatically generates a unique certificate. The user can register this certificate with the server by right-clicking on their name and selecting Register.
After registration, the server remembers the user, allowing them automatic access next time. If a user reinstalls Mumble or connects from a different computer, they will have a different certificate and a different username on the server; it’s important to be aware of this.
Administrators can manually create user accounts through the Server menu > Registered Users > Add. However, this merely reserves a username; actual connections are still made through the client’s certificate.
User Settings
Outgoing Sound Settings
After connecting to the server, it’s recommended to configure Mumble’s settings. All parameters are available in the Settings menu > Mumble Configuration for desktop versions, or in the app settings for mobile clients. The interface may vary slightly depending on the platform, but the main parameters and workings remain the same.
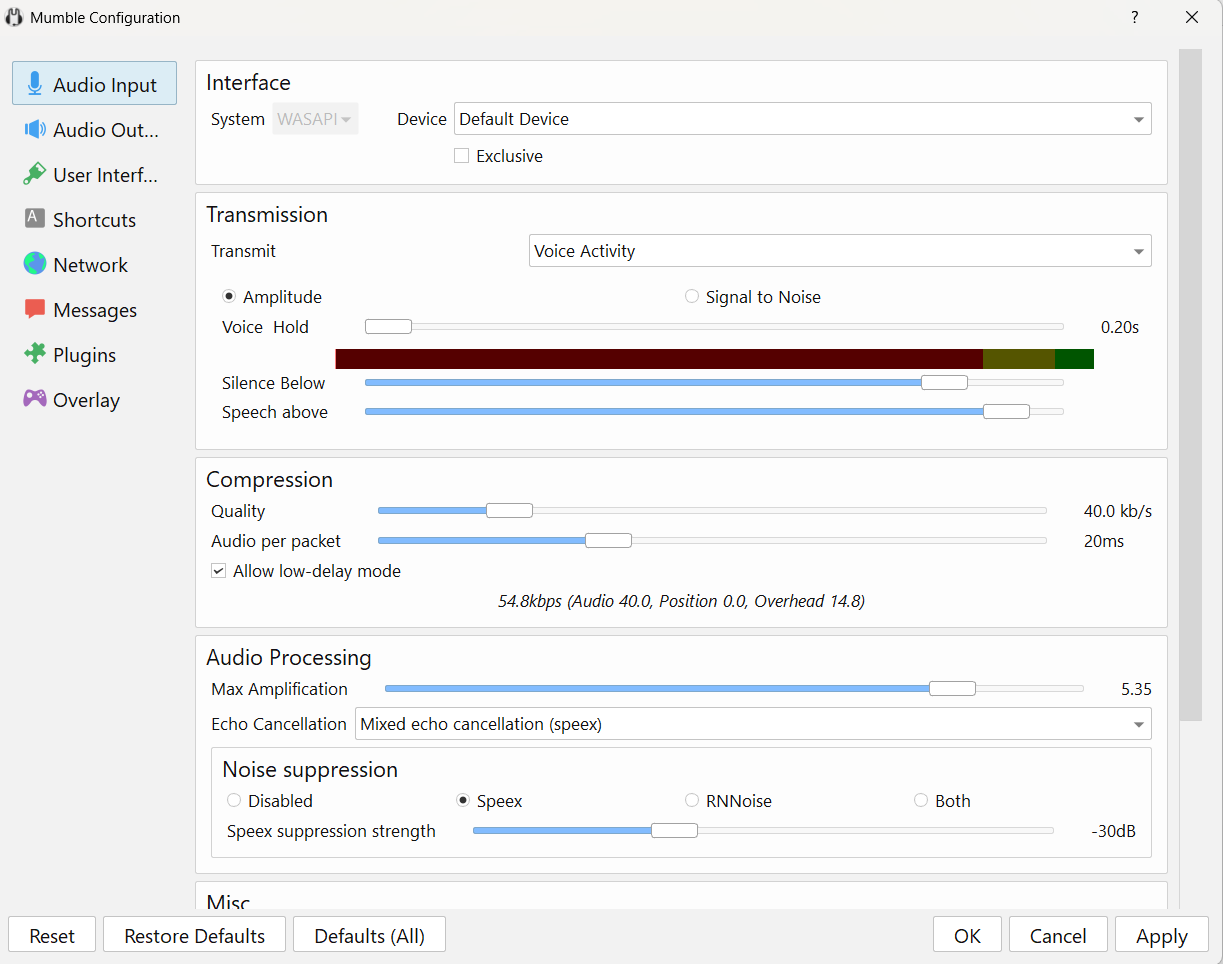
Mumble uses the Opus codec with adjustable sound transmission quality (under Audio Input > Compression > Quality). A value of around 40 kbit/s is usually sufficient for comfortable voice communication. For higher quality, you can increase it to 64–96 kbit/s. To save bandwidth (e.g., when using mobile internet), you can reduce it to 32 kbit/s, though this may result in slightly lower sound quality. The actual bitrate may dynamically change depending on transmission conditions and server settings.
By default, Voice Activity mode is used for sound transmission. In this mode, the microphone turns on automatically when speech is detected. Sensitivity sliders allow you to adjust the threshold to avoid transmitting background noise and ensure proper voice recognition.
The Audio Processing section offers noise suppression options. Mumble supports Speex and RNNoise algorithms, which can be used individually or together. RNNoise is generally more effective at suppressing constant background noise.
Echo suppression settings should be adjusted based on the equipment in use: more aggressive settings may be needed with speakers, while headphones often allow echo suppression to be turned off. Be cautious when adjusting the Maximum Gain setting, as too high a value can amplify noise and distort sound.
Incoming Sound Settings
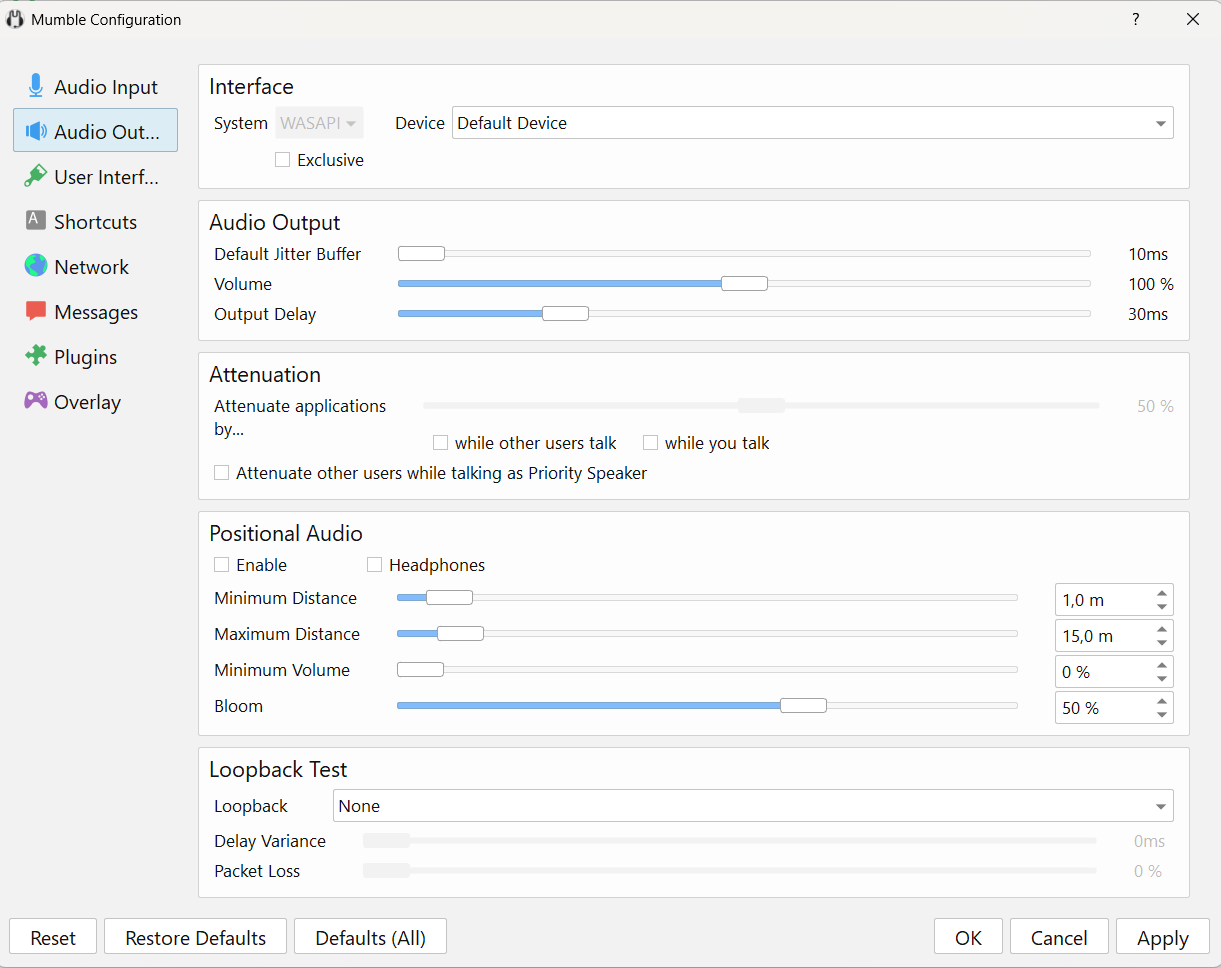
There are two key parameters in the “Audio Outgoing” section:
- The Default Jitter Buffer buffers incoming audio before playback to compensate for network instability. The default value is 10 ms; increase it if there is stuttering when people start speaking.
- Output Delay adds a buffer before sound is output. Too low a value may cause stuttering on some audio drivers. Increase this setting if you hear artifacts.
Volume can be adjusted using the slider in the client or through the system mixer. A useful feature is automatic attenuation of other applications’ sounds; when someone speaks, Mumble automatically reduces music or game noises.
Use the Loopback Test to check settings. The local mode tests input and output sound, while the server mode tests the network connection.
Messages
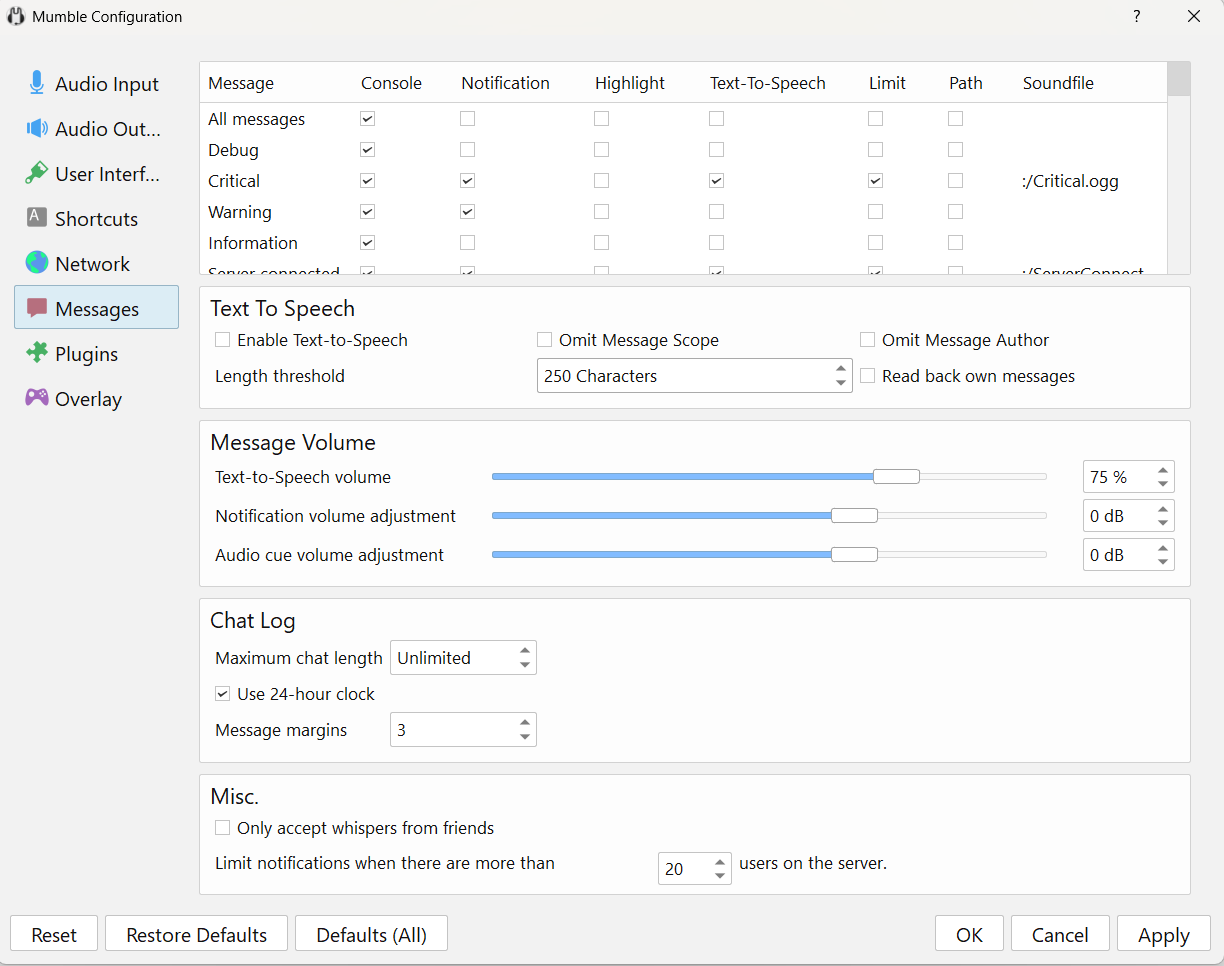
In the Messages section, you can customize which events are displayed in the chat window with sound alerts or text-to-speech narration. By default, basic notifications (user connections and disconnections, critical messages, and warnings) are enabled.
The Text to Speech option allows the system to read text messages aloud, which is convenient if you can’t constantly watch the screen. You can adjust its volume independently of the main chat volume. You can also limit the maximum length of narrated messages and exclude the sender’s name or message content from narration.
The Chat Log section lets you configure text message display: set a maximum chat history length, enable a 24-hour time format, and adjust message indentation for easier reading.
On servers with many users, it’s useful to limit notifications to prevent excessive notifications about connections and disconnections.
There’s also an option to Only accept whispers from friends, which limits reception of whispers to only messages from friends. The whisper feature itself remains unchanged: whispers are still sent by pressing a dedicated key.
Security and Additional Settings
The default port 64738 is easily detectable by scanners. To make it harder to find the server, you can change it to any other port.
Copy the configuration file to the host:
docker cp <container_ID>:/etc/mumble-server.ini ./mumble-server.iniEdit it with a text editor:
nano mumble-server.iniFind the line _port=64738 and change it to the desired port. Be cautious when choosing a port: system ports (1-1023) and popular ports (80, 443, 22, 25, 3306) may be occupied or blocked by the host. A safe range is 10000 to 65000.
Copy the file back:
docker cp ./mumble-server.ini <Container_ID>:/etc/mumble-server.iniRestart the server:
docker restart <container_ID>Users will need to specify the new port when connecting: IP:new_port
It’s important to back up the configuration file, especially if you’re not using Mumble for family communications.
Mumble’s user and channel data is stored in /mumble/mumble-server.sqlite inside the container.
Back it up regularly:
docker cp <container_ID>:/mumble/mumble-server.sqlite ./mumble-backup-$(date +%Y%m%d).sqliteYou can set up a cron job for automatic backups daily or weekly. If the server fails, you can restart a new container and restore settings from the backup.
After connecting and setting up, you can start chatting. If Voice-activation is enabled (by default), just start speaking, and the microphone will turn on automatically. During a conversation, a green frame around your name indicates that your voice is being transmitted.
To switch to another channel, double-click on it or drag your icon. To invite someone to join, provide their IP address and port 64738.
Basic functions are accessible through icons in the top panel or by right-clicking on your username: turn off the microphone, mute sound, enable Do Not Disturb mode. To exit, simply close the app.
Conclusion
We haven’t tested Mumble in a crowded parking lot, but seriously, it’s a simple and lightweight solution for voice communication that requires no complex setup. It sets up in 10 minutes, uses minimal resources, is not expensive, and isn’t dependent on other servers or network blocks.
Mumble won’t replace Zoom for large corporate meetings, nor will it become your primary messaging tool, but for family calls, small development teams, or gaming communities, it’s an excellent choice. Set it up, share the link, and forget about access issues!