Incus
在这篇文章中
信息
Incus 是一个开源的系统容器和虚拟机管理器。它是 LXD 的一个分支,提供了一个简单而强大的工具,用于在统一平台上管理 Linux 容器和虚拟机。
Incus 关键特性
- 容器和虚拟机管理:Incus 允许通过单一接口运行 Linux 系统容器和完整的 QEMU/KVM 虚拟机。
- 进程隔离:容器在隔离的环境中运行,拥有自己的文件系统、网络接口和进程。
- 网络功能:内置支持多种类型的网络——网桥、NAT、VLAN、容器的覆盖网络。
- 存储管理:灵活的存储池系统,支持不同的后端——dir、btrfs、ZFS、LVM。
- 快照和迁移:创建容器状态快照,在不中断服务的情况下在主机之间进行实时迁移。
- 配置配置文件:可重用的配置文件,用于快速部署具有预定义参数的容器。
- 资源限制:对每个容器的 CPU、内存、磁盘 I/O 和网络带宽进行精确控制。
- REST API:功能齐全的 HTTP API,用于自动化和与外部系统集成。
- Web 界面:内置 Web 管理面板,用于可视化基础设施控制。
- 镜像库:访问各种 Linux 发行版的现成镜像的广泛集合。
- 集群:能够将多个主机组合成单个集群以进行分布式管理。
部署功能
| ID | 软件名称 | 兼容操作系统 | 虚拟机 | 物理机 | vGPU | GPU | 最低CPU(核) | 最低内存(GB) | 最低硬盘(GB) | 自定义域名 | 是否启用 |
|---|---|---|---|---|---|---|---|---|---|---|---|
| 234 | Linux Containers Incus | Debian 13 | + | + | + | + | 2 | 2 | 50 | 否 | 订购 |
Incus 主要路径和文件:
- 主配置文件:
/etc/default/incus - 数据目录:
/var/lib/incus - 存储池:
/var/lib/incus/storage-pools/ - 容器:
/var/lib/incus/containers/ - 镜像:
/var/lib/incus/images/ - 日志文件:
/var/log/incus/incusd.log - 系统服务:
/usr/lib/systemd/system/incus*.service - Sysctl 配置:
/etc/sysctl.d/50-incus.conf - 用户配置:
/root/.config/incus/
备注
除非另有说明,我们默认从开发者网站或操作系统存储库安装软件的最新发布版本。
部署 Incus 后的入门指南
付款后,将向注册时指定的地址发送电子邮件通知,表明服务器已准备好运行。其中将包含 VPS IP 地址和访问凭据。我们的客户通过 服务器管理面板和 API — Invapi 管理设备。
认证数据可以在服务器管理面板的 Configuration >> Tags 选项卡或发送的电子邮件中找到:
- 访问 Incus Web 界面的链接:在标签 webpanel 中(端口 8443,HTTPS)
重要
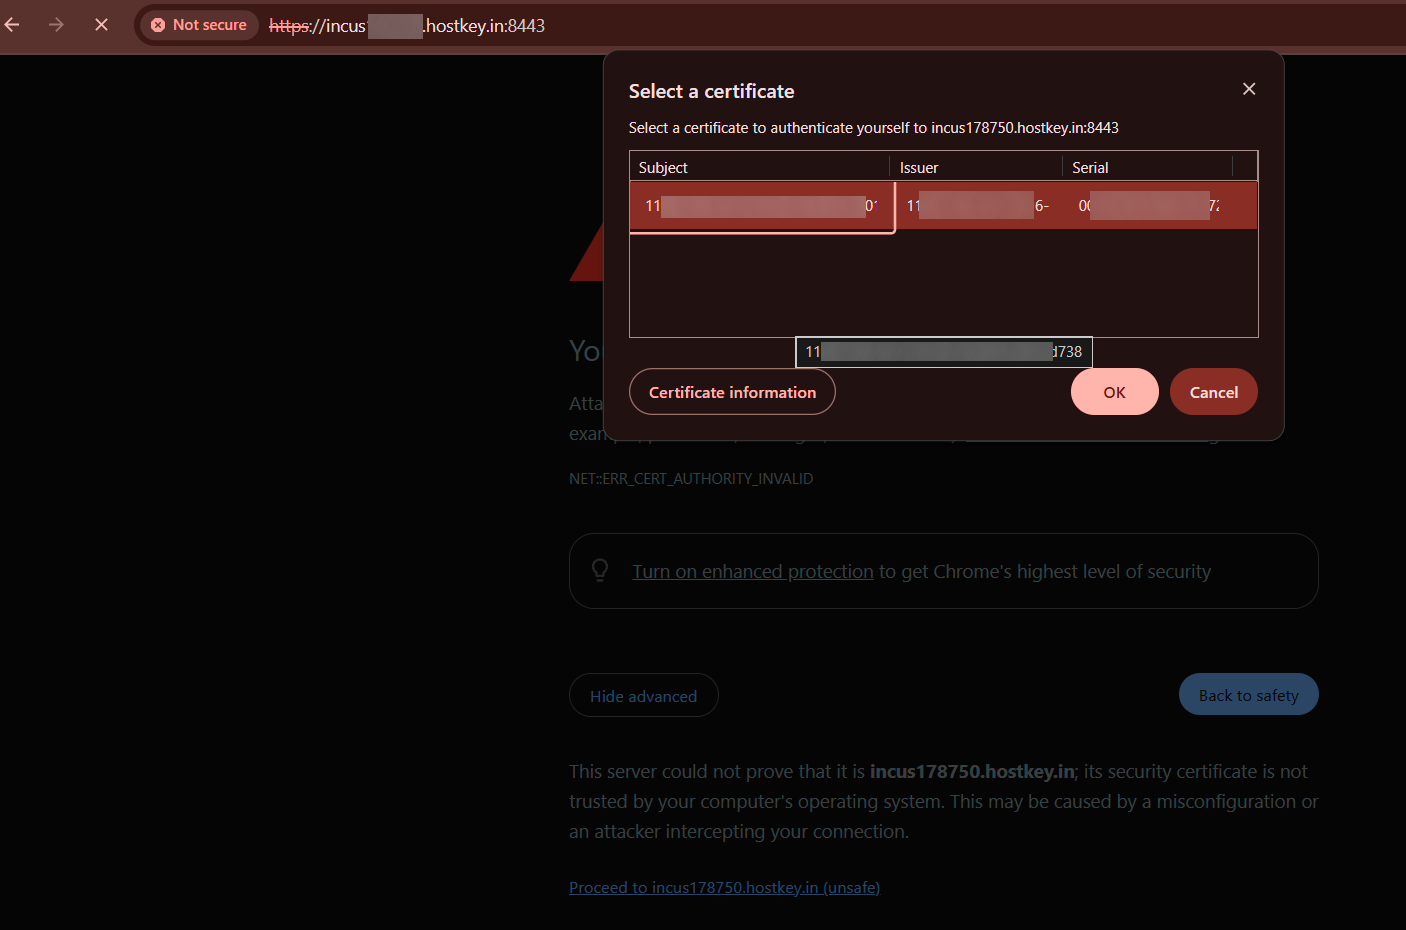
要访问 Web 界面,您必须使用 HTTPS 并在浏览器中接受自签名证书。
首次访问 Incus Web 界面时,由于自签名证书,浏览器会警告连接不安全。您必须接受证书才能继续:
接受证书后,将打开登录页面。点击 Login with TLS 按钮以开始身份验证过程:
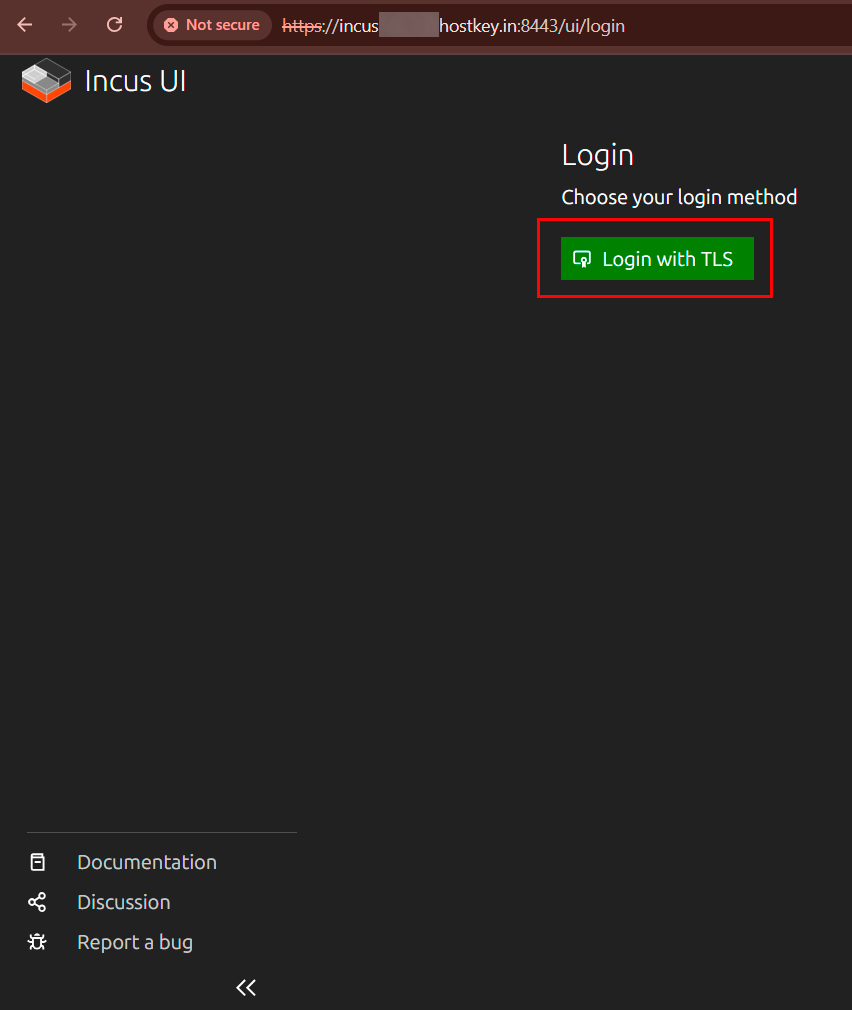
系统将重定向您到添加现有证书的页面:
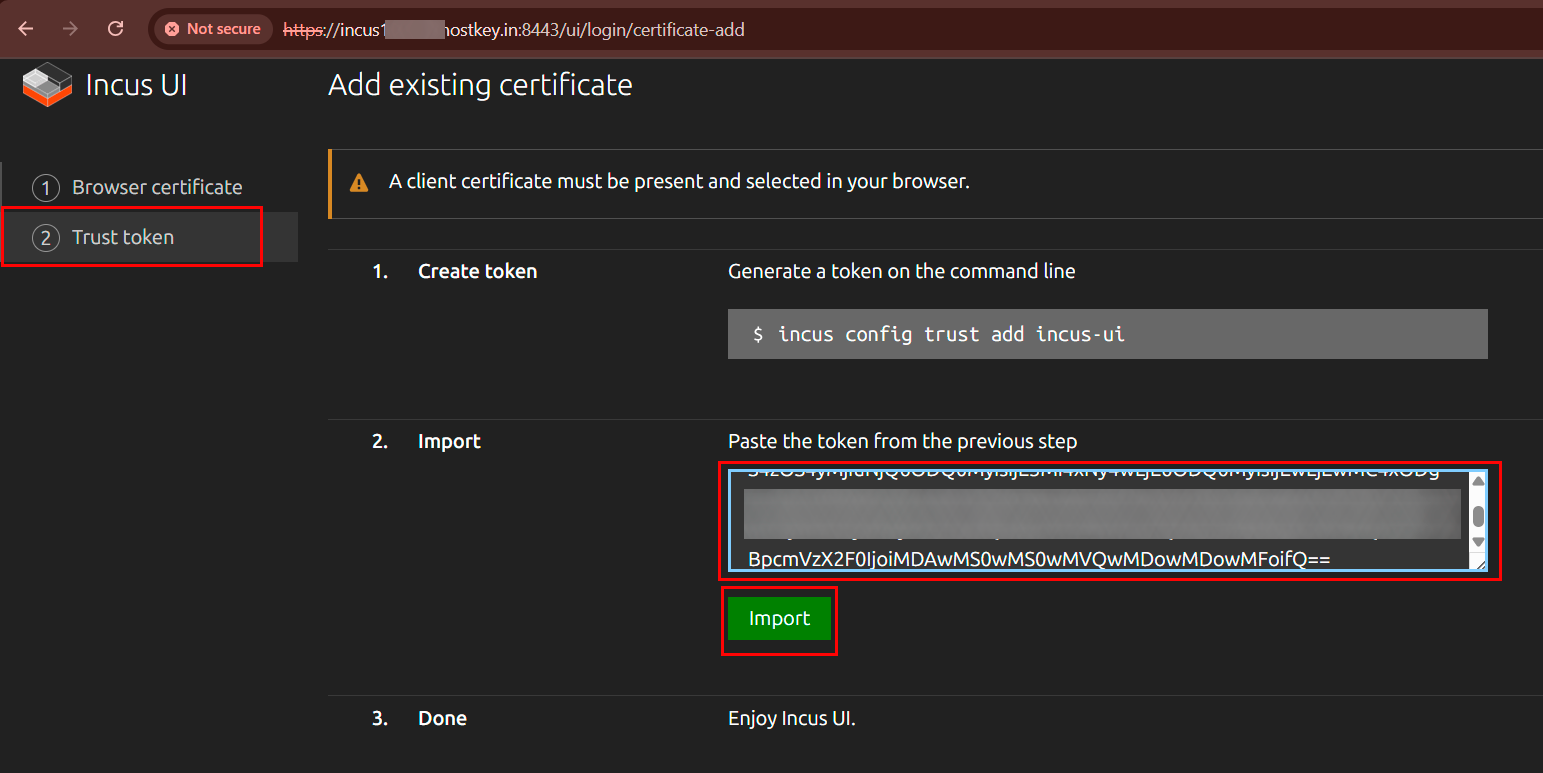
选择 Trust token 选项卡并按照说明操作:
-
在服务器终端中,执行生成令牌的命令:
-
系统将生成一个需要复制的令牌:

-
将获得的令牌粘贴到身份验证页面上的相应文本字段中,并点击
Import。
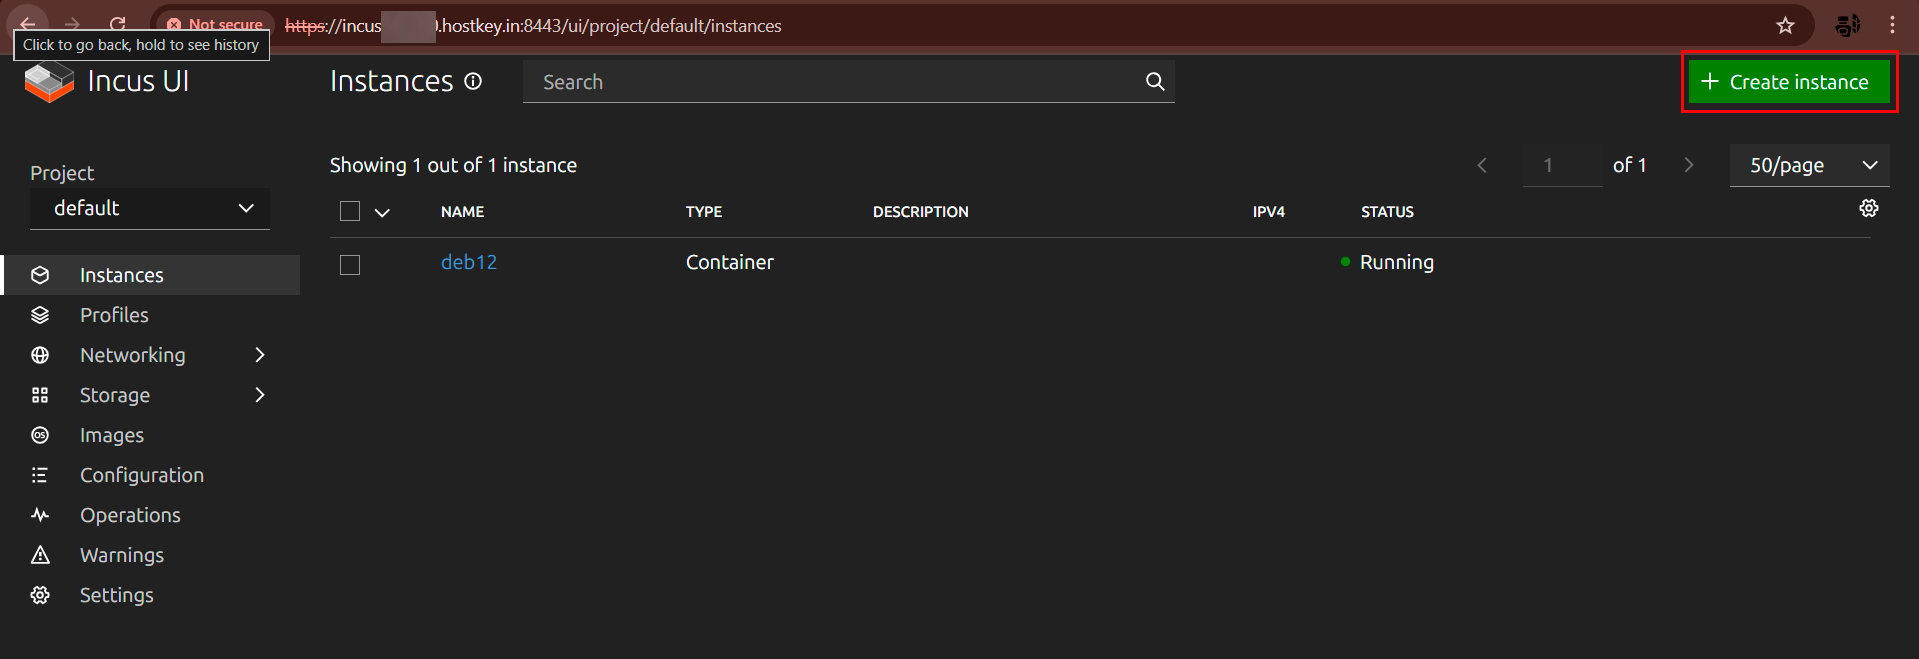
成功认证后,将打开带有实例列表的主 Web 界面页面。
通过 Web 界面创建新容器
要创建新容器,请点击界面右上角的 Create instance 按钮:
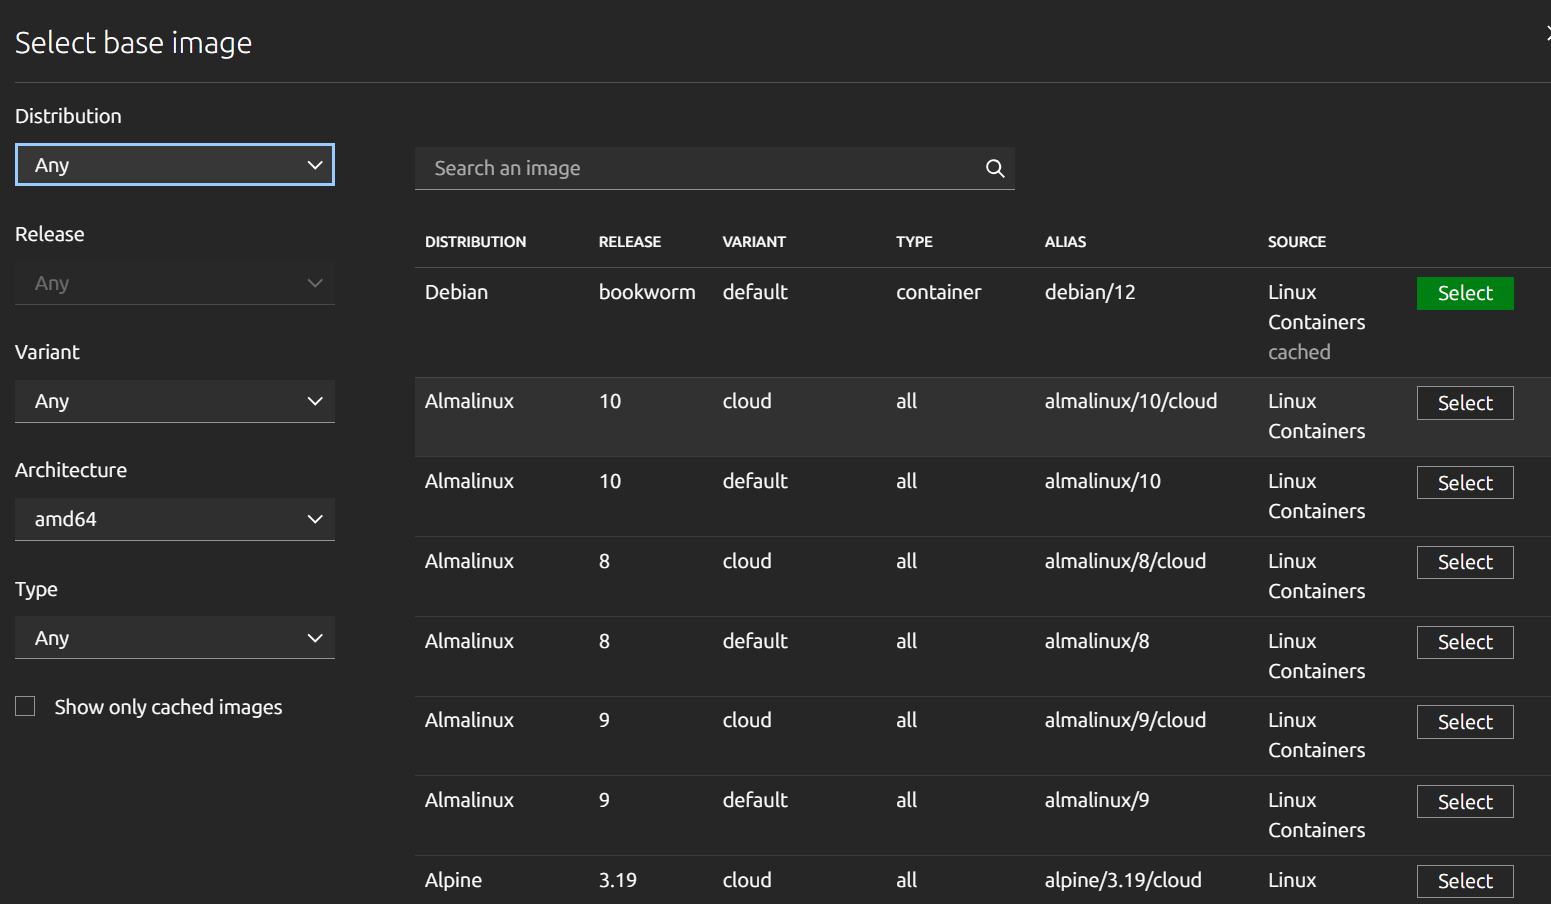
将打开一个带有几个配置部分的实例创建表单。要选择基础镜像,请点击 Browse images 按钮。将打开一个带有按发行版、版本、变体、架构和类型过滤的镜像选择窗口:
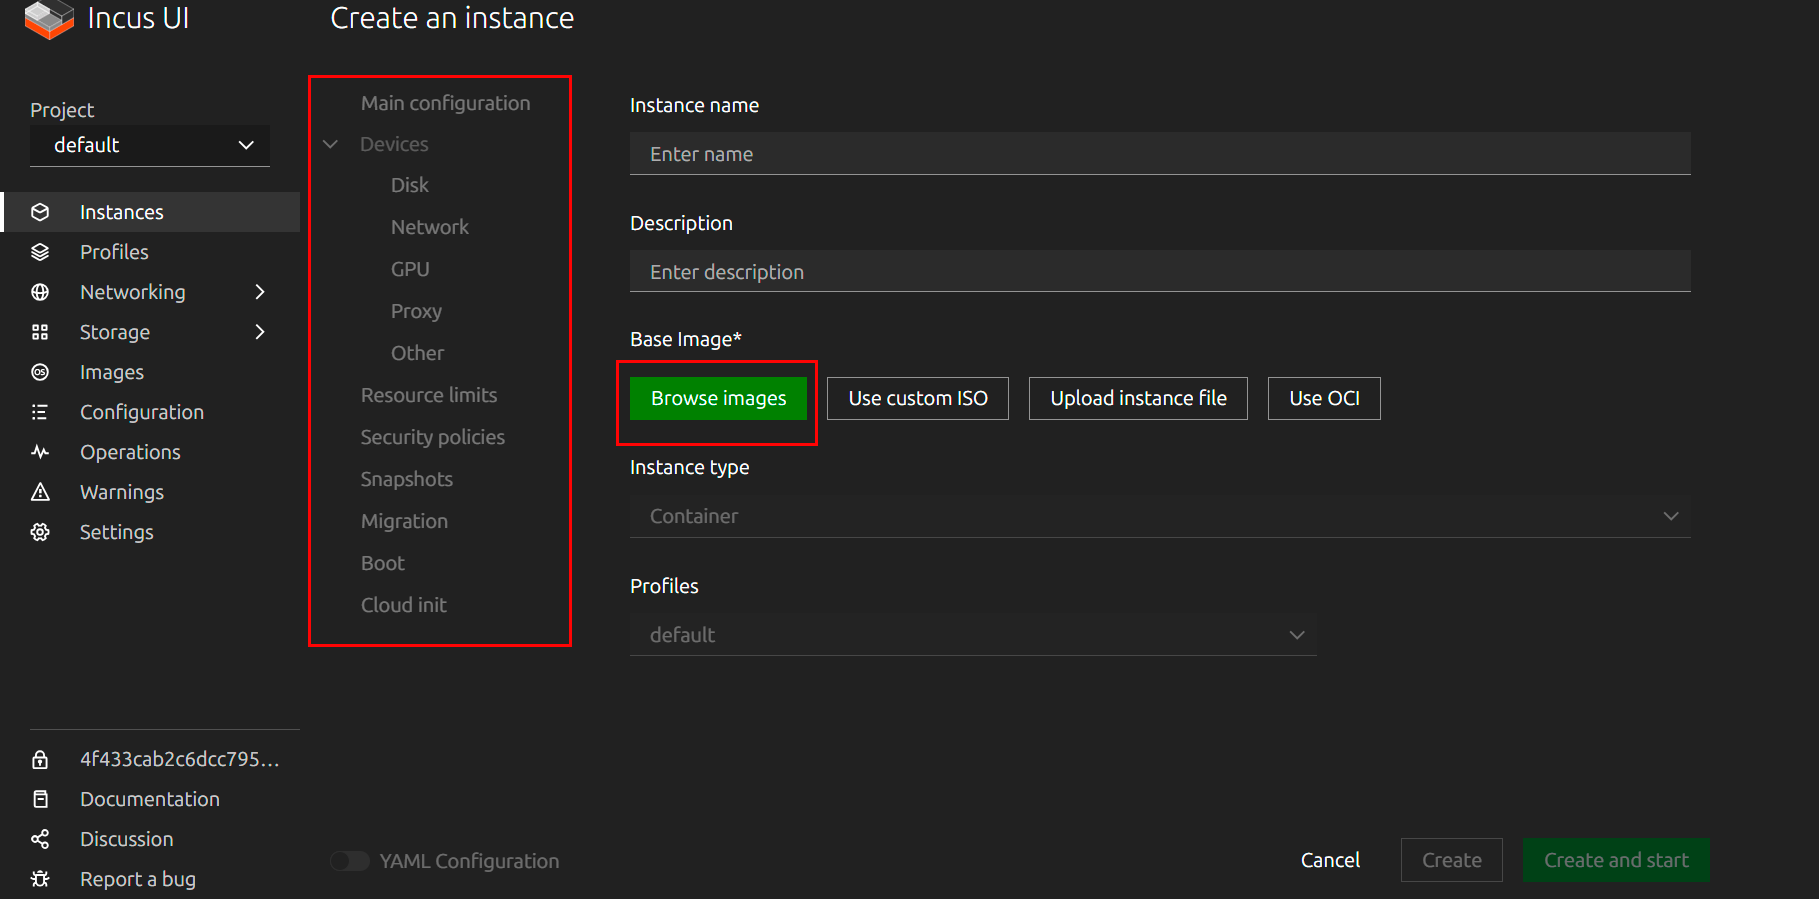
可用的配置部分如下:
- Main configuration — 基本容器参数:名称、描述、实例类型(容器或虚拟机)、基础镜像和分配的配置文件;
- Devices — 容器设备管理:
- Disk — 磁盘设备和挂载点配置;
- Network — 网络接口配置;
- GPU — 连接图形加速器;
- Proxy — 主机和容器之间的端口转发配置;
- Other — 其他设备类型;
- Resource limits — 资源限制:处理器 (CPU)、内存、磁盘 I/O 操作;
- Security policies — 安全策略:隔离配置、权限和安全配置文件 (AppArmor, SELinux);
- Snapshots — 容器状态快照管理,用于备份和恢复;
- Migration — 主机之间的容器迁移参数;
- Boot — 启动设置:启动设备顺序、系统启动时自动启动;
- Cloud init — 通过 cloud-init 自动配置容器初始化(用户、网络、包、脚本)。
通过点击旁边的 Select 按钮选择所需的镜像:
选择镜像后,填写基本参数:
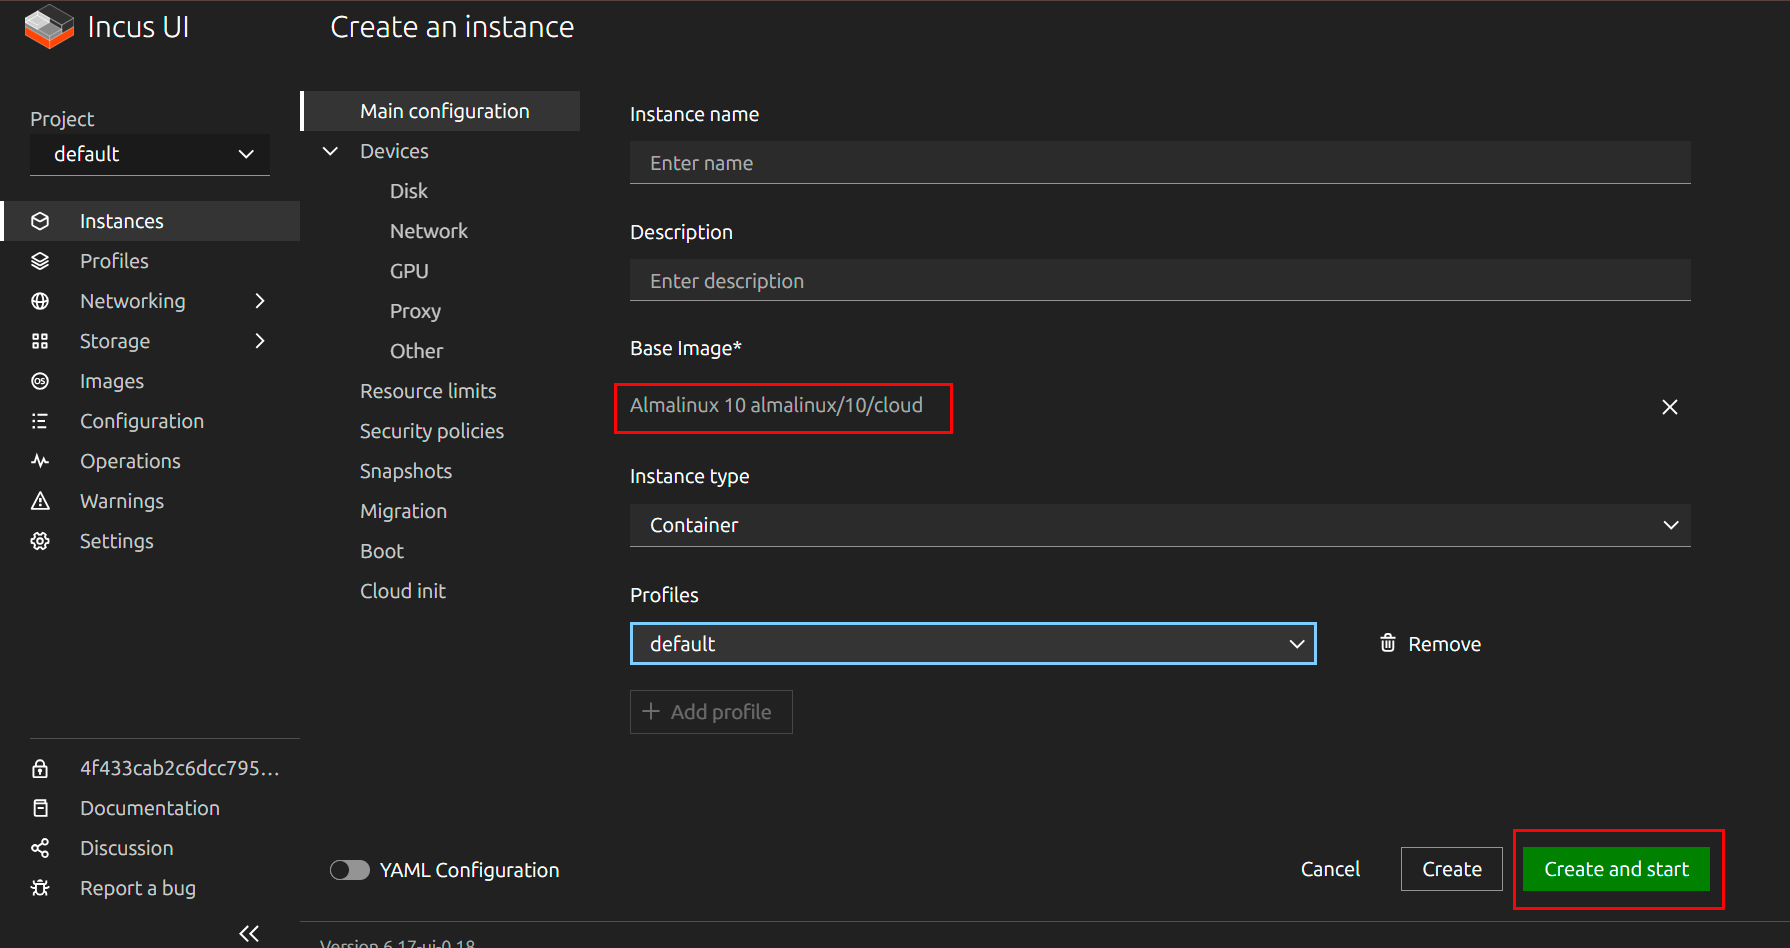
- Instance name — 容器名称;
- Description — 描述(可选);
- Instance type — 实例类型(Container 或 Virtual Machine);
- Profiles — 配置配置文件。
要立即在创建后启动容器,请点击 Create and start。要创建而不启动,请使用 Create 按钮。
容器状态监控
在容器部署期间,将显示镜像下载进度。“Setting up”状态及下载进度指示显示当前实例创建进度。安装完成后,状态将变为“Running”,并带有绿色指示器:

服务管理
检查状态:
重启服务:
停止服务:
启动服务:
查看日志:
初始基础设施设置
服务器部署后,建议执行初始 Incus 基础设施设置。
创建存储池
存储池定义容器数据的存储位置:
检查已创建的存储池:
要查看有关池的详细信息:
网络配置
为容器创建具有自动 IPv4 寻址的 NAT 网桥:
检查网络设置:
查看网络配置:
配置默认配置文件
default 配置文件定义新容器的基本配置。向配置文件添加根磁盘:
向配置文件添加网络接口:
检查配置文件配置:
创建和管理容器
创建容器
创建带有资源限制的 Debian 12 容器的示例:
命令参数:
images:debian/12- 来自公共存储库的镜像deb12- 容器名称--profile default- 使用默认配置文件-c limits.cpu=2- 限制为 2 个 CPU 核心-c limits.memory=2GiB- 内存限制为 2 GB
查看容器
所有实例列表:
输出将包含有关每个容器的状态、IP 地址和类型的信息。
管理容器状态
启动容器:
停止容器:
重启容器:
删除容器(需要先停止):
强制删除正在运行的容器:
容器访问
通过 bash 连接:
连接到 TTY 控制台:
要退出控制台,请使用键组合 Ctrl+a q。
端口转发
要从外部网络访问容器内的服务,通过代理设备进行端口转发:
此命令将主机端口 8080 转发到容器端口 80。
多个端口的示例:
HTTP:
HTTPS:
SSH:
管理容器配置
查看配置
查看完整的扩展容器配置:
查看不带配置文件的基本配置:
更改参数
设置配置参数:
CPU 限制:
内存限制:
磁盘 I/O 限制:
容器自动启动:
添加设备
添加设备的一般语法:
示例:
添加额外磁盘:
添加额外网络接口:
在容器中挂载主机目录:
移除设备:
处理快照和迁移
创建快照
快照允许保存容器状态以供后续恢复:
示例:
容器快照列表:
从快照恢复
示例:
删除快照:
重命名和复制
重命名容器:
在同一主机上复制容器:
将容器复制到另一个 Incus 主机:
要与远程主机一起工作,您必须首先添加一个远程主机:
管理镜像
查看镜像
本地镜像列表:
远程存储库中的镜像列表:
搜索特定发行版:
复制镜像
从公共存储库复制镜像并自动更新:
使用别名复制镜像:
从容器创建镜像
删除镜像
或通过别名:
网络交互
网络管理
网络列表:
查看网络配置:
创建新网络:
# 创建网桥网络
incus network create mybr0 \
  ipv4.address=10.10.10.1/24 \
  ipv4.nat=true \
  ipv6.address=none

# 创建 macvlan 网络
incus network create mymacvlan \
  type=macvlan \
  parent=eth0
编辑网络:
删除网络:
网络转发规则
创建端口转发的转发规则:
存储管理
管理存储池
池列表:
查看池信息:
创建存储池:
基于 Dir 的池:
Btrfs 池:
ZFS 池:
编辑池:
删除池:
管理卷
创建自定义卷:
池中的卷列表:
将卷附加到容器:
incus config device add <container> <device-name> disk \
  pool=<pool-name> \
  source=<volume-name> \
  path=/mount/path
复制卷:
删除卷:
配置 NAT 和路由
在某些情况下,可能需要手动配置 NAT 和路由规则,以提供容器对外部网络的访问。
切换到 nftables
启用 IP 转发
要永久应用,请添加到 /etc/sysctl.conf:
更改后重启 Incus:
配置 NAT 表
创建 NAT 表和 POSTROUTING 链:
为容器子网添加伪装规则:
备注
将 ens1 替换为您的外部网络接口名称,将 10.1.4.0/24 替换为您的 Incus 网桥子网。
配置 FORWARD 链
创建 filter 表和 FORWARD 链:
添加允许流量的规则:
允许来自容器的向外流量:
允许已建立/相关的流量返回:
nft insert rule ip filter FORWARD iifname "ens1" oifname "incusbr0" ct state established,related accept
检查 nftables 规则
查看所有规则:
保存规则(适用于 Debian/Ubuntu):
安装用于保存规则的包:
保存当前规则:
启用自动加载:
备注
有关 Incus 所有功能的详细信息,请参阅 官方开发者文档。
使用 API 订购带有 Incus 的服务器
要使用 API 安装此软件,请遵循 这些说明。