Proxmox Backup Server
In this article
- Proxmox Backup Server. Key Features
- Deployment Features
- Getting Started after Deploying Proxmox Backup Server
- Authentication
- Creating a Datastore (Storage)
- Datastore Management Interface
- Backup Types and Monitoring
- Using ZFS for Storage
- Integration of Proxmox Backup Server with Proxmox VE
- Ordering Proxmox Backup Server via API
Information
Proxmox Backup Server is specialized software for backing up virtual machines, containers, and physical servers. Proxmox Backup Server supports client-side deduplication, data compression, and encryption.
Proxmox Backup Server. Key Features
- Efficient Data Storage: Client-side and server-side data deduplication, compression, and incremental backups to save disk space and time.
- High Security: End-to-end encryption using modern algorithms (AES-256-GCM), key-based authentication, and support for two-factor authentication.
- Easy Administration: Intuitive web interface, RESTful API, and command-line tools for convenient backup management.
- Flexible Storage Options: Ability to create a datastore on a single disk or use ZFS, LVM, and support for remote storage via S3-compatible services.
- Integration with Proxmox VE: Seamless integration with Proxmox Virtual Environment for simplified virtual machine and container backups.
- Data Verification: Automatic integrity check of backups to ensure reliable recovery.
- Task Scheduling: Flexible scheduling of backup tasks using schedules and retention policies.
- Monitoring and Notifications: Tools for monitoring backup processes, receiving task status notifications, and error alerts.
- High Performance: Optimized for fast creation and restoration of backups with minimal impact on system performance.
- Cluster Support: Configuration of a high-availability cluster to ensure continuous backup and data recovery.
Deployment Features
| ID | Name of Software | Compatible OS | VM | BM | VGPU | GPU | Min CPU (Cores) | Min RAM (GB) | Min HDD/SDD (GB) | Custom Domain | Active |
|---|---|---|---|---|---|---|---|---|---|---|---|
| 303 | Proxmox Backup Server 3.3 | Debian 12 | + | + | + | + | 2 | 2 | 60 | No | ORDER |
Getting Started after Deploying Proxmox Backup Server
After payment, an email notification will be sent to the address specified at registration indicating that the server is ready for operation. It will include the VPS IP address and credentials for access. Our company's clients manage equipment through the Server Management Panel and API — Invapi.
Authentication data can be found either in the Configuration* >> **Tags tab of the server management panel or in the sent email: - Username: root; - Password: Sent by email upon server readiness post-deployment.
Authentication
To start working with Proxmox Backup Server, you need to:
- Open a web browser and enter in the address bar:
https://<IP-address-of-the-server>:8007 - Accept the SSL certificate security warning (on first connection);
- Enter credentials:
- Username:
root; - Password: Received upon server order;
- Realm: Select
Linux PAM standard authentication;
- Username:
- Click the
Loginbutton:

Information
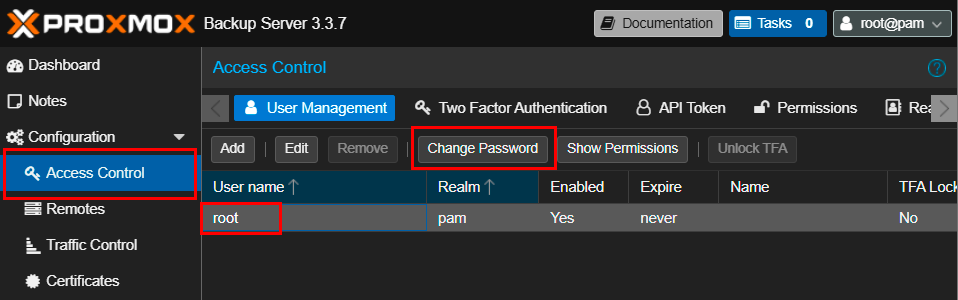
After the first login, it is recommended to change the administrator's password for security purposes. This can be done in the section Configuration >> Access Control >> Change Password button:
It is also possible to connect via SSH to execute commands in the terminal:
Creating a Datastore (Storage)
Proxmox Backup Server allows you to configure a datastore on a separate disk or in a directory on one disk. To create a datastore:
- In the web interface, go to the Data Storage section
- Click the
Add Datastorebutton -
Fill in the necessary fields:
- Name: Enter a unique name for the datastore. Important: The name should contain only lowercase Latin letters, numbers, and underscores (e.g.,
my_datastore). Spaces, uppercase letters, and special characters are not allowed; - Backing Path: Specify the absolute path to the directory for storing backups;
- Garbage Collector Schedule: Choose a garbage collector schedule (e.g.,
daily); - Deletion Schedule: Select a cleanup schedule for old copies (e.g.,
daily); - If necessary, mark the option Removable datastore - allows marking the datastore as removable (e.g., an external disk);
- Comment: Add a comment (optional).
- Name: Enter a unique name for the datastore. Important: The name should contain only lowercase Latin letters, numbers, and underscores (e.g.,
Important
If the entered name of the datastore does not match the allowed format, the system will display an error parameter verification errors (400) with the clarification name: value does not match the regex pattern. In this case, change the name using only permitted symbols.
Creating a Datastore on One Disk in a Separate Directory
A feature of Proxmox Backup Server is the ability to create a datastore on one disk in a separate directory: 1. First, create a directory that will be used for storing backups through SSH or console:
2. When creating a datastore in the web interface: - In the Datastore Path field, specify the path to the created directory:/backups - Fill out other parameters as needed - Click 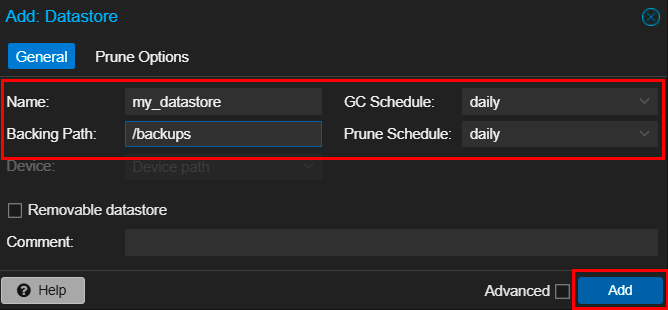
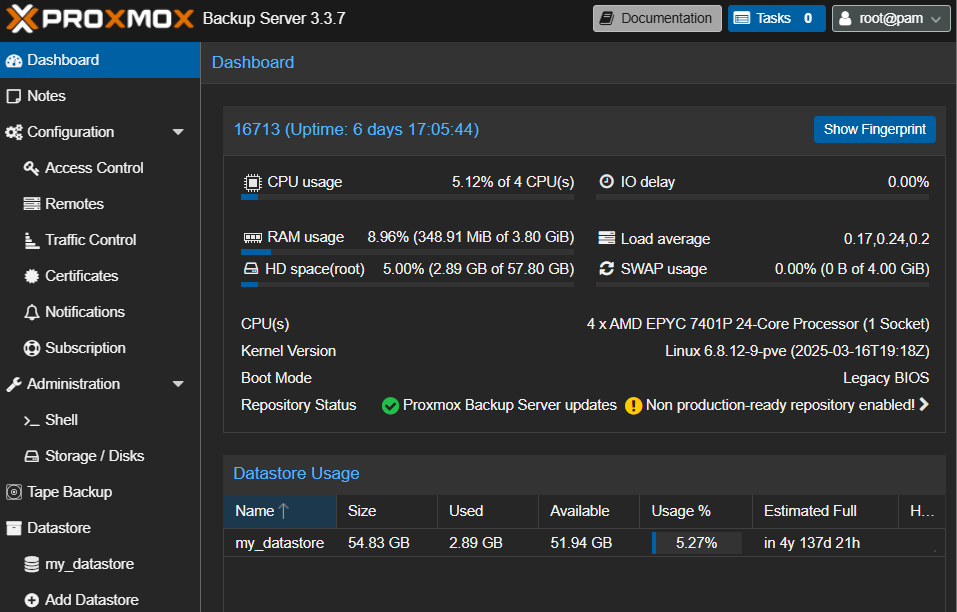
After that, the created datastore will be available for use and management:
Note
When creating a datastore on one disk in a separate directory, pay attention to the available disk space. It is recommended to leave at least 10% free space for system needs.
Datastore Management Interface
After creating a datastore, you will have access to various management tools through tabs:
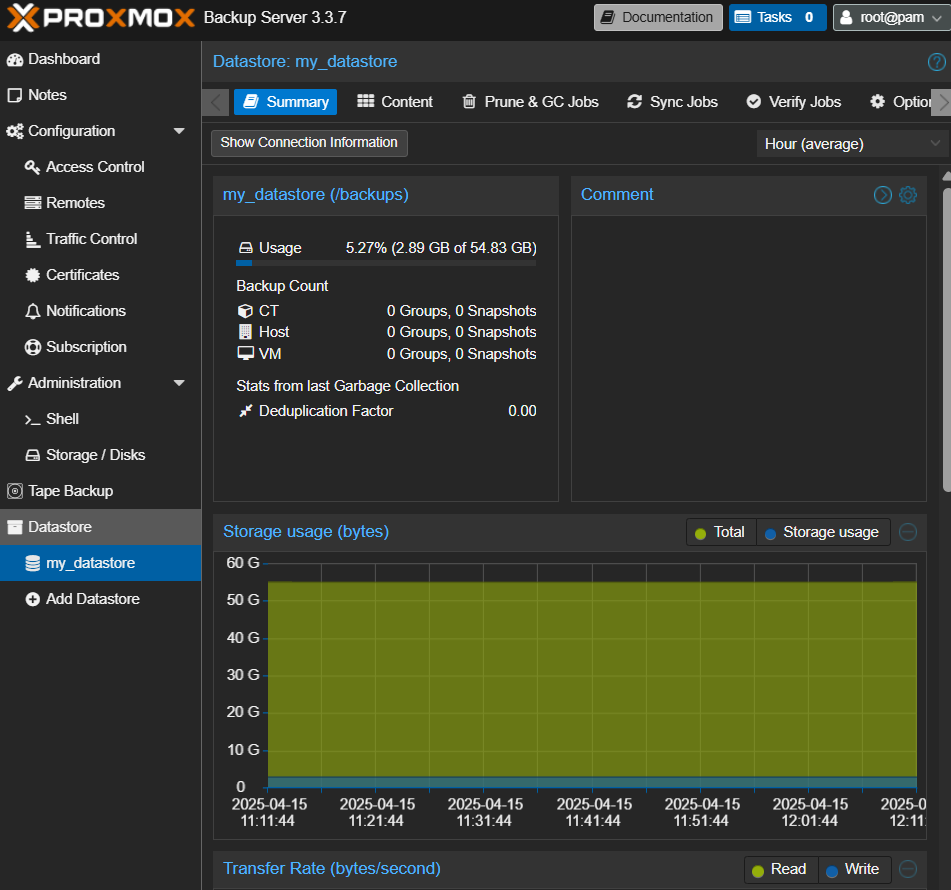
- Summary: Main information about the datastore, including disk space usage and deduplication factor;
- Contents: View and manage saved backups;
- Prune & GC Jobs: Set up clean-up and garbage collection tasks;
- Sync Jobs: Set up synchronization with other datastores;
- Verify Jobs: Set up regular integrity checks of data;
- Settings: Change datastore settings;
- Permissions: Manage access permissions to the datastore.
Backup Types and Monitoring
Proxmox Backup Server supports several types of backups:
- Container: Backups of LXC containers;
- Host: Backups of physical servers;
- Virtual Machine: Backups of virtual machines (QEMU/KVM).
The system displays for each type the number of groups and snapshots in the datastore.
Monitoring Datastore Usage
In the datastore section, you can track:
- Disk Space Usage: Total used and free space;
- Deduplication Factor: Indicator of data deduplication efficiency. A value above 1.0 means that the system effectively eliminates duplicate data. For example, a factor of 2.0 means that thanks to deduplication, twice as much space is saved;
- Usage Graph: Visual display of datastore filling dynamics over time;
Note
Detailed information on the main settings of Proxmox Backup Server can be found in the developers' documentation.
Using ZFS for Storage
Proxmox Backup Server supports creating storage on ZFS, which provides additional benefits in the form of built-in data protection, compression, and snapshots at the file system level.
What is ZFS and why should you use it
ZFS is both a file system and volume manager, ensuring high data integrity through checksums for all data and metadata. It provides RAID protection at the file system level without the need for additional hardware RAID controllers, supporting various configurations (RAID-Z1, RAID-Z2, RAID-Z3, mirroring). ZFS allows you to create instant system snapshots that take up minimal space, provides built-in compression without noticeable performance loss, as well as deduplication to eliminate duplicate data blocks. For Proxmox Backup Server, using ZFS is particularly beneficial as it increases the reliability of backup storage, provides additional protection against data corruption, and allows more efficient use of disk space. It is important to note that for maximum efficiency, ZFS is recommended to be used on physical servers with direct access to disks, rather than on virtual machines where direct access to hardware resources is limited.
Important
When ordering Proxmox Backup Server through the Invapi control panel at the Apps and panels stage, the necessary packages for working with ZFS are installed automatically. If you selected installation only through the Operating System stage without selecting Proxmox Backup Server at the Apps and panels stage, you need to install additional packages manually before using ZFS.
Installing Necessary Packages for ZFS (only for manual installation)
If you installed Proxmox Backup Server manually, you need to install the following packages to work with ZFS:
After installing the packages, restart the server to apply the changes:Creating a ZFS Pool
- Identify available disks using the command:
- Create a ZFS pool (example for one disk): Or for RAID-Z (similar to RAID-5, requires at least 3 disks):
- Check the created pool:
Integration of Proxmox Backup Server with Proxmox VE
One of the key advantages of Proxmox Backup Server is the ability to seamlessly integrate with Proxmox Virtual Environment for efficient virtual machine and container backups.
Adding Proxmox Backup Server in Proxmox VE
- Log into the Proxmox VE web interface (
https://<IP-address_Proxmox_VE>:8006); -
Go to Datacenter > Storage:
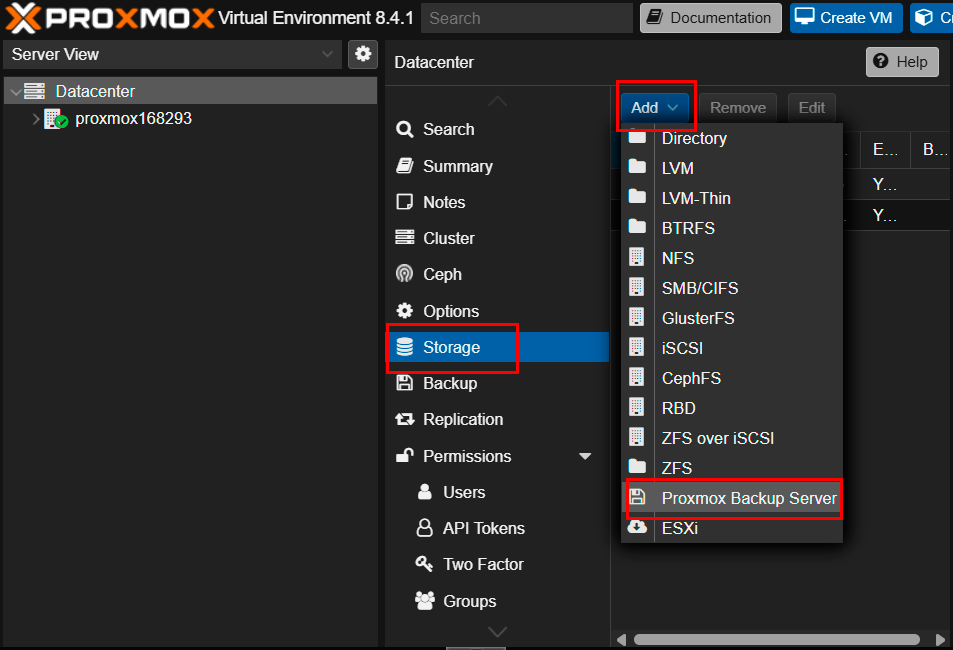
-
Click the
Addbutton and select Proxmox Backup Server; -
Fill in the necessary fields:
- ID: Unique identifier of the datastore (e.g.,
pbs); - Server: IP address of the PBS server (format:
<IP>:8007); - Datastore: Name of the datastore created on Proxmox Backup Server;
- Username: Username for authentication (format:
root@pam); - Password: User password;
- Fingerprint: Leave the field empty on first connection attempt;
- Click the
Addbutton to save settings:
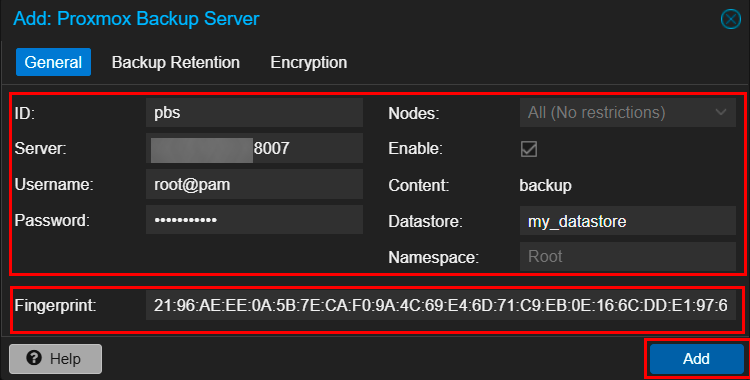
- ID: Unique identifier of the datastore (e.g.,
Note about Certificate Fingerprint
During the first connection attempt without specifying a certificate fingerprint, the system may display an error like:
create storage failed: pbs: error fetching datastores - fingerprint '21:96:AE:EE:0A:5B:7E:CA:F0:9A:4C:69:E4:6D:71:C9:EB:0E:16:6C:DD:E1:97:65:70:DF:C2:EA:98:82:EB:DB' not verified, abort! (500)
For additional verification, you can manually obtain the fingerprint using the command:
The obtained fingerprint should match the one shown in the error message.Creating a Backup Task in Proxmox VE
-
Go to Datacenter > Backup:
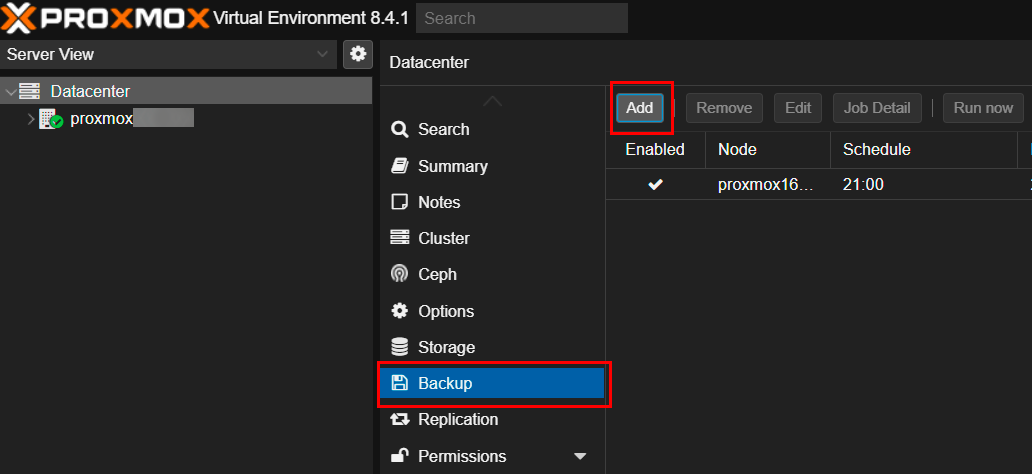
-
Click the
Addbutton -
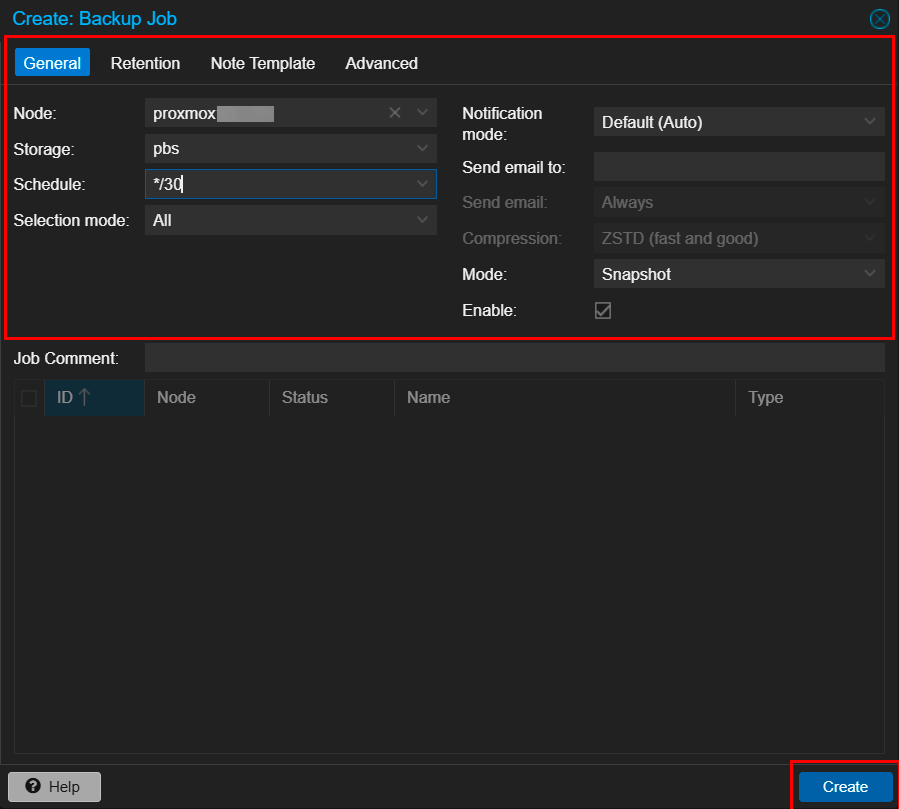
Configure backup parameters:
- Storage: Select the previously added PBS datastore;
- Schedule: Set a schedule;
- Selection Mode: Choose which VMs to back up (All/Include/Exclude);
- Compression: Choose a compression method (
zstdis recommended); - Mode: Choose the copy mode (snapshot/pause/stop);
- Enable: Activate the task;
- Click
Createto save the task:
Setting up Proxmox Backup Client on Proxmox VE
-
On Proxmox VE servers, the
proxmox-backup-clientis usually pre-installed. Check for the presence of the client: -
Connect to Proxmox Backup Server with datastore specification:
-
On first connection, the system will display a certificate fingerprint and request confirmation. Enter
yto confirm. Remember or note this fingerprint - it is needed when adding the datastore in Proxmox VE. -
To check connection status and information about the datastore:
-
In Proxmox VE, when adding a PBS datastore, use the certificate fingerprint from step 3 in the "Fingerprint" field.
-
For all operations with Proxmox Backup Client version 3.4.0, it is necessary to explicitly specify the
--repositoryparameter with the full repository address, including the datastore name.
Restoring Virtual Machines from Backups
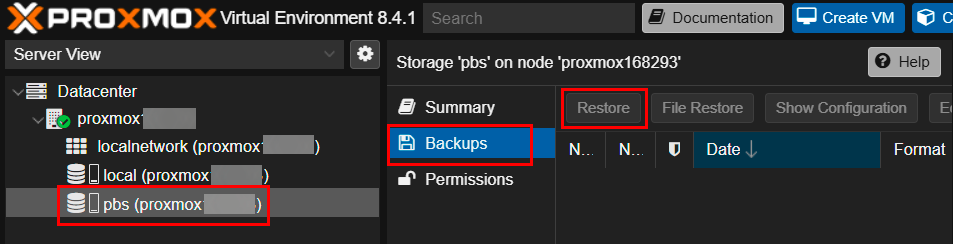
- In the Proxmox VE web interface, go to the PBS datastore by clicking on it in the sidebar:
proxmox_<ID_server>>pbs (proxmox_<ID_server>); - Go to the Backups tab;
- Select the desired backup from the list (when they appear);
- Click the
Restorebutton in the top panel; - In the opened dialog window, configure restore parameters;
- Click
Restoreto start the process:
Tip
For increased security, it is recommended to create a separate user on PBS with limited rights instead of using the root account.
Note
Detailed information on the main settings of Proxmox VE can be found in the developers' documentation.
Ordering Proxmox Backup Server via API
To install this software using the API, follow these instructions.