Talos OS
In this article
Information
Talos OS is a modern operating system specifically developed for running Kubernetes. It uses an immutable file system and container architecture, providing high security, minimal attack surface, and optimized performance of Kubernetes clusters.
Talos OS. Main Features
- Minimizes the chance of attacks: lack of shell (shell), package manager, and other standard Linux components reduces security threats.
- Immutable infrastructure: based on immutability concept where updates are applied atomically rather than modifying the existing system.
- Embedded Kubernetes: integrated Kubernetes optimized for maximum performance, not installed over the system.
- API-centric management: complete management through API without needing SSH or executing commands in a shell.
- High automation: automated configuration and recovery of cluster components without manual intervention.
- Simplified updates: reliable OS and Kubernetes update with automatic rollback on errors.
- Built-in container support: optimized for running containerized applications.
- Strict security: compliance with best security practices, including enforced encryption and signature verification.
- Efficient resource usage: minimal consumption of system resources to maximize allocation to workloads.
- High resilience: designed to operate in distributed and fault-tolerant environments.
Deployment Features
| ID | OS Name | Alias | Active | BM | GPU | VPS | VDS | Family | OS Group | CloudInit | Avilible |
|---|---|---|---|---|---|---|---|---|---|---|---|
| 268 | Talos 1.9.5 | - | Yes | + | + | + | - | Talos | Others | No | ORDER |
Important: Temporary Loading Without Installation
When ordering a server with Talos OS, the system is initially loaded into RAM and not installed on disk. If the server is rebooted before completing the configuration and installation process, the system will be lost and require reordering.
When ordering a server with Talos OS, you receive:
- A server with temporarily loaded Talos OS in maintenance mode;
- Access to the server console through the control panel;
- The ability to configure and install the system on disk using Talos tools.
Installing Talos OS on the Provided Server
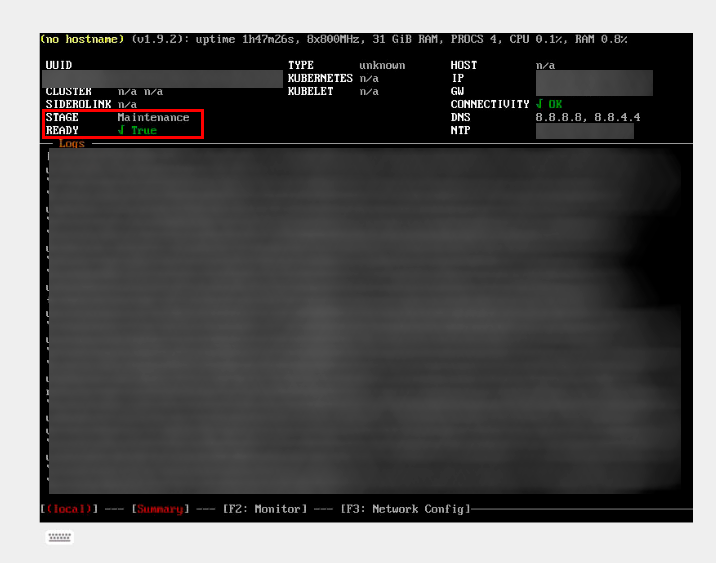
After receiving a server with Talos OS, you need to go to the servers and API management panel — Invapi go to the server card and open the Native Console. You will see the system in maintenance mode (Maintenance) with a Ready: True note through the control panel console. This is a temporary state requiring further configuration for permanent installation:
Step 1: Loading Talos CLI Tool
First, install the utility talosctl on your local machine:
For Linux/MacOS:
For Windows:
- Create a folder for talosctl (if it doesn't exist yet)
- Download the latest version of talosctl for Windows
- Add the path to talosctl to the PATH environment variable
Information
You can also install talosctl without using the command line:
- Download the latest version of talosctl for Windows directly from GitHub;
- Rename the downloaded file to
talosctl.exe; - Copy the file into the folder
C:\Windows\System32\(administrator rights required).
After installation, open a new terminal window and check functionality:
Step 2: Preparing Configuration Files
Generating secrets:
Generating basic configuration:
Replace [SERVER-IP] with the actual IP address of your server.
Step 3: Creating a Patch File
The disk and interface parameters in the configuration should match your server's hardware. To determine these values, run the following commands:
-
Determine available disks
2. Determine network interfaces
In the command output, find:
- The name of your main disk (usually
/dev/sda,/dev/vdaor/dev/nvme0n1); - The name of your network interface (usually
eth0,ens3,enp0s3and so on).
Create a file named patch.controlplane.yaml with the following content:
cluster:
  apiServer:
    certSANs:
      - [SERVER-IP]
      - 127.0.0.1
      - localhost
      - kubernetes
      - kubernetes.default
      - kubernetes.default.svc
      - kubernetes.default.svc.cluster.local
machine:
  install:
    disk: /dev/sda
    image: factory.talos.dev/installer/376567988ad370138ad8b2698212367b8edcb69b5fd68c80be1f2ec7d603b4ba:v1.9.5
    wipe: true
    extraKernelArgs:
      - talos.platform=metal
  features:
    hostDNS:
      enabled: false
      forwardKubeDNSToHost: false
  kubelet:
    clusterDNS:
      - [SERVER-IP]
  network:
    hostname: node-talos
    interfaces:
      - interface: eth0
        dhcp: true
    nameservers:
      - 8.8.8.8
      - 8.8.4.4
  time:
    disabled: false
    servers:
      - ntp.ix.com
    bootTimeout: 2m0s
Replace [SERVER-IP] with your server's IP address in several places in the file.
Note
To work with static IPs, use the following patch
cluster:
  apiServer:
    certSANs:
      - 127.0.0.1
      - localhost
      - kubernetes
      - kubernetes.default
      - kubernetes.default.svc
      - kubernetes.default.svc.cluster.local
      - [SERVER-IP-ADDRESS]
machine:
  install:
    disk: /dev/sda
    image: factory.talos.dev/installer/376567988ad370138ad8b2698212367b8edcb69b5fd68c80be1f2ec7d603b4ba:v1.9.5
    wipe: true
    extraKernelArgs:
      - talos.platform=metal
  features:
    hostDNS:
      enabled: false
      forwardKubeDNSToHost: false
  kubelet:
    clusterDNS:
      - [SERVER-IP-ADDRESS]
  network:
    hostname: node-talos
    interfaces:
      - interface: [INTERFACE NAME]
        addresses:
          - [YOUR SERVER'S API]/[SUBNET MASK]
        mtu: 8765
        routes:
          - network: 0.0.0.0/0
            gateway: [YOUR SERVER's GATEWAY]
    nameservers:
      - 8.8.8.8
      - 8.8.4.4
  time:
    disabled: false
    servers:
      -  pool.ntp.org
    bootTimeout: 2m0s
Step 4: Configuring Talos Client
talosctl --talosconfig talosconfig config endpoint [SERVER-IP]
talosctl --talosconfig talosconfig config node [SERVER-IP]
Step 5: Applying Patch to Configuration
For Linux/macOS:
talosctl machineconfig patch controlplane.yaml --patch @patch.controlplane.yaml -o controlplane_patched.yaml
For Windows (PowerShell):
talosctl machineconfig patch controlplane.yaml --patch "`@patch.controlplane.yaml" -o controlplane_patched.yaml
Step 6: Applying Configuration to Server
talosctl --talosconfig ./talosconfig apply-config --insecure -n [SERVER-IP] -e [SERVER-IP] --file ./controlplane_patched.yaml
After running this command, the installation process will begin on the server. You can monitor this process through the control panel console.
Step 7: Waiting for Installation Completion
Wait until the server's console status changes:
Stage: Booting>Stage: Running;Ready: Trueshould remain active:
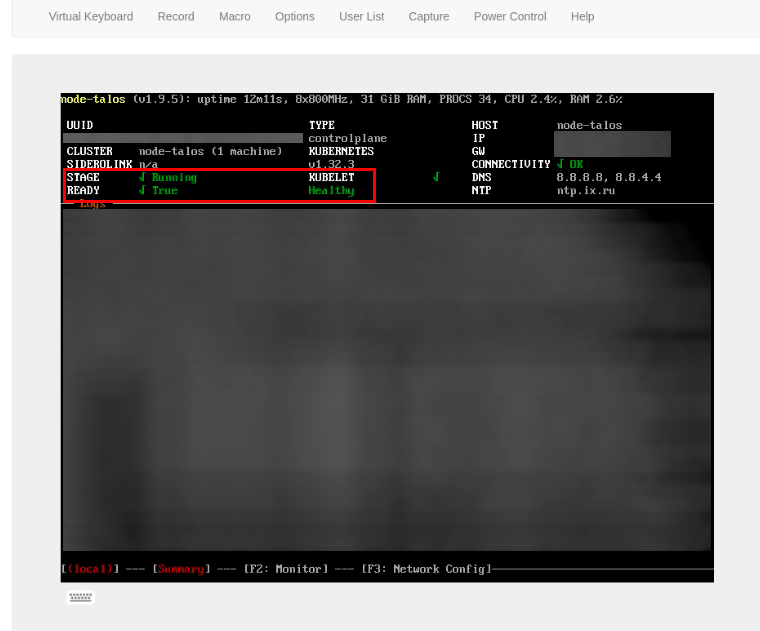
The console should display a message:
[talos] etcd is waiting to join the cluster. If this node is the first node in the cluster, please run 'talosctl bootstrap'
Step 8: Initializing Cluster
After the server displays a message about waiting to join the cluster, run:
Step 9: Obtaining Kubernetes Configuration
Wait for the message [talos] machine is running and ready in the console, then execute:
This command will create a file kubeconf, which can be used to manage the Kubernetes cluster.
Important Notes
- Save the files
secrets.yamlandtalosconfigin a secure location - they are necessary for future access to the cluster; - After successful installation, the system will be saved on disk and not lost upon reboot;
- The host name must exactly match between your configuration files and commands.
Configuration and Management
After successfully installing Talos OS on disk, you can manage your server using talosctl:
- Get node status:
- View system resources:
- List running services:
- Reboot the node:
Creating a Kubernetes Cluster
Your Kubernetes cluster should already be initialized after executing the bootstrap command. To start working with it:
- Install kubectl on your local machine:
For Linux:
curl -LO "https://dl.k8s.io/release/$(curl -L -s https://dl.k8s.io/release/stable.txt)/bin/linux/amd64/kubectl"
chmod +x kubectl
sudo mv kubectl /usr/local/bin/
For Windows:
- Configure access to the cluster:
for Linux/macOS:
for Windows PowerShell:- Verify cluster functionality:
Creating a Multi-Node Cluster
To add additional nodes to the cluster:
-
For a new control plane node:
-
For a worker node:
Note
Bootstrap is performed only once on the first node. Additional nodes will automatically join the existing cluster.
Cluster Management Interface
After creating the cluster, various tools are available for management:
- talosctl: managing Talos OS nodes;
- kubectl: managing Kubernetes resources;
- Web panels: additional control panels can be installed through Kubernetes.
System Update and Monitoring
Updating Talos OS
Talos OS supports atomic updates without cluster downtime:
-
Check available versions:
-
Perform node update:
System Monitoring
Talos OS provides several monitoring methods:
-
Built-in tools:
-
Install monitoring solutions through Kubernetes:
Note
Detailed information on additional Talos OS configurations is available in the developers' documentation.
Useful Articles on the Topic
Order Talos OS using API
To install this software using the API, follow these instructions.