Quant-UX
In this article
Information
Quant-UX is an open source platform for prototyping, usability testing, and user experience analytics. It allows you to create fully interactive prototypes of web and mobile applications, conduct user tests, and analyze user behavior (heatmaps, funnels, quantitative metrics) within a single tool. Quant-UX is often considered a free self-hosted alternative to Figma and Maze and is distributed under the GPL-3.0 license.
Quant-UX Key Features
- Interactive prototypes: all widgets are fully functional—users can enter data, check checkboxes, and interact with elements. Combined with animations and data handling, the prototype behaves like a real application.
- Visual Designer: a convenient canvas for creating screens, adding components, and building transitions between screens via links.
- AI Assistant: generation of prototype fragments based on text prompts (e.g., "create a login form") with subsequent fine-tuning and styling capabilities.
- Design Systems: building scalable design systems based on components, design tokens, and master screens.
- Animations: the Animation Composer tool for creating realistic animations and increasing prototype fidelity.
- Rich component palette: ready-made widget sets for WireFrame, Survey, iOS, and Android—you can start designing immediately.
- Smart tools: grid resizing, smart cloning, and repeater grids to speed up your workflow.
- A/B Testing: comparing multiple design variants within a single prototype using the A/B operator—simply link an element to a test and specify two variants.
- Business Logic: modeling logic through REST requests and decision elements, required fields, input format validation, and data binding for passing input between screens.
- Usability testing and analytics: collection of user behavior data, heatmaps, and quantitative UX metrics for data-driven decision making.
- Integrations and Import: drag-and-drop import of images (.webp, .jpg, .psd) onto the canvas, as well as importing layouts from Figma.
- Open Source: self-hosted deployment without the project limits on the number of projects and users found in cloud SaaS versions.
Deployment Features
| ID | Name of Software | Compatible OS | VM | BM | VGPU | GPU | Min CPU (Cores) | Min RAM (GB) | Min HDD/SDD (GB) | Custom Domain | Active |
|---|---|---|---|---|---|---|---|---|---|---|---|
| 633 | Quant-UX | Ubuntu 22.04 | + | + | + | + | 1 | 2 | 20 | No | ORDER |
Information
You can find information regarding the deployment features of this software at this link.
Note
Unless otherwise specified, we install the latest release version of the software from the developer's website or operating system repositories by default.
Note
Quant-UX is deployed in Docker and consists of several containers: a MongoDB database (quant-ux-mongo), a Java backend (quant-ux-backend), the Quant-UX web application / frontend (quantux<Server_ID>.hostkey.in), a separate websocket server (quant-ux-websocket-server), an nginx reverse proxy with automatic TLS certificate issuance, and a local Mailpit mail collector (quant-ux-smtp-sink).
Note
The Java backend is launched with the -Xmx2g parameter, meaning the maximum heap size is limited to 2 GB (actual consumption is significantly lower under no load). Considering MongoDB and other services, a minimum of 4 GB RAM is required; for comfortable operation under load, it is recommended to allocate more.
Note
For email notifications (password resets, participant invitations), a local Mailpit SMTP collector is pre-installed in the build—emails are intercepted locally and are not delivered to external addresses. To send real emails to users, specify your own SMTP server parameters (QUX_MAIL_HOST, QUX_MAIL_USER, QUX_MAIL_PASSWORD) in the backend settings.
Connection Data
After payment of the order, a notification will be sent to the email address provided during registration once the server is ready for operation. It will contain the VPS IP address, as well as the login and password for connection.
Service management is performed via the Quant-UX web interface, the link to which is located in Invapi.
Authorization data can be found in the Configuration >> Tags section of the server control panel or in the sent email:
- Link: in the webpanel; tag;
- Login and Password for server management: sent via email to your address once the software deployment is complete and the server is ready. Account credentials within the application itself (email and password) are created separately during registration upon your first visit to the web interface link.
The web interface will be available at: https://quantux{Server_ID_from_Invapi}.hostkey.in
Note
Technical parameters and passwords are set during automatic installation for Quant-UX operation (connecting the frontend to the backend, the backend to the MongoDB database, as well as SMTP and JWT secrets). Deployment files are located in the /opt/quantux directory. You can view the current values by running:
QUX_JWT_PASSWORD value and the mail server parameters with your own—check the official Quant-UX documentation for details. Getting Started After Quant-UX Deployment
-
For the first launch, go to a link like
https://quantux<Server_ID>.hostkey.in. A login screen with Login and Sign Up tabs will open. To create an account, go to the Sign Up tab.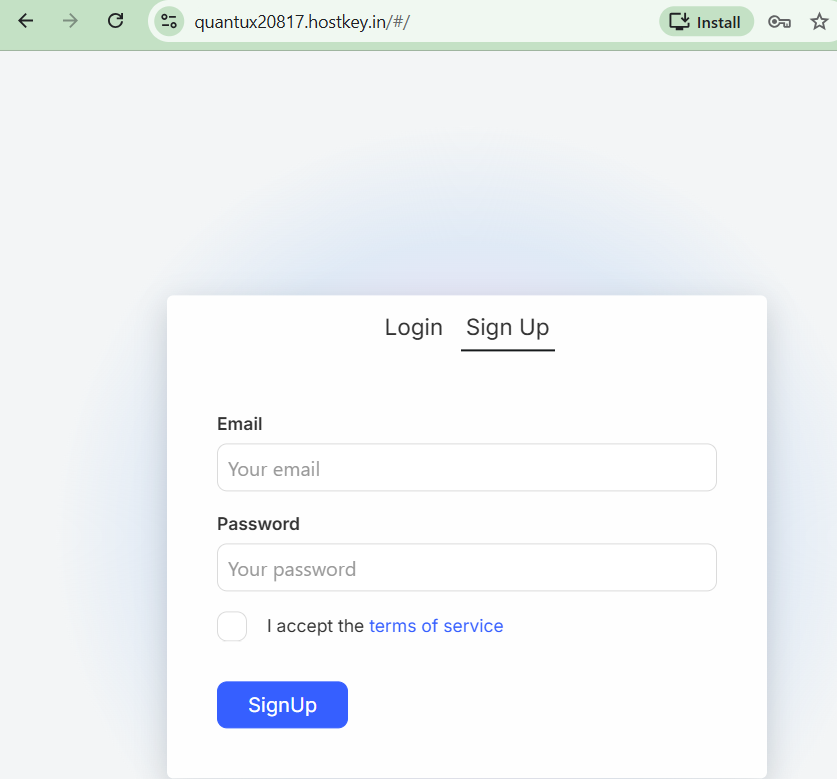
Fill in the registration fields:
- Email - your email address (also used as your username);
- Password - your password.
Check the I accept the terms of service checkbox and click
SignUp. For subsequent logins, use the Login tab.Note
A separate administrator account is not created by default—during registration, a standard user account (role
user) is created, which becomes the owner of its own prototypes and teams. Email address confirmation for login is not required. The ability to self-register is controlled by theQUX_USER_ALLOW_SIGNUPvariable, and the list of allowed email domains is controlled by theQUX_USER_ALLOWED_DOMAINSvariable in the/opt/quantux/quantux-compose.ymldeployment file. For more details on managing users and teams, see the developer documentation. -
After registration, you will be automatically logged in, and the Quant-UX desktop with a welcome message will open.
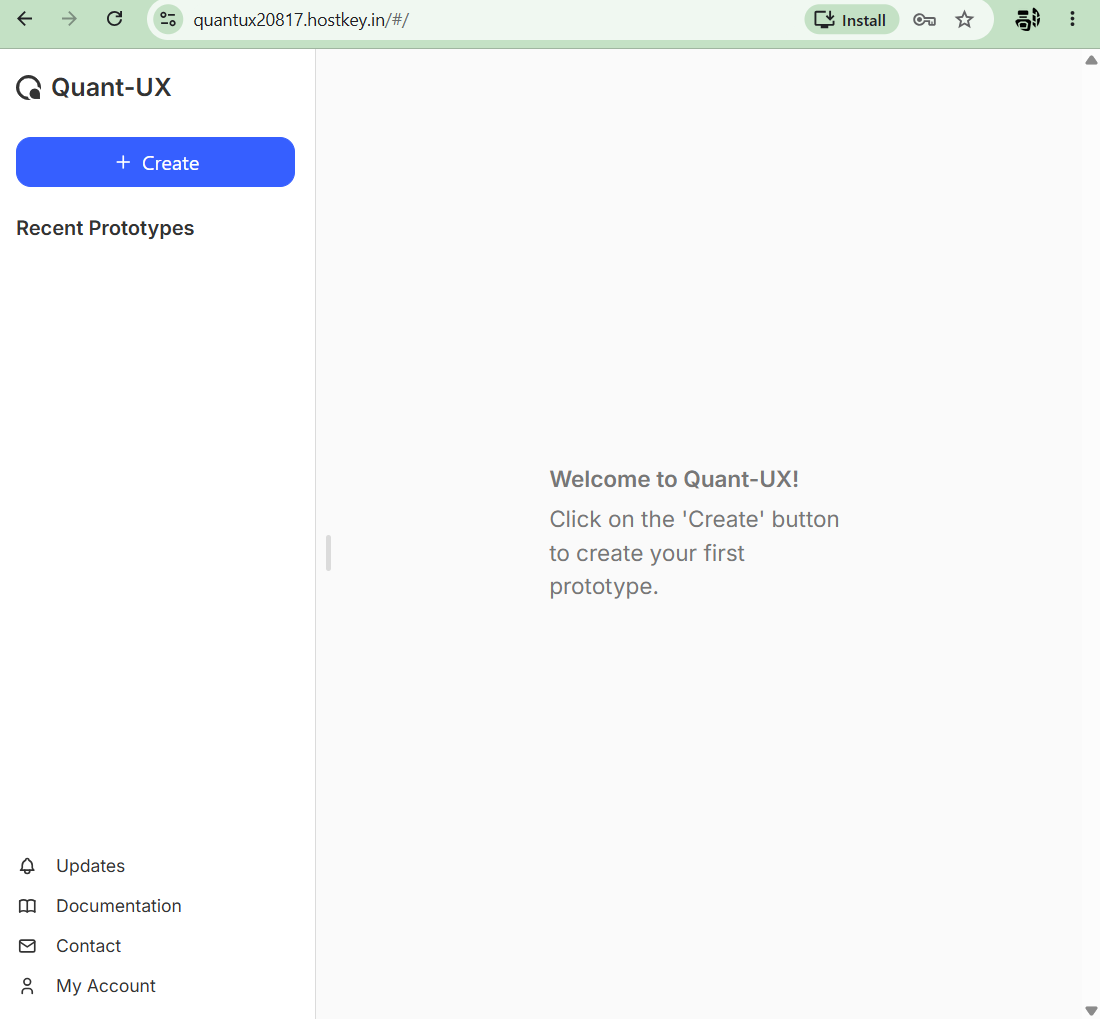
Main interface elements:
- + Create - create a new prototype;
- Recent Prototypes - a list of your recent prototypes;
- Updates - updates and notifications;
- Documentation - go to the official Quant-UX documentation;
- Contact - contact information and feedback;
- My Account - account settings.
-
To create a prototype, click
Create. In the Create a new prototype window that opens, specify the parameters: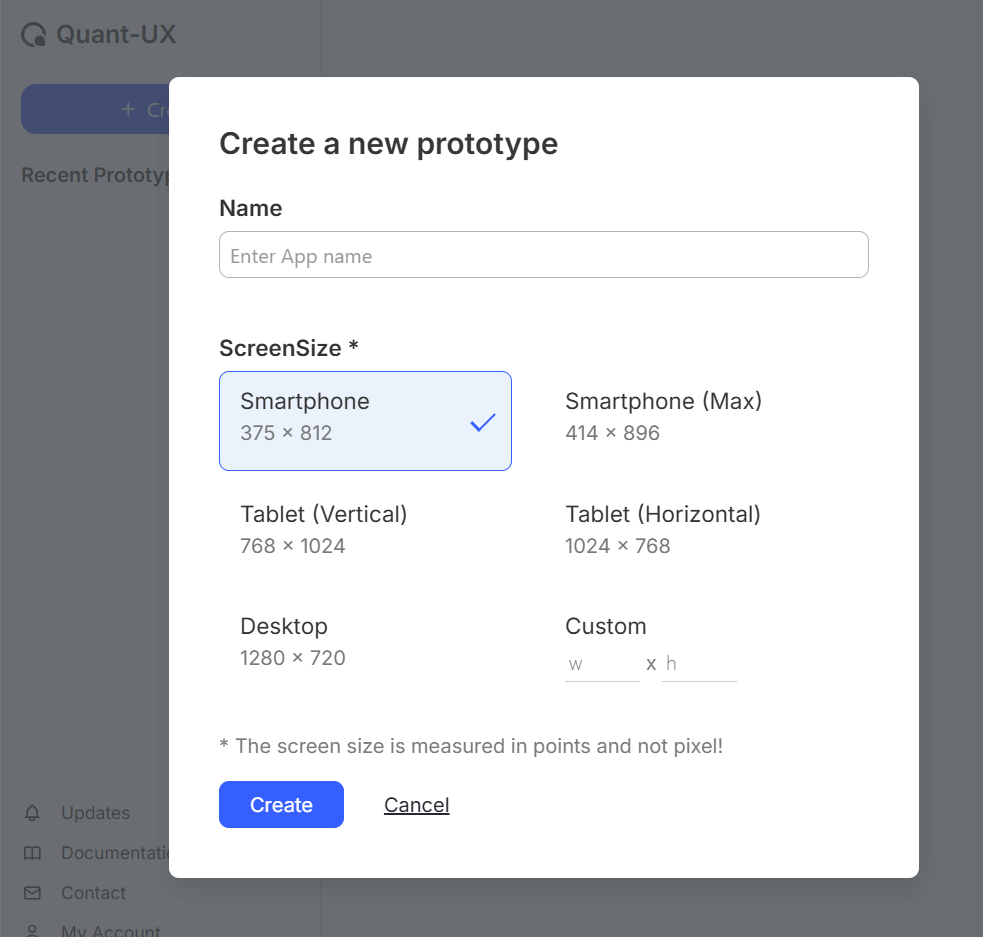
- Name - name of the prototype (application);
- ScreenSize - screen size: Smartphone, Smartphone (Max), Tablet (Vertical), Tablet (Horizontal), Desktop, or Custom (custom dimensions).
Click
Create— the visual designer will open.Note
Screen size is specified in points, not pixels.
-
In the visual designer, you create the prototype design: screens, widgets, and transitions between them.
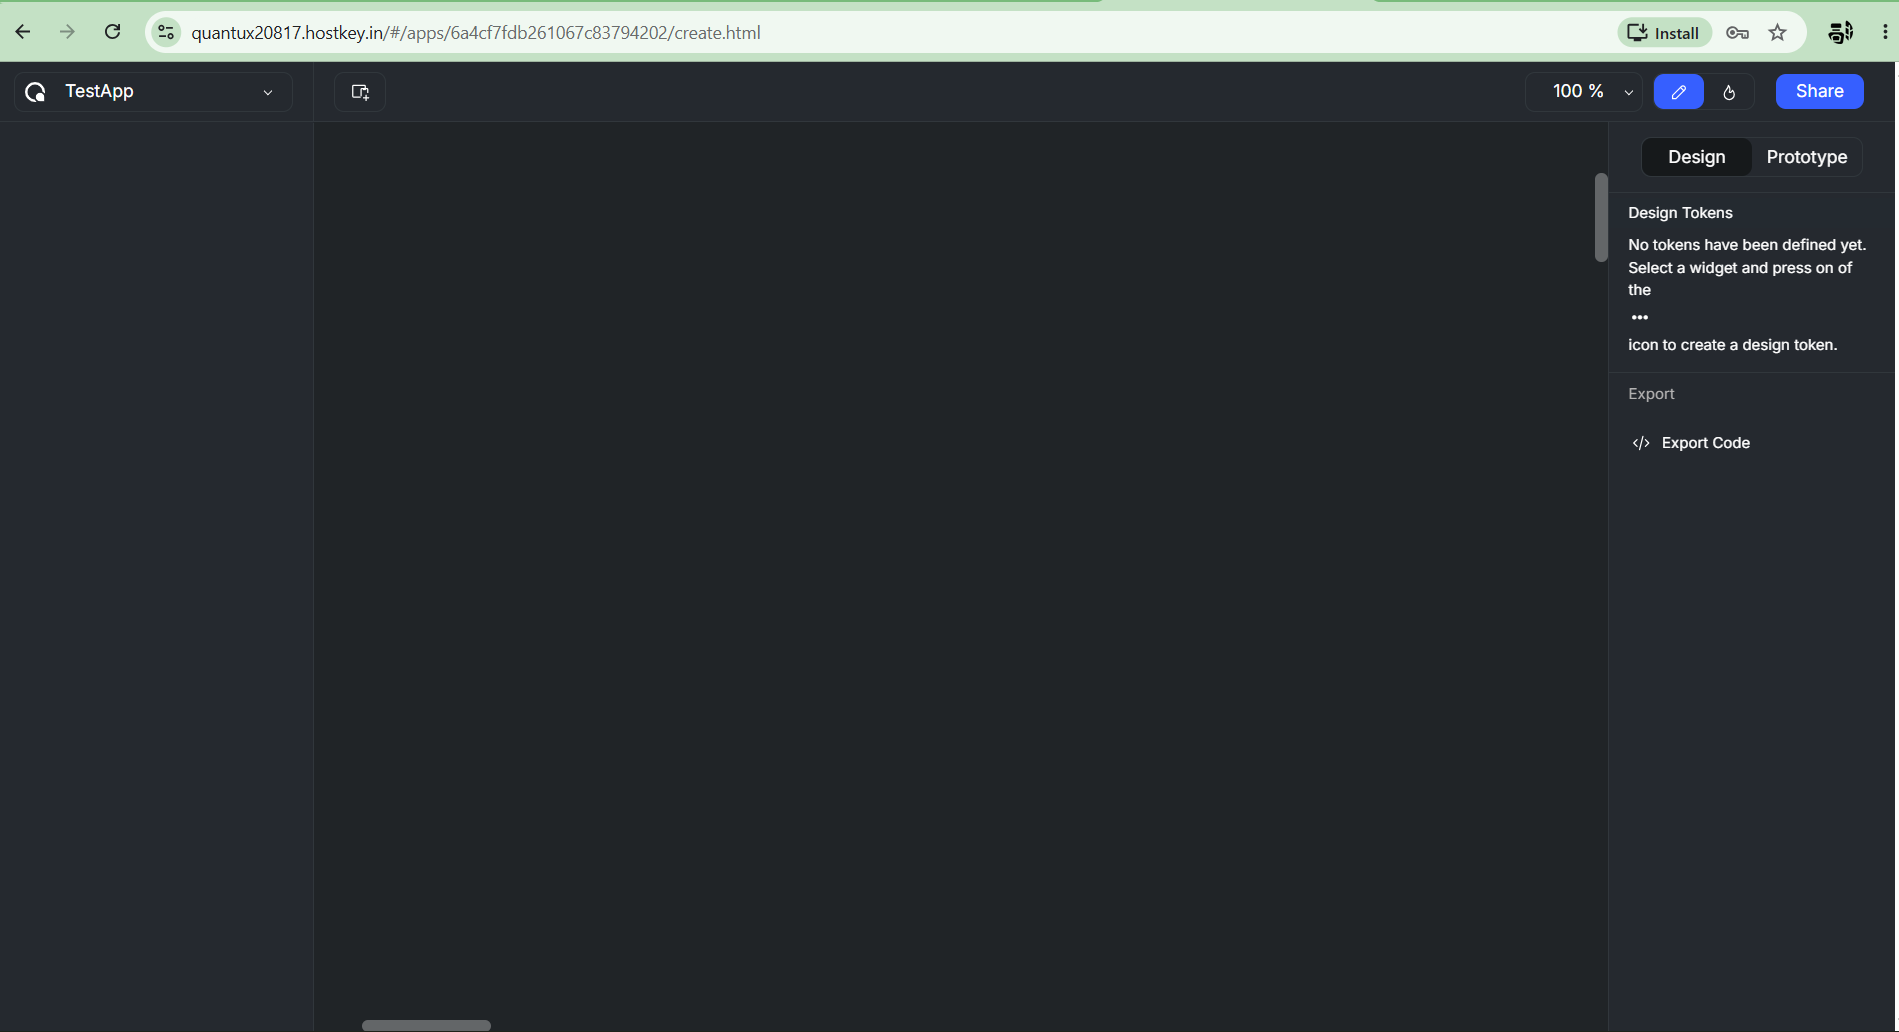
Main editor elements:
- Design / Prototype mode toggle — switch between interface design and interactive link setup;
- Design Tokens — creating and managing design tokens;
- Export Code — exporting the prototype code;
- Share button — publishing the prototype and providing access via a link;
- Zoom control (100 %) and active prototype selection in the top left corner.
Note
Detailed information on working with Quant-UX can be found in the developer documentation, and self-hosted deployment instructions are available in the project's GitHub repository.
Ordering Quant-UX via API
To install this software using the API, follow these instructions.