Updating the VPS Server Pricing Plan
In this article
The feature to update a VPS server to a more powerful configuration within the same product line allows you to increase computational resources (processor, RAM, disk space) without needing to migrate data or reinstall the operating system.
Attention
Upgrades are only available to more powerful/expensive plans. You cannot downgrade to a cheaper plan or a configuration with lower specifications using the upgrade feature!
Updating a VPS server may be necessary in the following cases:
- Increased load on your project or service;
- Need for additional disk space;
- Requirement for more RAM;
- Need to increase computing power for more efficient application performance.
Available Product Lines
Location Restrictions
Depending on the server location, not all presets may be available for upgrade.
Two upgrade options are available for VPS:
- Upgrade within the same line - traditional upgrade path without data migration;
- Migration between lines - transition to another product line with automatic data migration.
Below are the available VPS upgrade for our product lines.
-
Basic (VM)
Upgrade Path: vm.pico > vm.nano > vm.mini > vm.medium
-
Standard (V2)
Upgrade Path: vm.v2-pico > vm.v2-nano > vm.v2-mini > vm.v2-medium > vm.v2-heavy
-
High-end (V3)
Upgrade Path: vm.v3-pico > vm.v3-nano > vm.v3-mini > vm.v3-medium > vm.v3-heavy
-
Storage-Optimized
Upgrade Path: vm.storage-1000 > vm.storage-2000 > vm.storage-4000
VPS Upgrade Process
To upgrade the pricing plan of a VPS server, you need to perform the following actions:
-
Log in server control panel and API - Invapi and go to the list of your servers.
-
Select the server to upgrade.
- In the list of your servers, find the one you want to upgrade;
- Go to the Configuration tab.
-
Click the
Upgradebutton. The VPS configuration change window will open.
-
Select the product line and pricing plan
- In the opened Virtual Server Upgrade window, you will see:
- Current server configuration
- Current plan price
- Paid until date
- In the Upgrade options section, three tabs are available for selecting a product line:
- Basic VPS - basic line
- Standard VPS - standard line with improved characteristics
- High-end VPS - high-end line with premium performance
- Storage-Optimized VPS - line optimized for data storage
- Select the desired product line tab;
- In the dropdown list, select the appropriate configuration showing characteristics (vCPU, RAM, Storage) and price:
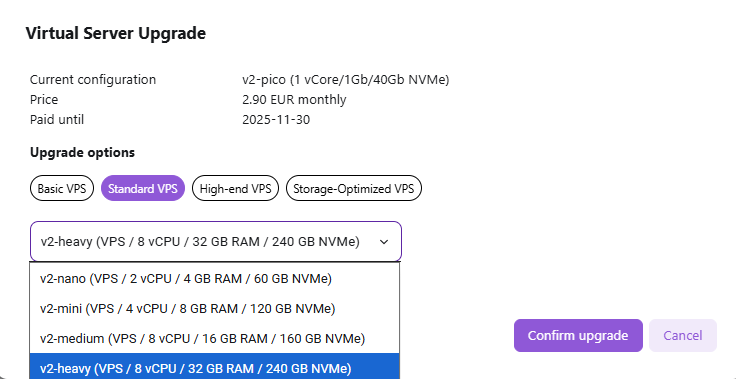
- In the opened Virtual Server Upgrade window, you will see:
-
Confirm the configuration selection
- After selecting the desired configuration, the system will display:
- Price after upgrade
- Amount to pay (difference between plans)
- Click the
Confirm upgradebutton to proceed; - Or click the
Cancelbutton to return to the server list:
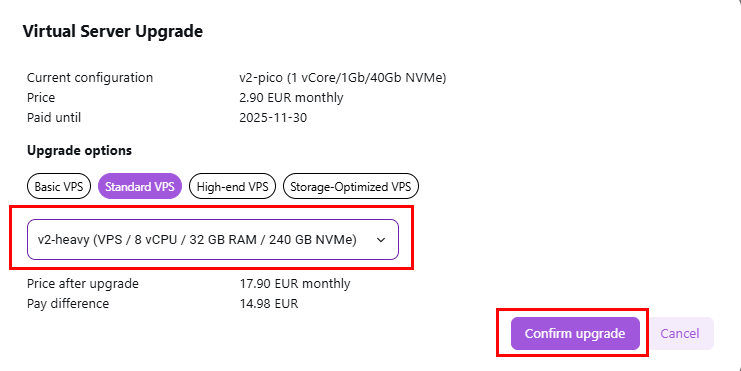
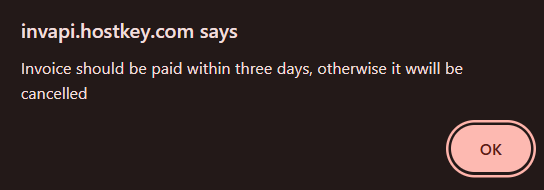
- A bill for payment will be generated, valid for 3 days:
- After selecting the desired configuration, the system will display:
-
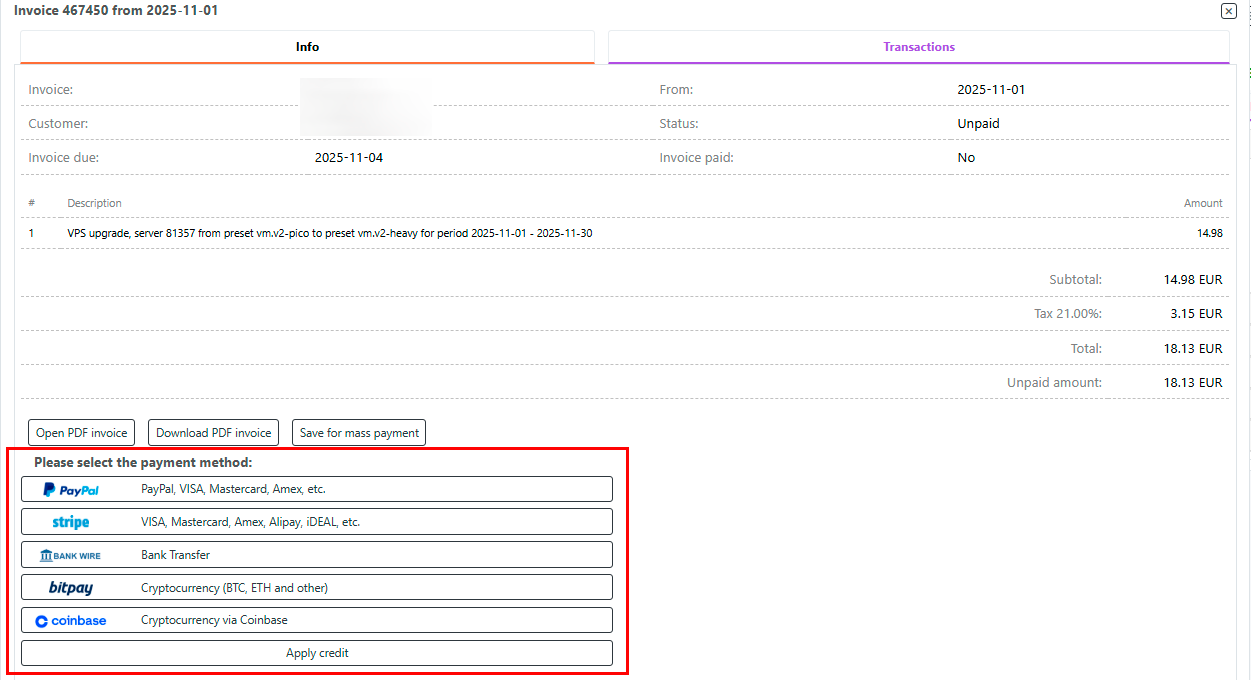
Pay for the upgrade
- You can use the credit balance of your account or make a payment using a credit card or another available payment method:
-
Wait for the update process to complete
- After confirming the payment, the update process will start automatically;
- Your server will be turned off during the update;
- The system will update the equipment configuration:
-
Configure additional disk space
- To use increased disk space, it is necessary to perform its expansion in the operating system.